> ## Documentation Index
> Fetch the complete documentation index at: https://stytch.com/docs/llms.txt
> Use this file to discover all available pages before exploring further.
# Adding magic links to a custom auth flow
> Integrate with Stytch’s headless or backend SDKs for complete control over your authentication flow.
## Overview
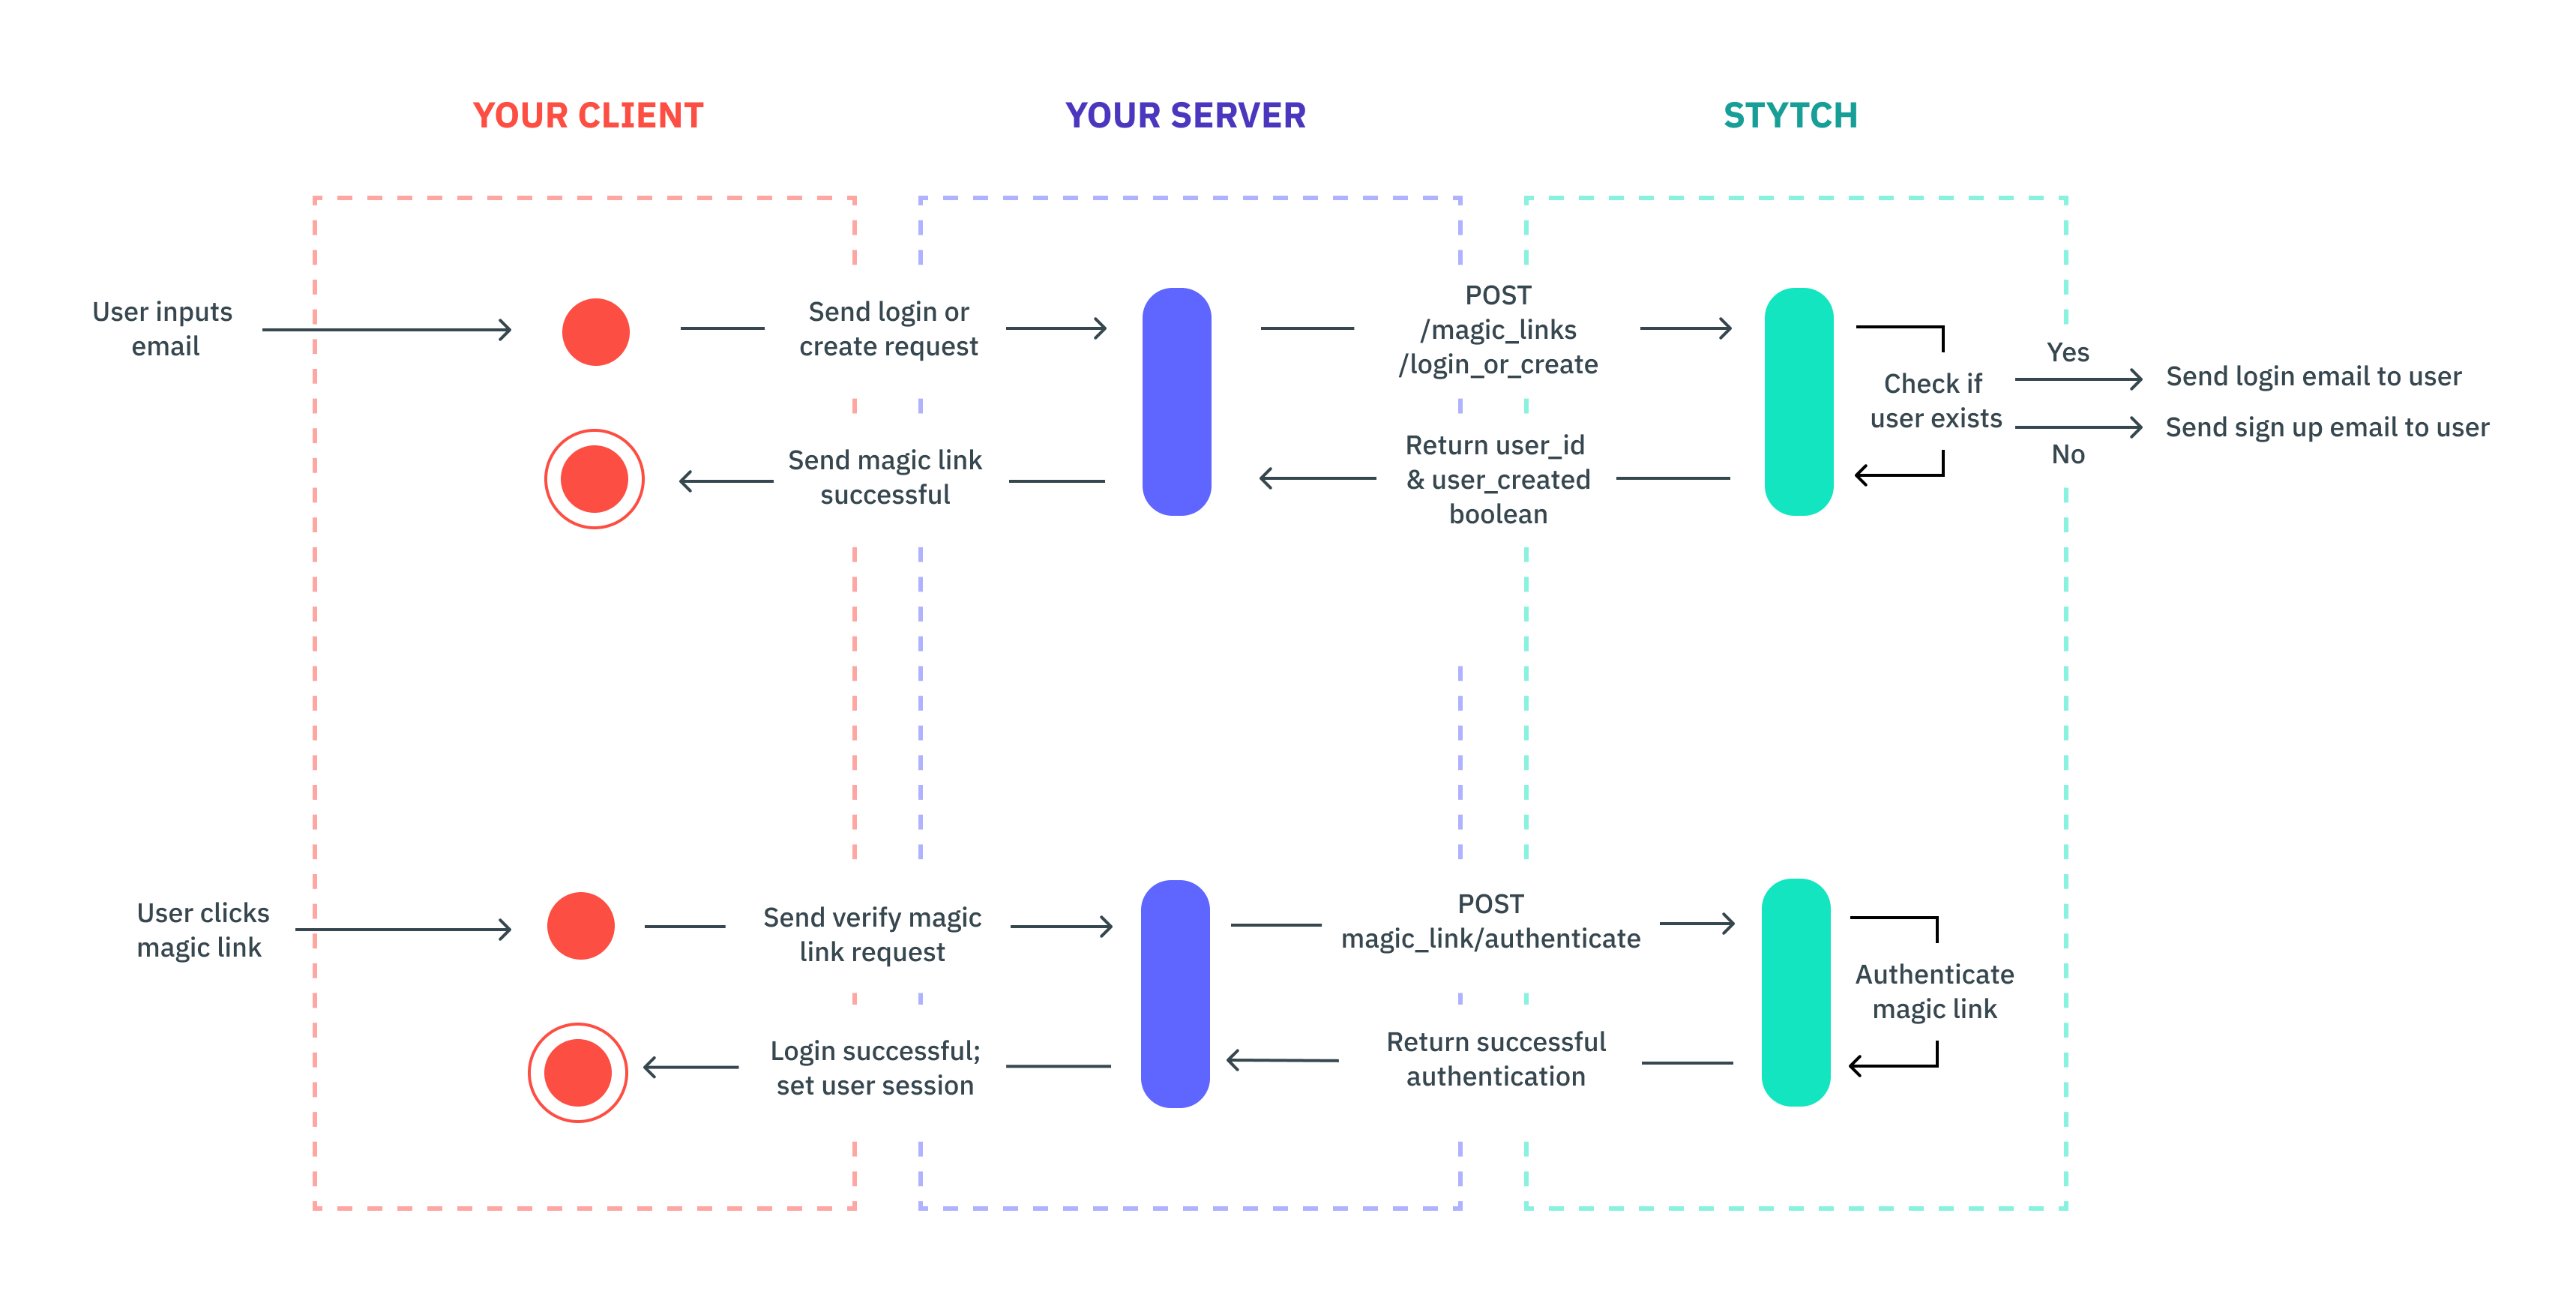
Managing user login with Stytch enables you to authenticate users on an ongoing basis via one-click, passwordless login. When a user signs up for your app, you'll add them to Stytch. Then, whenever a user goes to login to your app, authenticate them via a magic link.
 ## Implementation
This guide walks through integrating magic links using Stytch’s backend SDKs. This approach handles all authentication logic on your backend, giving you complete control over the user experience.
If you'd like to follow our code in this guide, you'll need to install stytch first.
```bash theme={null}
npm install stytch
```
If you don't already have one, you'll need to build a sign up or login view for your app. You can collect any information you want, but you'll need to include an email field so the user can login with their email later.
## Implementation
This guide walks through integrating magic links using Stytch’s backend SDKs. This approach handles all authentication logic on your backend, giving you complete control over the user experience.
If you'd like to follow our code in this guide, you'll need to install stytch first.
```bash theme={null}
npm install stytch
```
If you don't already have one, you'll need to build a sign up or login view for your app. You can collect any information you want, but you'll need to include an email field so the user can login with their email later.
 Create a route that will act as your magic link endpoint. Users will be directed there from the login email. The route should accept a token as a query parameter that you will use to authenticate. For example, your route should be something like [https://example.com/authenticate](https://example.com/authenticate). Users will be directed to [https://example.com/authenticate?token=abc](https://example.com/authenticate?token=abc), where abc is the token you'll pass to our authentication endpoint.
Add the login and signup URLs to the project's list of predefined redirect URLs in the [Dashboard](https://stytch.com/dashboard/redirect-urls). For more information on why this step is necessary, please check out the documentation [here](/api-reference/consumer/api/resources/url-validation).
By default, all redirect URLs are set to [http://localhost:3000](http://localhost:3000) for Test environments.
Send either a login or create magic link to the user based on if the email is associated with a user already. If the user was created, use the `user_id` returned in the response to manage that user within Stytch. Save this `user_id` with your user's record in your app's storage.
```js theme={null}
const stytch = require('stytch');
const client = new stytch.Client({
project_id: "PROJECT_ID",
secret: "SECRET"
});
const loginOrCreateWithMagicLink = async () => {
const params = {
email: "sandbox@stytch.com",
login_magic_link_url: "https://example.com/authenticate",
signup_magic_link_url: "https://example.com/authenticate",
};
const response = await client.magicLinks.email.loginOrCreate(params);
console.log(response);
};
loginOrCreateWithMagicLink().then().catch(err => console.log(err));
```
Once the user clicks the magic link from the email and is directed to either the login\_magic\_link\_url or signup\_magic\_link\_url, you'll use the token from the URL to call the authenticate endpoint to log the user in. You'll need to manage the user session from your app.
```js theme={null}
const stytch = require('stytch');
const client = new stytch.Client({
project_id: "PROJECT_ID",
secret: "SECRET"
});
const authenticateMagicLink = async (token) => {
const params = {
token,
session_duration_minutes: 60
};
const response = await client.magicLinks.authenticate(token);
console.log(response);
};
// Replace with token from request
const token = "SeiGwdj5lKkrEVgcEY3QNJXt6srxS3IK2Nwkar6mXD4="
authenticateMagicLink(token).then().catch(err => console.log(err));
```
Create a route that will act as your magic link endpoint. Users will be directed there from the login email. The route should accept a token as a query parameter that you will use to authenticate. For example, your route should be something like [https://example.com/authenticate](https://example.com/authenticate). Users will be directed to [https://example.com/authenticate?token=abc](https://example.com/authenticate?token=abc), where abc is the token you'll pass to our authentication endpoint.
Add the login and signup URLs to the project's list of predefined redirect URLs in the [Dashboard](https://stytch.com/dashboard/redirect-urls). For more information on why this step is necessary, please check out the documentation [here](/api-reference/consumer/api/resources/url-validation).
By default, all redirect URLs are set to [http://localhost:3000](http://localhost:3000) for Test environments.
Send either a login or create magic link to the user based on if the email is associated with a user already. If the user was created, use the `user_id` returned in the response to manage that user within Stytch. Save this `user_id` with your user's record in your app's storage.
```js theme={null}
const stytch = require('stytch');
const client = new stytch.Client({
project_id: "PROJECT_ID",
secret: "SECRET"
});
const loginOrCreateWithMagicLink = async () => {
const params = {
email: "sandbox@stytch.com",
login_magic_link_url: "https://example.com/authenticate",
signup_magic_link_url: "https://example.com/authenticate",
};
const response = await client.magicLinks.email.loginOrCreate(params);
console.log(response);
};
loginOrCreateWithMagicLink().then().catch(err => console.log(err));
```
Once the user clicks the magic link from the email and is directed to either the login\_magic\_link\_url or signup\_magic\_link\_url, you'll use the token from the URL to call the authenticate endpoint to log the user in. You'll need to manage the user session from your app.
```js theme={null}
const stytch = require('stytch');
const client = new stytch.Client({
project_id: "PROJECT_ID",
secret: "SECRET"
});
const authenticateMagicLink = async (token) => {
const params = {
token,
session_duration_minutes: 60
};
const response = await client.magicLinks.authenticate(token);
console.log(response);
};
// Replace with token from request
const token = "SeiGwdj5lKkrEVgcEY3QNJXt6srxS3IK2Nwkar6mXD4="
authenticateMagicLink(token).then().catch(err => console.log(err));
```