> ## Documentation Index
> Fetch the complete documentation index at: https://stytch.com/docs/llms.txt
> Use this file to discover all available pages before exploring further.
# Adding magic links to Stytch Login
> Integrate magic links with Stytch's pre-built UI components.
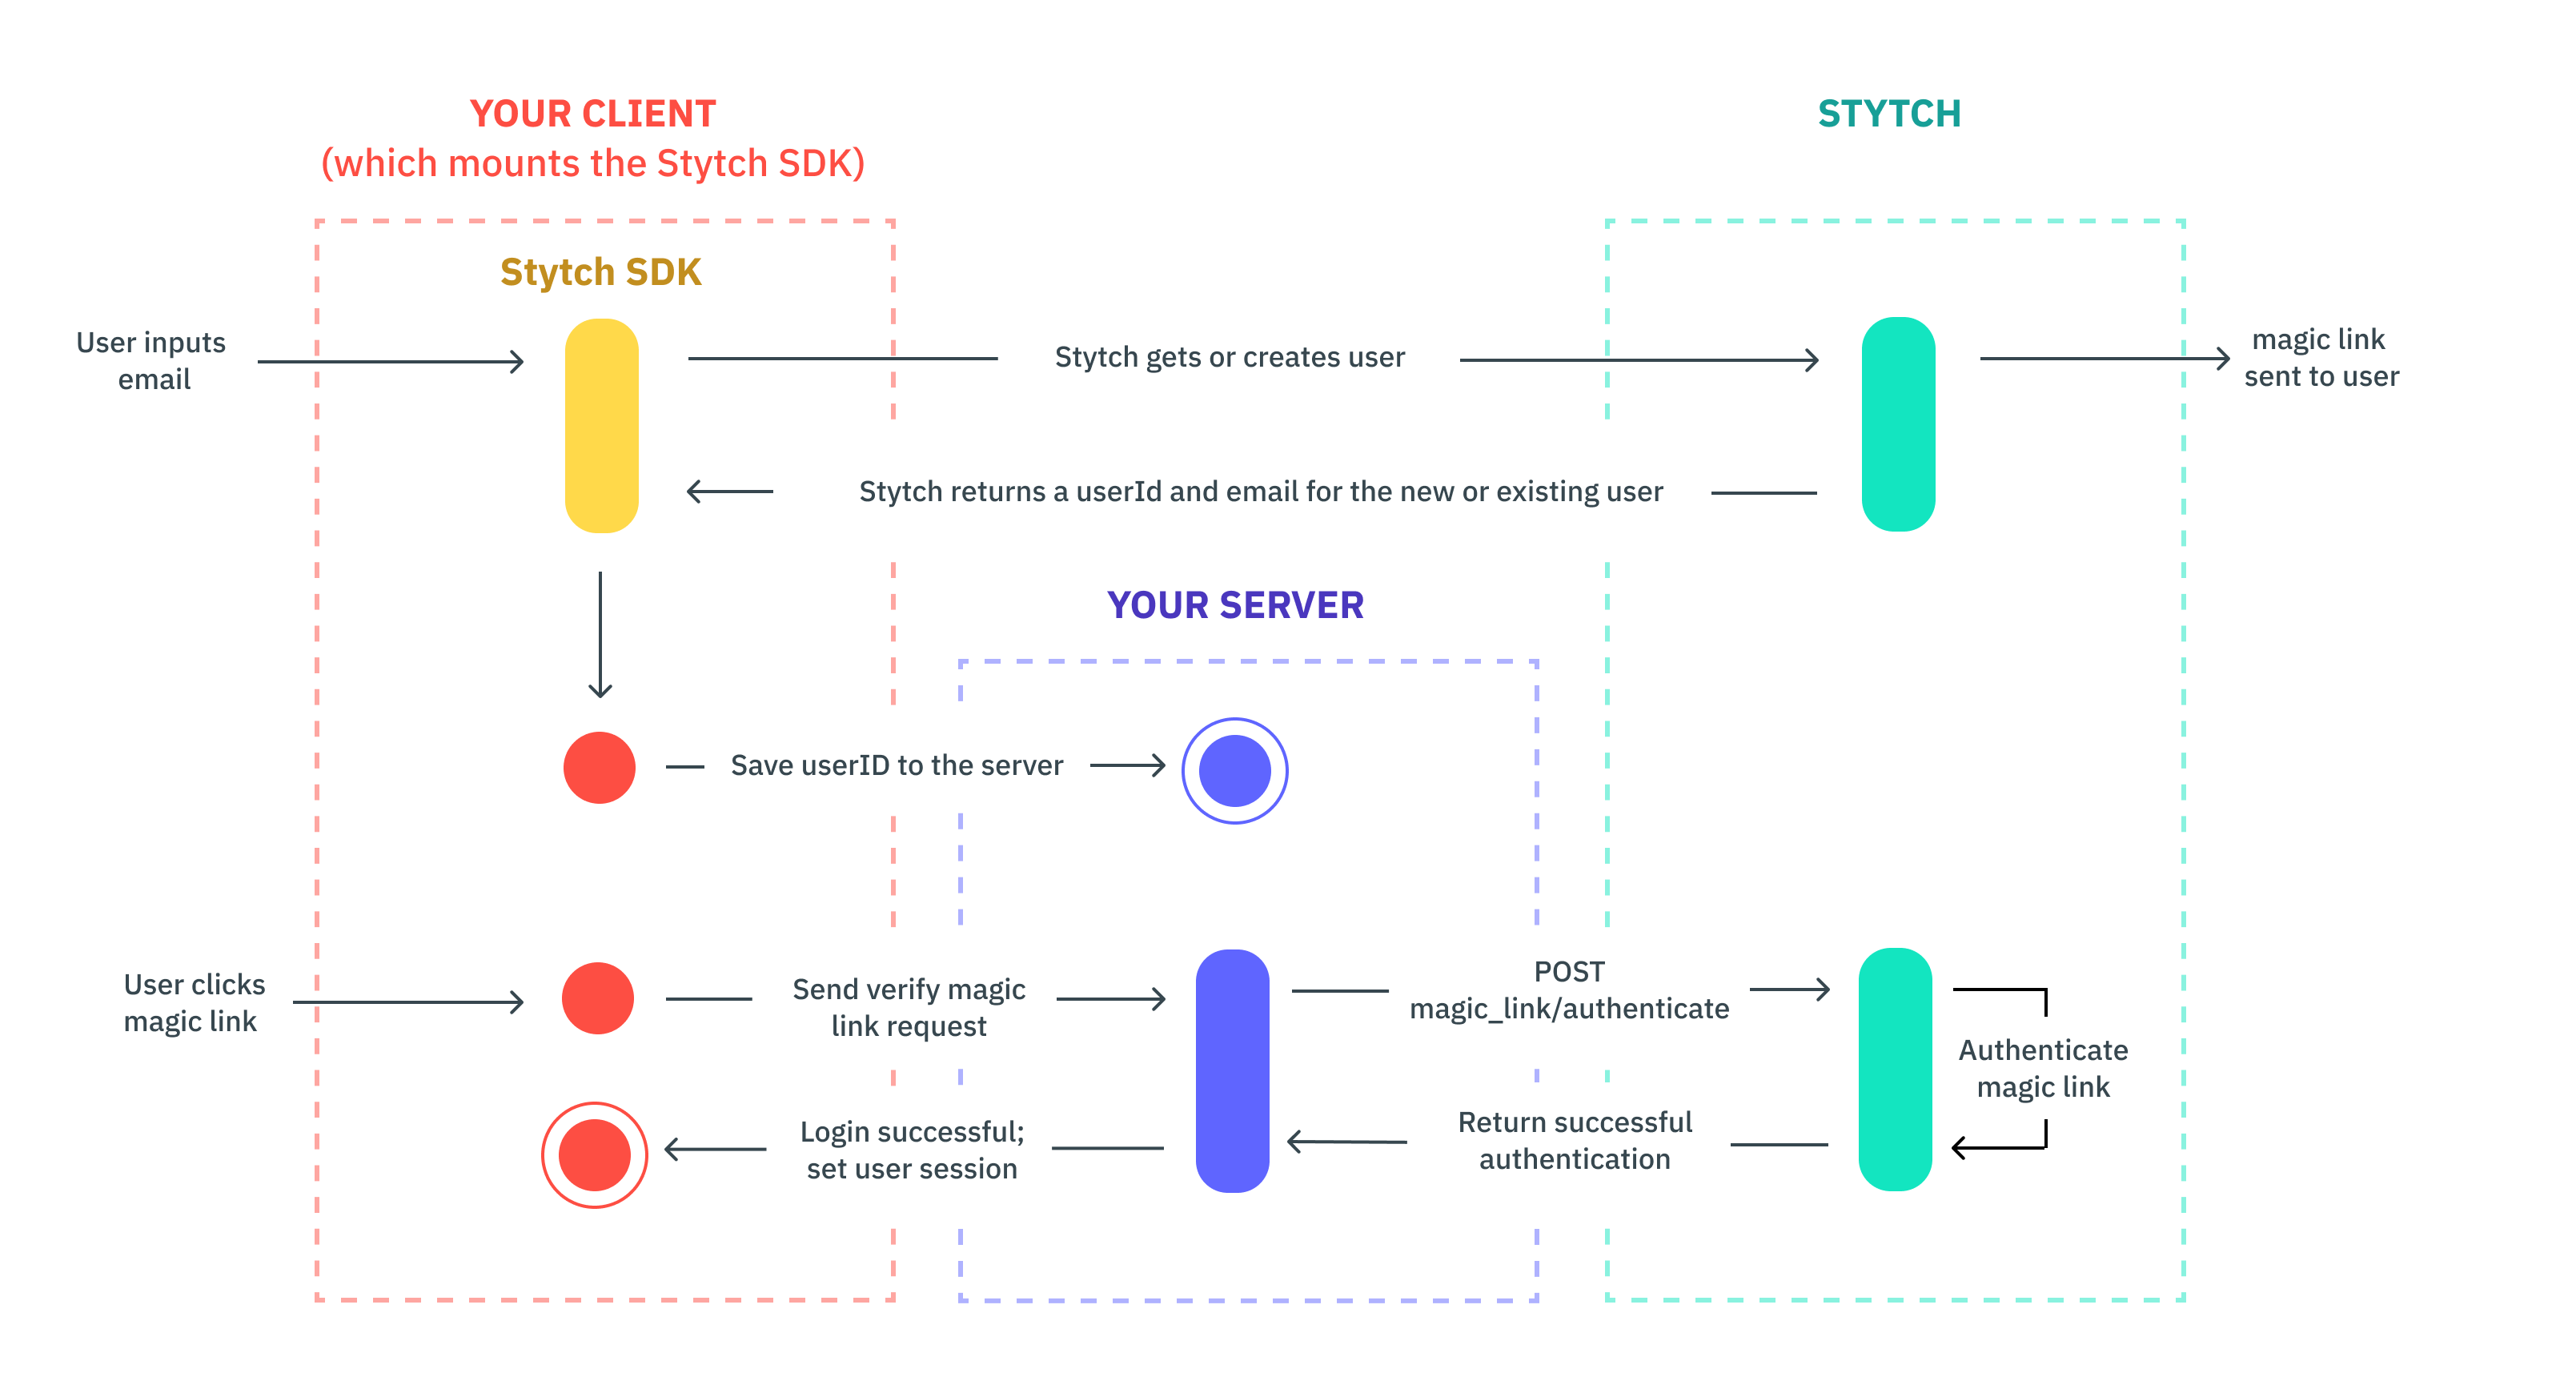
This guide shows how to enable Email Magic Links in Stytch Login, then authenticate Magic Link tokens on your backend. For broader SDK details, see the [frontend SDK docs](/docs/api-reference/consumer/frontend-sdks/vanilla-js/overview).
 1. Create **Login** and **Sign-up** redirect URLs on the [redirect URL configuration page](https://stytch.com/dashboard/redirect-urls).
2. In [Frontend SDK](https://stytch.com/dashboard/sdk-configuration), authorize your domain and enable **Email magic links** → **Enable the LoginOrCreate Flow**.
3. From [Project ID & API keys](https://stytch.com/dashboard), copy your `public_token`.
Install the frontend package:
```bash theme={null}
npm install @stytch/react --save
```
```js theme={null}
import { createStytchClient, StytchProvider } from '@stytch/react';
const stytch = createStytchClient('PUBLIC_TOKEN');
const root = ReactDOM.createRoot(document.getElementById("root")!);
root.render(
,
);
```
```js theme={null}
import { Products, StytchLogin } from '@stytch/react';
const config = {
emailMagicLinksOptions: {
loginExpirationMinutes: 30,
loginRedirectURL: 'https://example.com/authenticate',
signupExpirationMinutes: 30,
signupRedirectURL: 'https://example.com/authenticate',
},
products: [Products.emailMagicLinks],
};
export const Login = () => {
return ;
};
```
```js theme={null}
const presentation = { // [!code ++:3]
theme: { 'font-family': '"Helvetica Neue", Helvetica, sans-serif' },
};
export const Login = () => {
return (
);
};
```
Install the backend SDK:
```bash theme={null}
npm install stytch --save
```
When a user logs in for the first time, the SDK creates a Stytch User and returns a `user_id`. Save it in your user store.
```js theme={null}
app.post('/users', function (req, res) {
var stytchUserId = req.body.userId;
// TODO: Save stytchUserId with your user record in your app's storage
res.send(`Created user with stytchUserId: ${stytchUserId}`);
});
```
Handle Magic Link authentication on a route that receives the `token` query param:
```js theme={null}
const stytch = require('stytch');
const client = new stytch.Client({
project_id: "PROJECT_ID",
secret: "SECRET",
env: stytch.envs.test
});
app.get('/authenticate', function (req, res) {
var token = req.query.token;
client.magicLinks.authenticate(token)
.then(response => {
req.session.authenticated = true;
req.session.save(function(err) {
console.log(err);
});
res.redirect('/home')
})
.catch(error => {
console.log(error);
res.send('There was an error authenticating the user.');
});
});
```
If authentication is successful, create a user session and log them into your app. To keep users logged in longer, set `session_duration_minutes`. See the [session management guide](/docs/consumer-auth/manage-sessions/overview).
1. Create **Login** and **Sign-up** redirect URLs on the [redirect URL configuration page](https://stytch.com/dashboard/redirect-urls).
2. In [Frontend SDK](https://stytch.com/dashboard/sdk-configuration), authorize your domain and enable **Email magic links** → **Enable the LoginOrCreate Flow**.
3. From [Project ID & API keys](https://stytch.com/dashboard), copy your `public_token`.
Install the frontend package:
```bash theme={null}
npm install @stytch/react --save
```
```js theme={null}
import { createStytchClient, StytchProvider } from '@stytch/react';
const stytch = createStytchClient('PUBLIC_TOKEN');
const root = ReactDOM.createRoot(document.getElementById("root")!);
root.render(
,
);
```
```js theme={null}
import { Products, StytchLogin } from '@stytch/react';
const config = {
emailMagicLinksOptions: {
loginExpirationMinutes: 30,
loginRedirectURL: 'https://example.com/authenticate',
signupExpirationMinutes: 30,
signupRedirectURL: 'https://example.com/authenticate',
},
products: [Products.emailMagicLinks],
};
export const Login = () => {
return ;
};
```
```js theme={null}
const presentation = { // [!code ++:3]
theme: { 'font-family': '"Helvetica Neue", Helvetica, sans-serif' },
};
export const Login = () => {
return (
);
};
```
Install the backend SDK:
```bash theme={null}
npm install stytch --save
```
When a user logs in for the first time, the SDK creates a Stytch User and returns a `user_id`. Save it in your user store.
```js theme={null}
app.post('/users', function (req, res) {
var stytchUserId = req.body.userId;
// TODO: Save stytchUserId with your user record in your app's storage
res.send(`Created user with stytchUserId: ${stytchUserId}`);
});
```
Handle Magic Link authentication on a route that receives the `token` query param:
```js theme={null}
const stytch = require('stytch');
const client = new stytch.Client({
project_id: "PROJECT_ID",
secret: "SECRET",
env: stytch.envs.test
});
app.get('/authenticate', function (req, res) {
var token = req.query.token;
client.magicLinks.authenticate(token)
.then(response => {
req.session.authenticated = true;
req.session.save(function(err) {
console.log(err);
});
res.redirect('/home')
})
.catch(error => {
console.log(error);
res.send('There was an error authenticating the user.');
});
});
```
If authentication is successful, create a user session and log them into your app. To keep users logged in longer, set `session_duration_minutes`. See the [session management guide](/docs/consumer-auth/manage-sessions/overview).