Back to blog
How to securely implement M2M authentication and authorization in Node.js using Stytch
Auth & identity
Engineering
Jan 12, 2024
Author: Isaac Ejeh
Author: Edwin Lim
The growing adoption of open APIs, microservices, and modular monolith architectures is transforming how we communicate, both between humans and machines and between machines. M2M applications and services now communicate exclusively with each other to execute core business functions across multiple servers and networks, making it easier to deliver frictionless product experiences for today’s users.
However, to protect these services, APIs, or applications, and maintain the integrity of your resources, you must implement a secure machine-to-machine (M2M) authentication and access control strategy that is built on the OAuth 2.0 open standard.
For instance, you may require one of your cronjobs, APIs, or backend services (known as the Client) to communicate with another service (known as the Resource) without any human user entering a username and password. This is where OAuth 2.0 machine authorization with Stytch comes into play.
Machine-to-machine (M2M) authentication and authorization is the process of verifying a machine’s identity before granting it the necessary permission to communicate with another machine. In today’s age of distributed systems, you can securely communicate between your APIs and services by verifying the client credentials (client ID and client secret) and scopes of each M2M application to ensure they have the required permission before granting access to specific resources.
In this tutorial, we’ll walk you through a step-by-step implementation of M2M authentication and authorization between two internal backend services in a hypothetical neobank using Stytch as our OAuth 2.0 authorization server and identity provider.
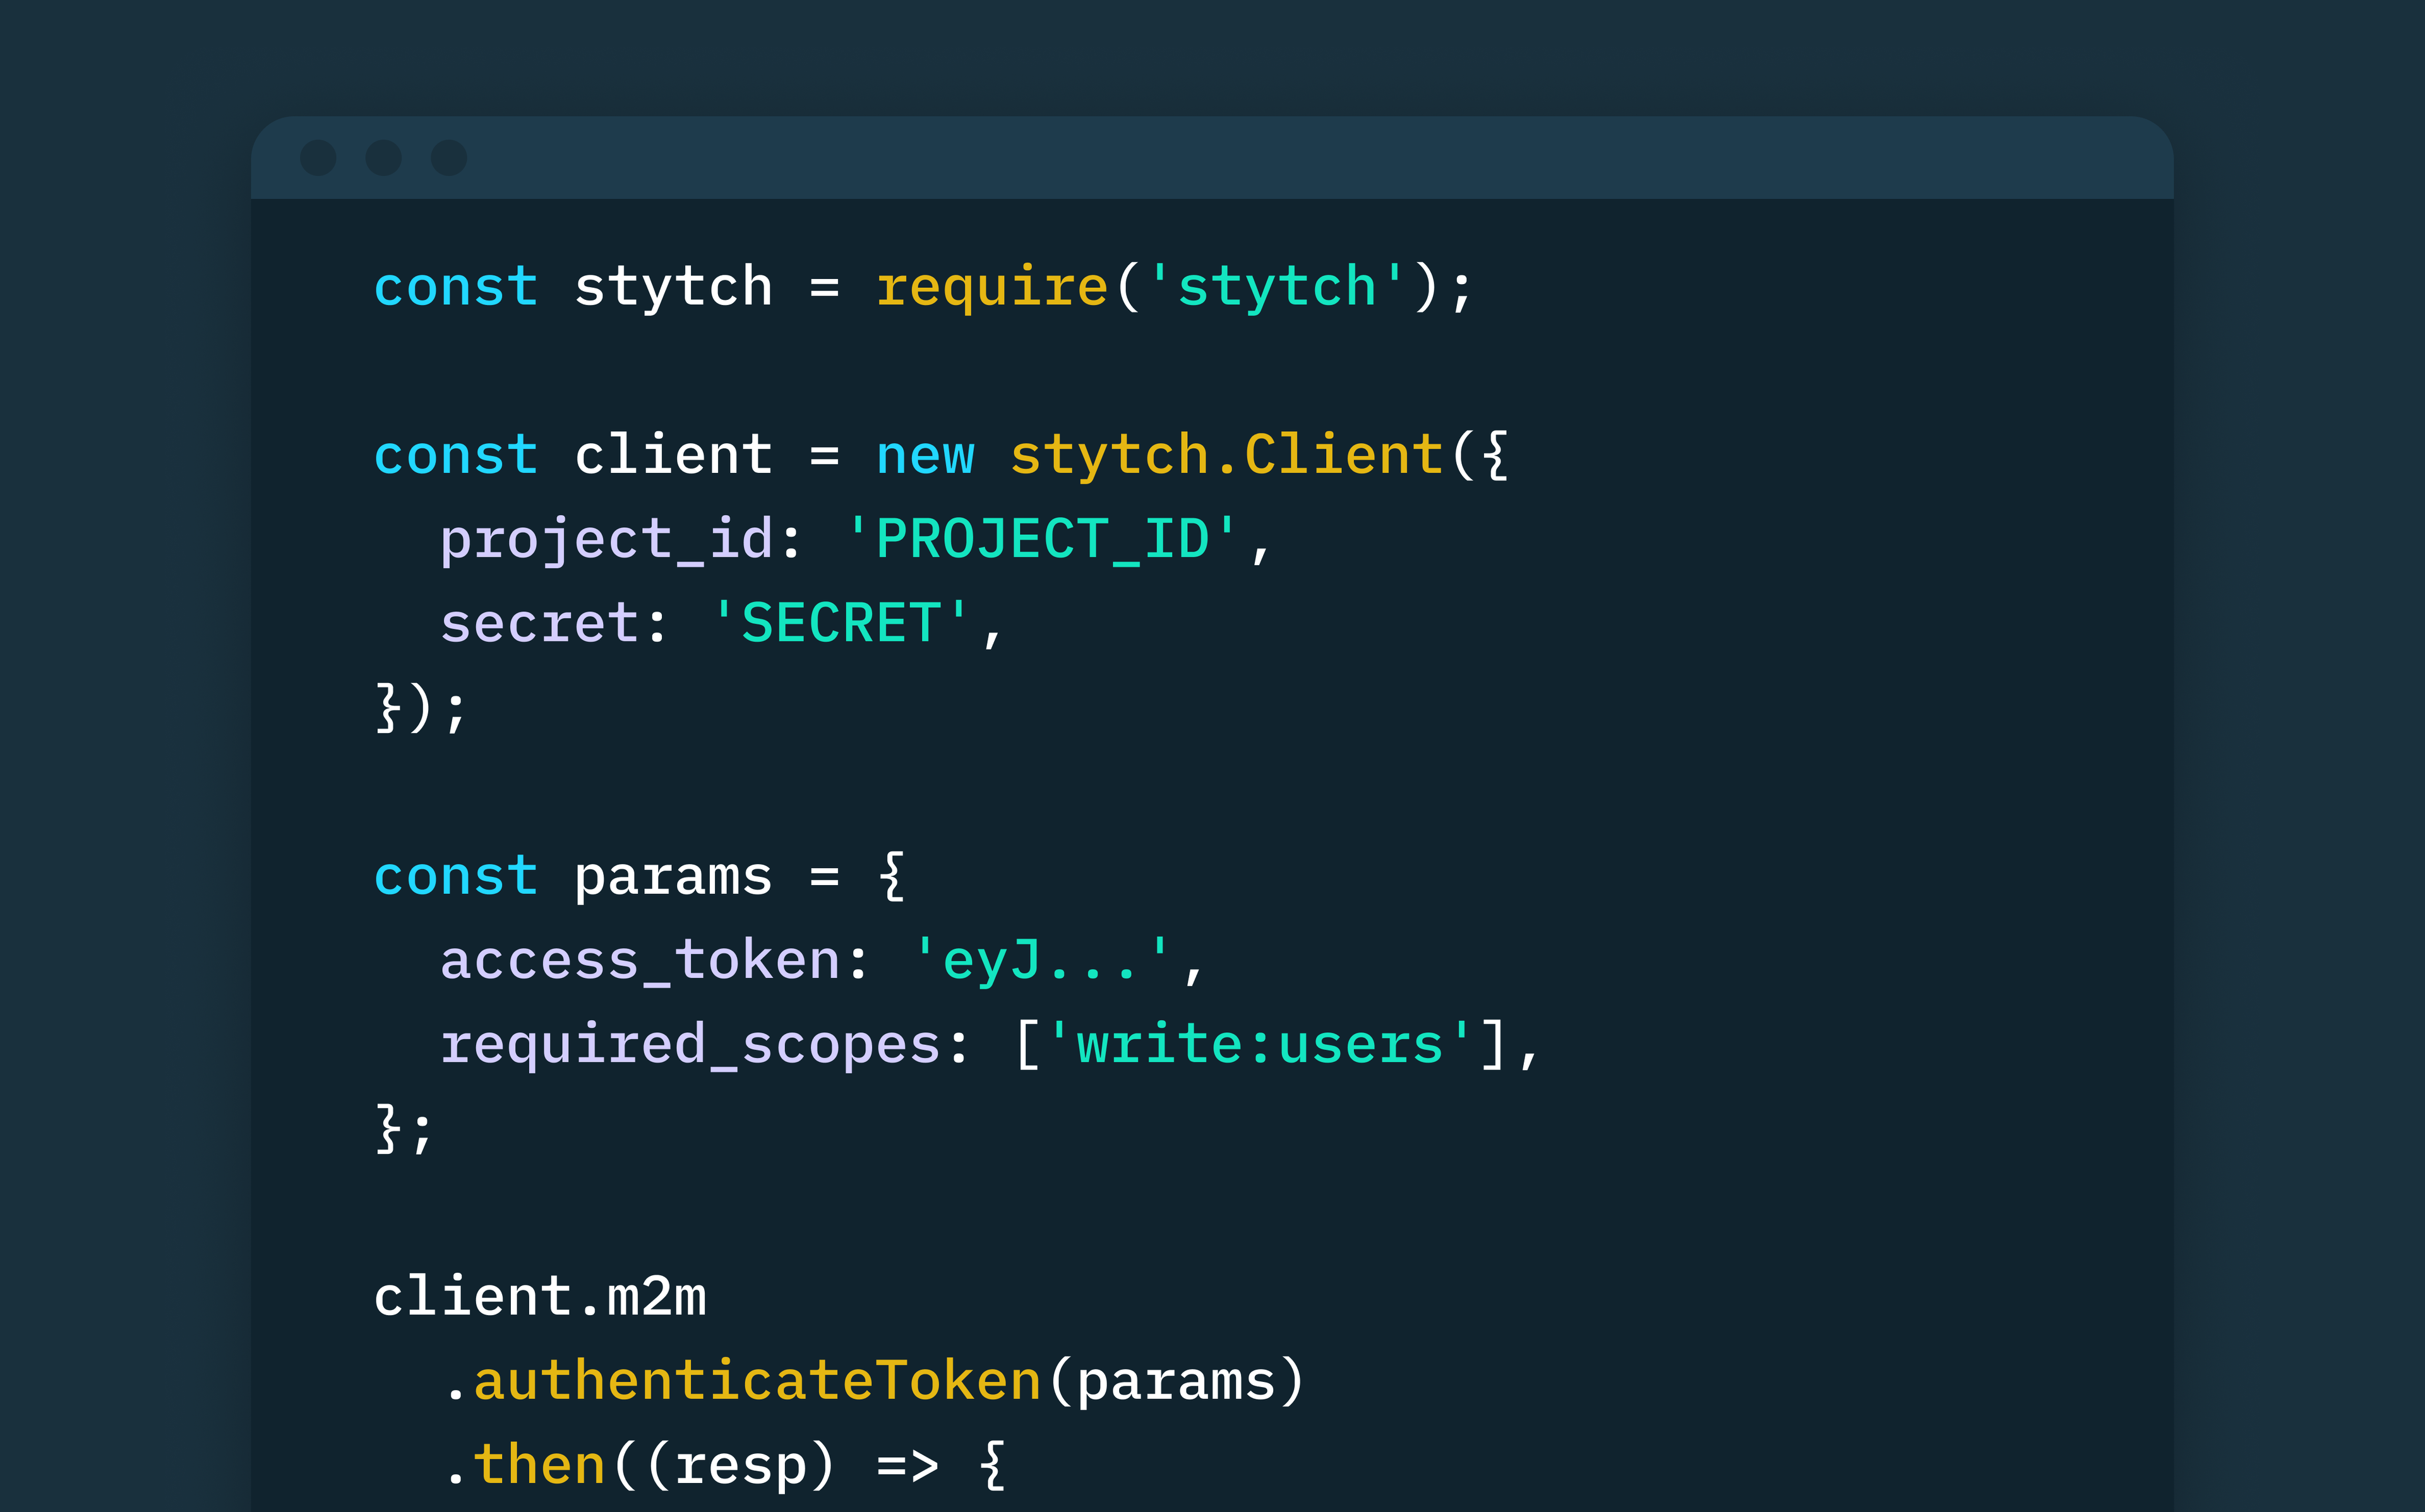
We’ll implement Stytch’s robust suite of M2M REST endpoints that make it easy for you to securely create and manage M2M clients, their credentials, and authorization tokens (JSON Web Tokens (JWTs)).
We’ve outlined each implementation step in this tutorial, but if you’d like to get a working copy of the final code, you can find it on GitHub.
How OAuth 2.0 M2M authorization works on Stytch
Stytch is a modern identity platform that makes it easy for developers, startups, and enterprises to build end-to-end authentication and user management for any application and architecture. Stytch also offers a machine-to-machine solution for securing APIs and services using dedicated machine-to-machine (M2M) applications.
Stytch lets you create multiple M2M applications and clients, each with its unique client credentials (client ID and client secret). These M2M clients can securely access your protected resources by providing their client credentials and the specified read/write permissions, to obtain authorization tokens from Stytch. In essence, Stytch acts as your OAuth 2.0 authorization server.
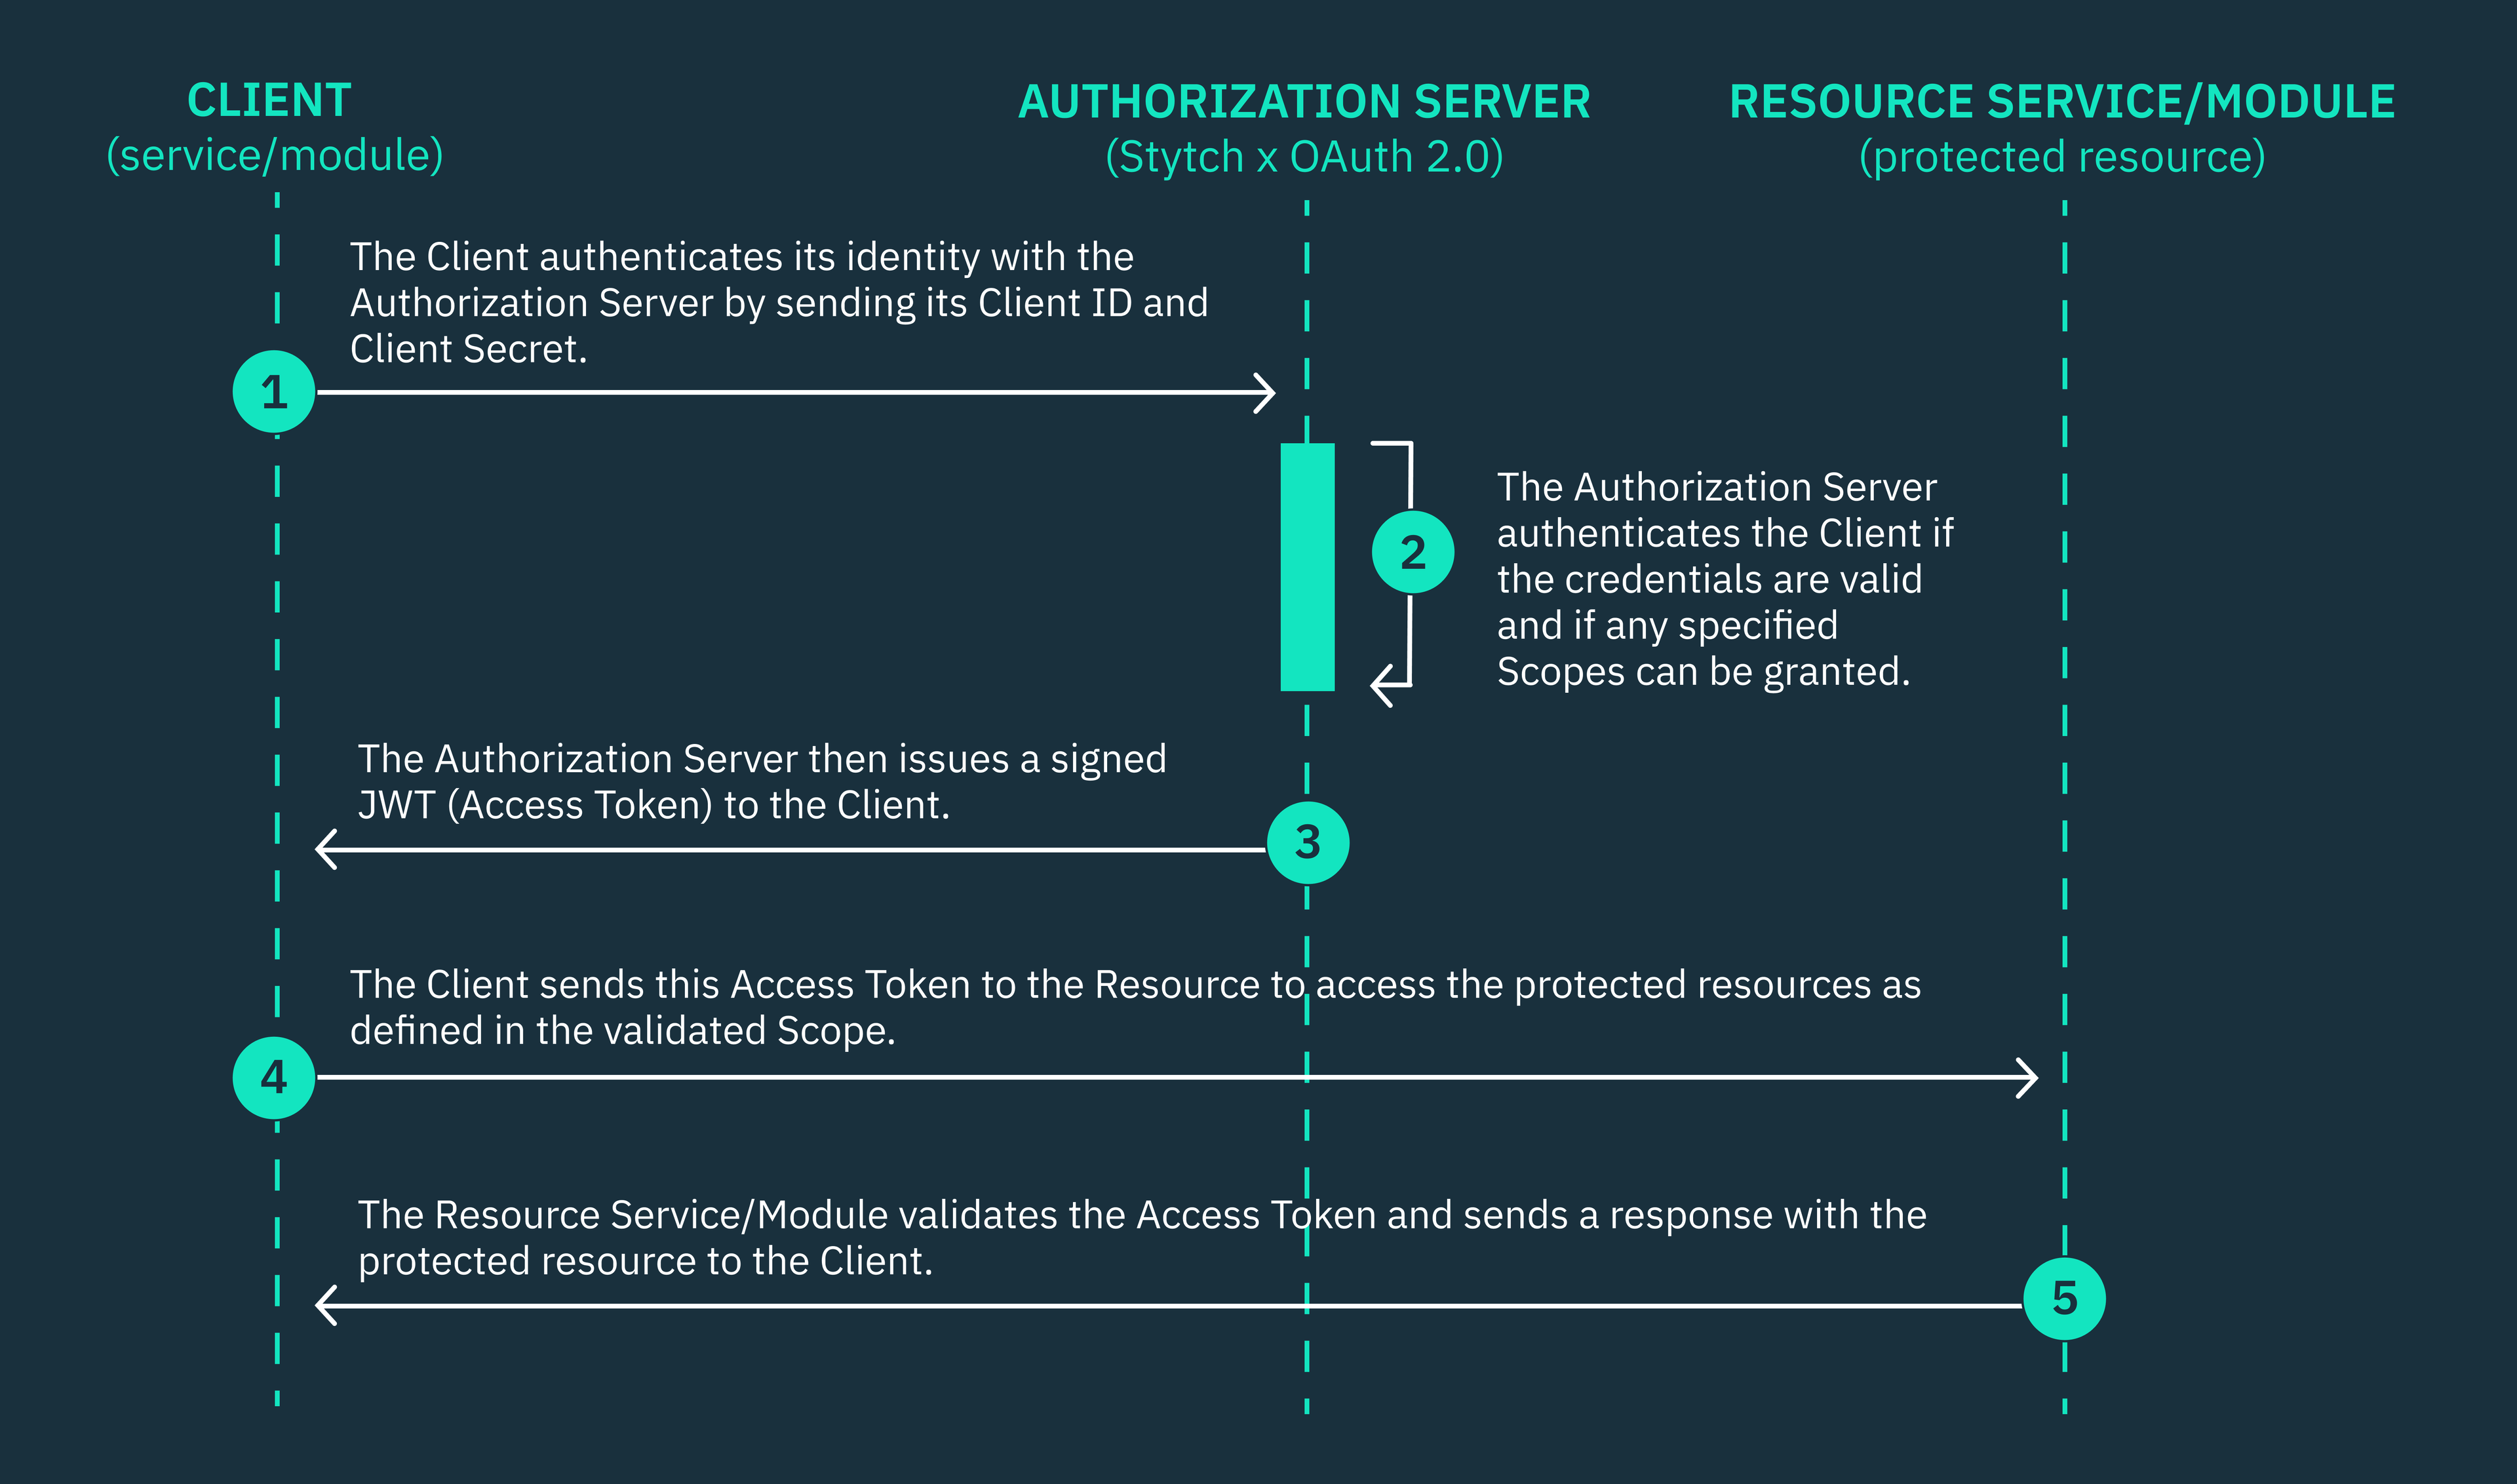
Stytch’s M2M product is built on the OAuth 2.0 RFC 6749 protocol, which is the industry-wide open authorization standard for managing access and permissions between APIs, services, and other machines. This framework defines the steps that a client must follow to securely gain access to specific protected resources from a resource server, using the Client Credentials grant flow.
Client Credentials grant flow
The OAuth 2.0 Client Credentials grant type is the ideal flow for securing communication between machine-to-machine (M2M) applications, such as backend services, servers, APIs, background processes, or command line interfaces (CLIs) that don’t require human interaction.
Client applications must provide their client credentials, such as a client ID and client secret, and an array of scopes to obtain an OAuth access token that authorizes the client to communicate with the resource server. The client application must authenticate its credentials with an OAuth 2.0 authorization server, typically powered by an identity provider that supports the OAuth 2.0 standard. In this tutorial, our authorization server will be powered by Stytch.
Our M2M example app: what we’ll build
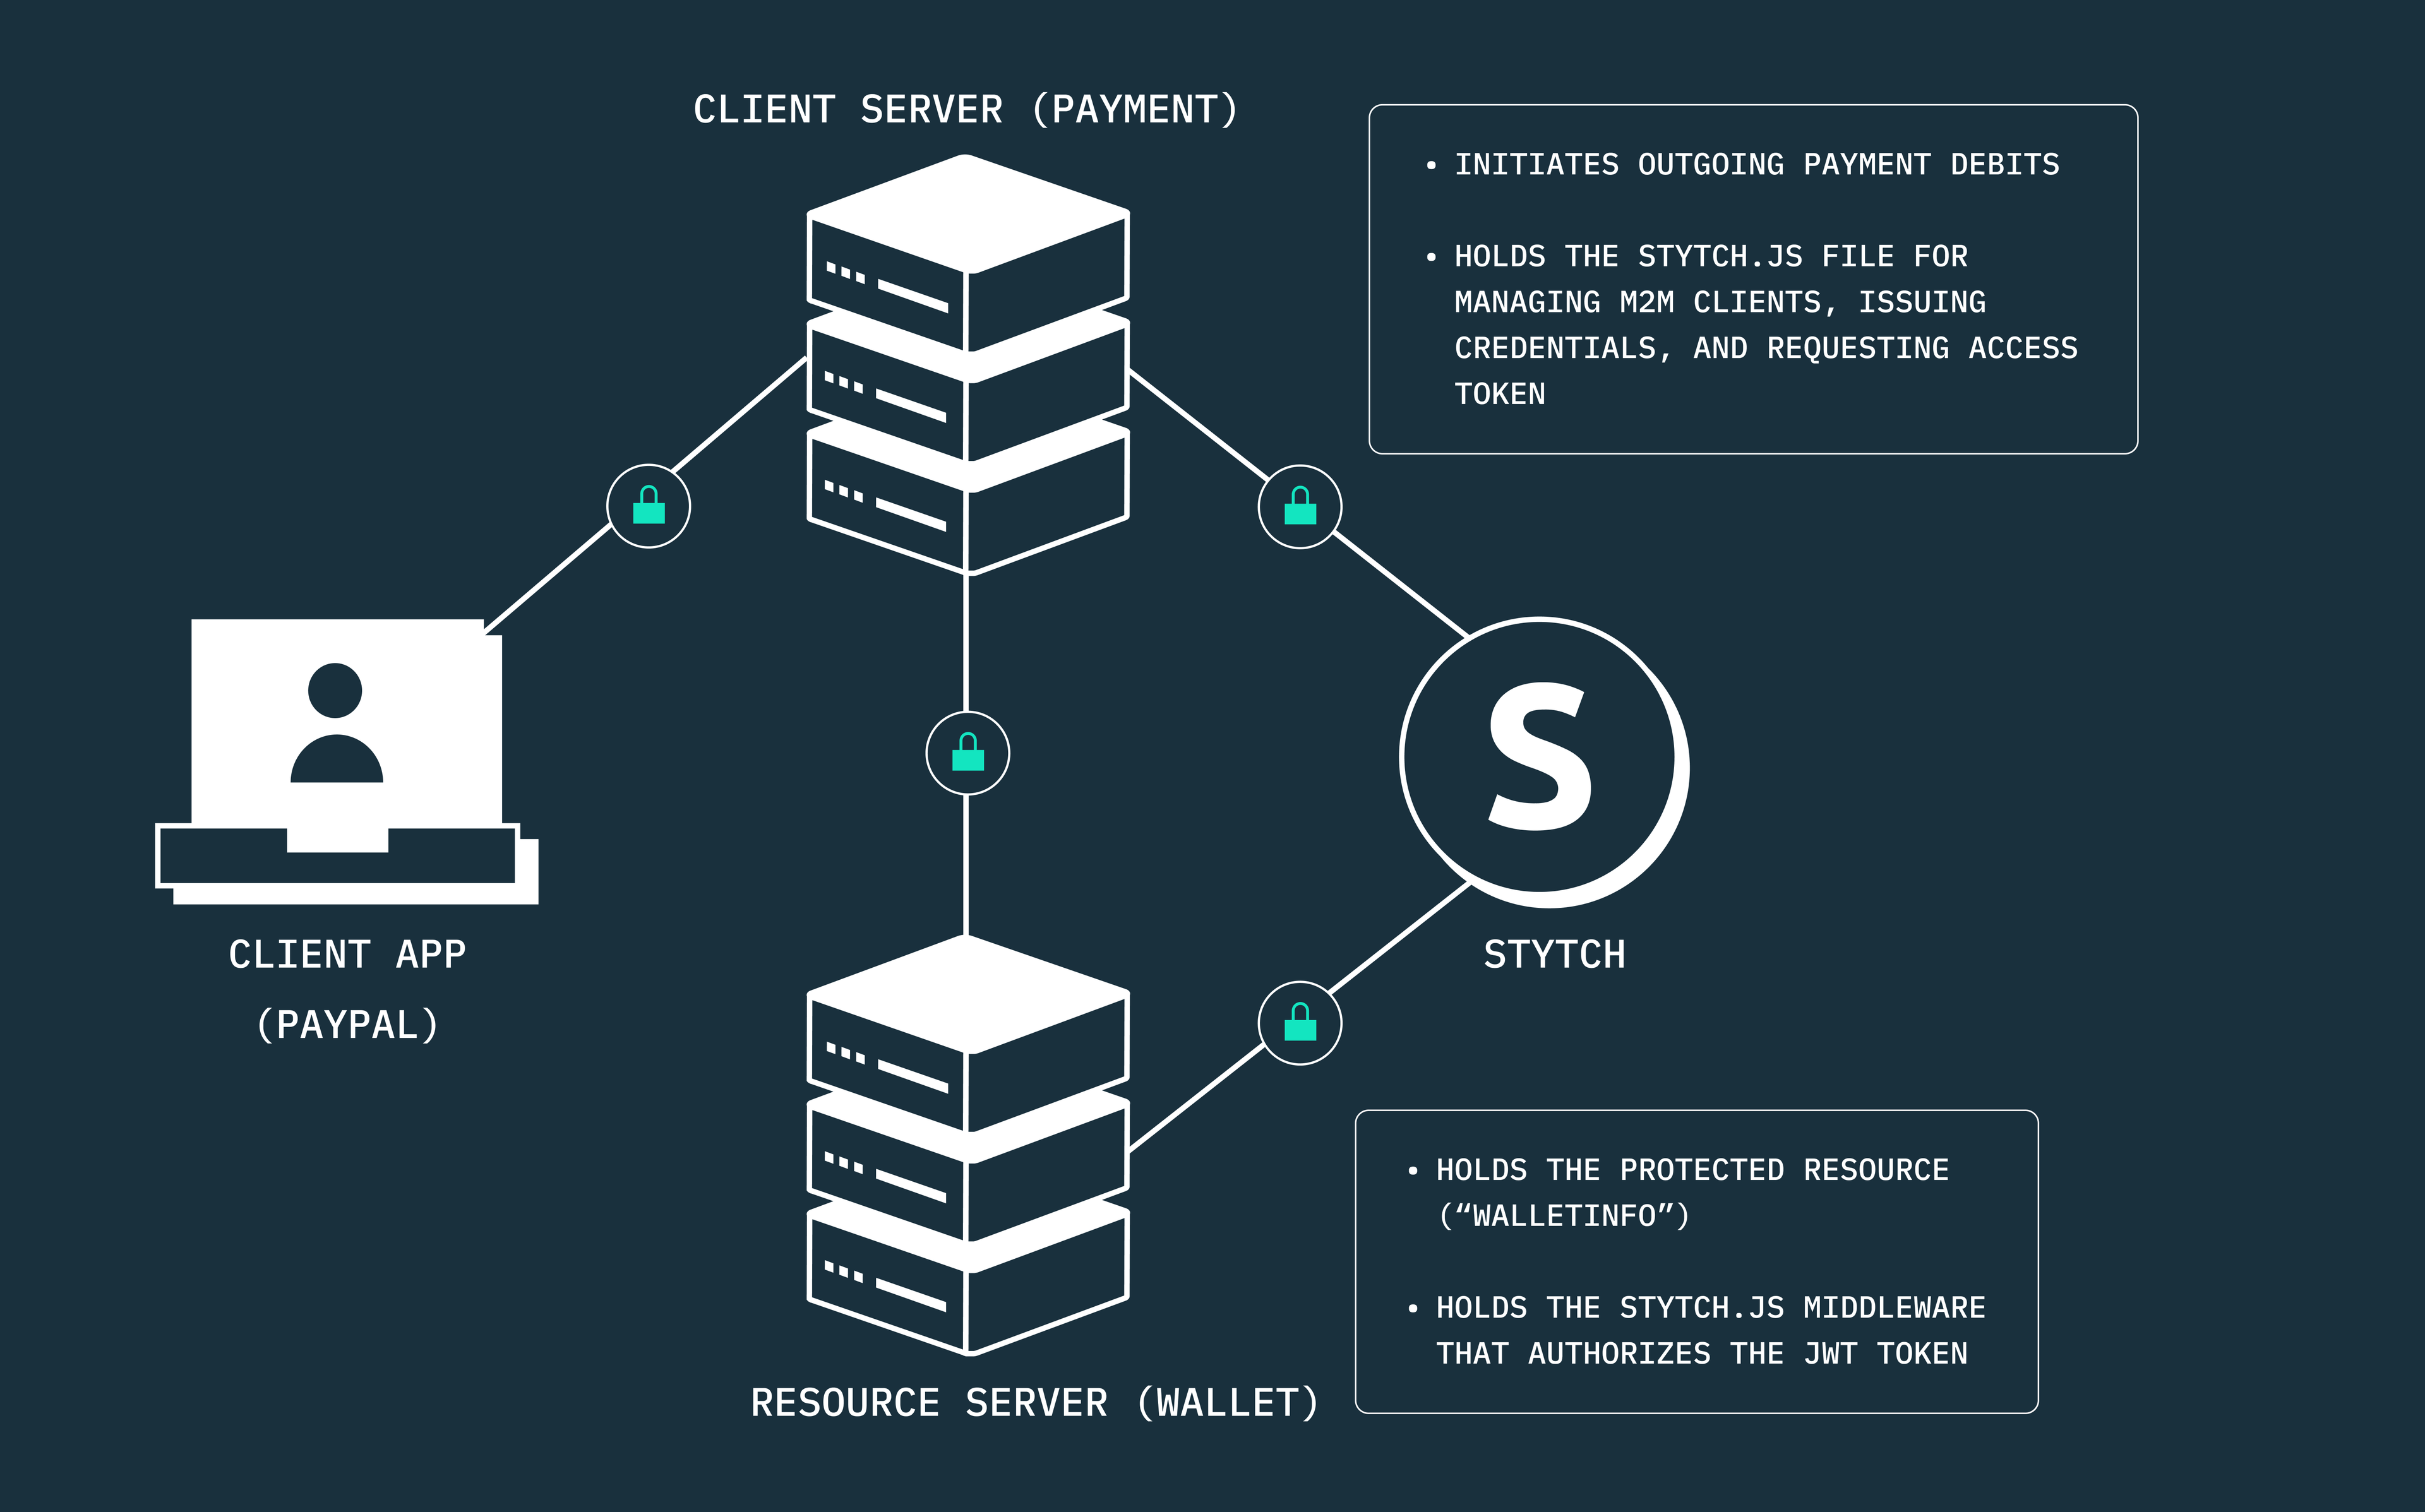
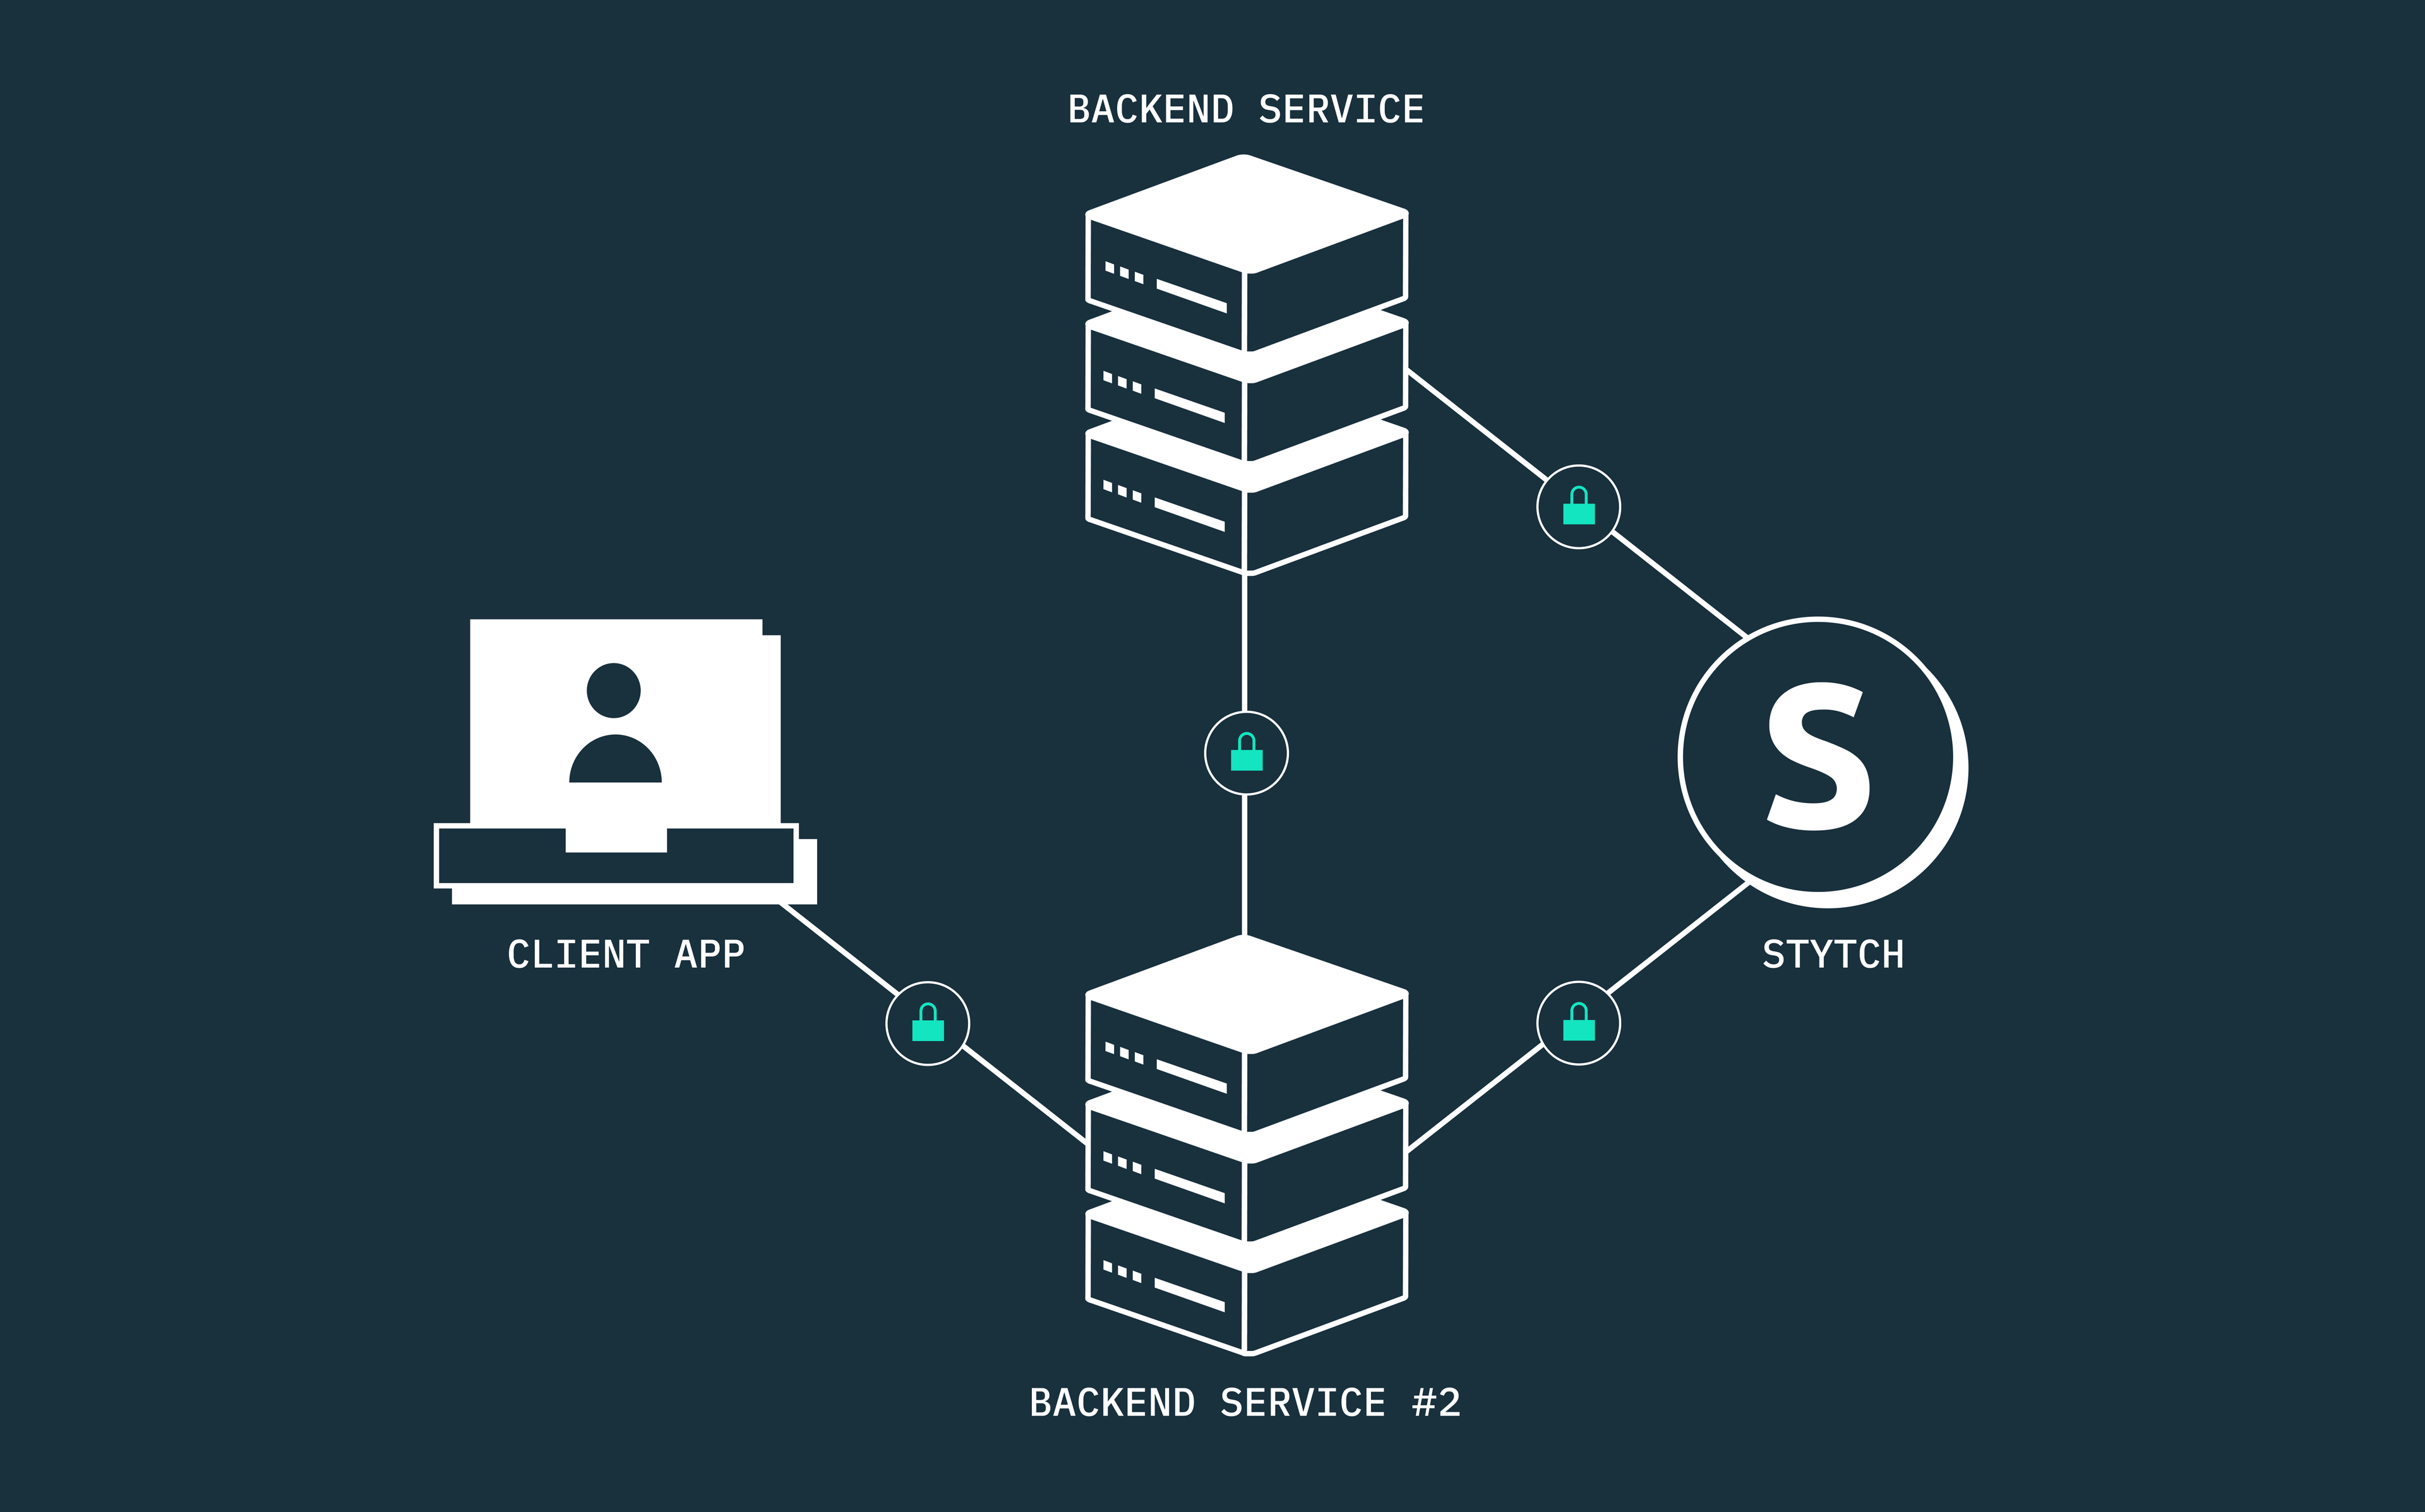
We’ll use Stytch’s M2M authentication service to enable secure communication between two backend services in a hypothetical fintech neobank: the Payment Management Service and the Wallet Management Service. For the purpose of this tutorial, we’ll assume that our hypothetical fintech neobank is PayPal.
In our hypothetical PayPal scenario, the Payment Service (the Client), which is responsible for processing outward debits from a PayPal customer’s wallet, needs to securely communicate with the Wallet Service (the Resource) to access a customer’s current “walletBalance”. The Payment Service requires the customer’s current wallet balance to determine whether they have sufficient funds to successfully process a pending outward debit of $769 from their PayPal wallet.
We’ll make this happen using the endpoints and tools that Stytch provides, and we’ll occasionally refer to the Payment Service as “payment-server” and the Wallet Service as “wallet-server”.
In our example app, both services are internal backend services within a microservices architecture. As such, we manage our Stytch implementation for handling M2M client requests from the payment-server, while we handle token authorization via Stytch on the resource server (wallet-server).
However, if this were to be the case of a client server communicating with an external resource server, the client wouldn’t handle the creation of M2M clients or the issuance of credentials. Instead, both the creation of clients and issuance of credentials, as well as the authorization of access tokens would all be handled by the external resource’s authorization server, depending on the identity provider that must have been implemented.
Now, let’s get right into it.
You can find the full sample code on Github.
Setting up the developer environment
Prerequisites
If you want to run the example application on your machine, make sure you have the following set up:
- A Stytch developer account with API keys. If you don’t have one, sign up to get yours.
- A Stytch Consumer Authentication project.
- Postman.
- Node.js dev environment.
Getting started
To get started, you have to clone the example application. Run the following command in the terminal to clone it. The example app is an Express app.
git clone https://github.com/StytchExamples/stytch-m2m-node-example/Next, navigate to the root of both the payment-server and wallet-server directories and run the following commands to install the dependencies for each directory:
// In the payment-server directory
cd payment-server
npm install

// In the wallet-server directory
cd wallet-server
npm install
Get your Stytch API credentials
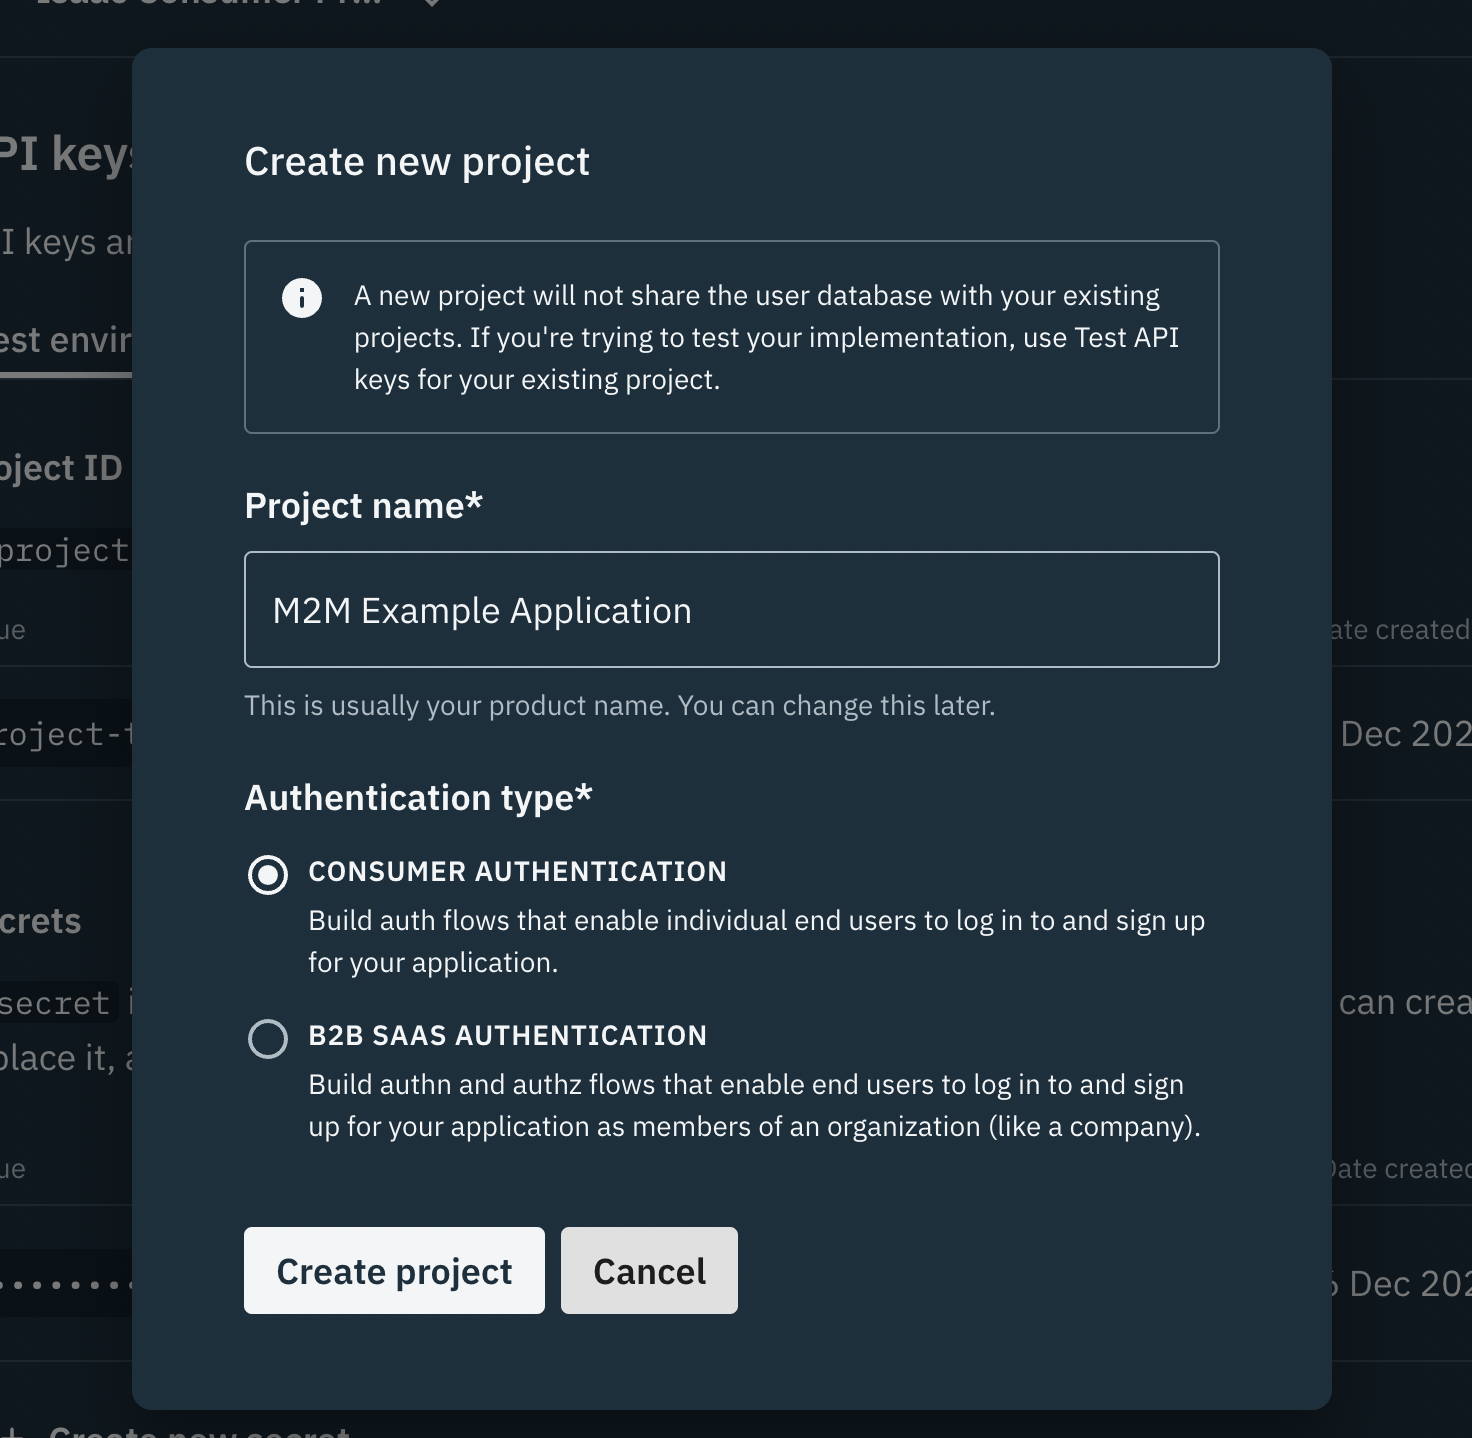
If you don’t have a Consumer Authentication project already, log in to your Stytch account and create one. Stytch also supports M2M auth in B2B SaaS Authentication projects, but for this guide, we’ll be using the consumer auth project.
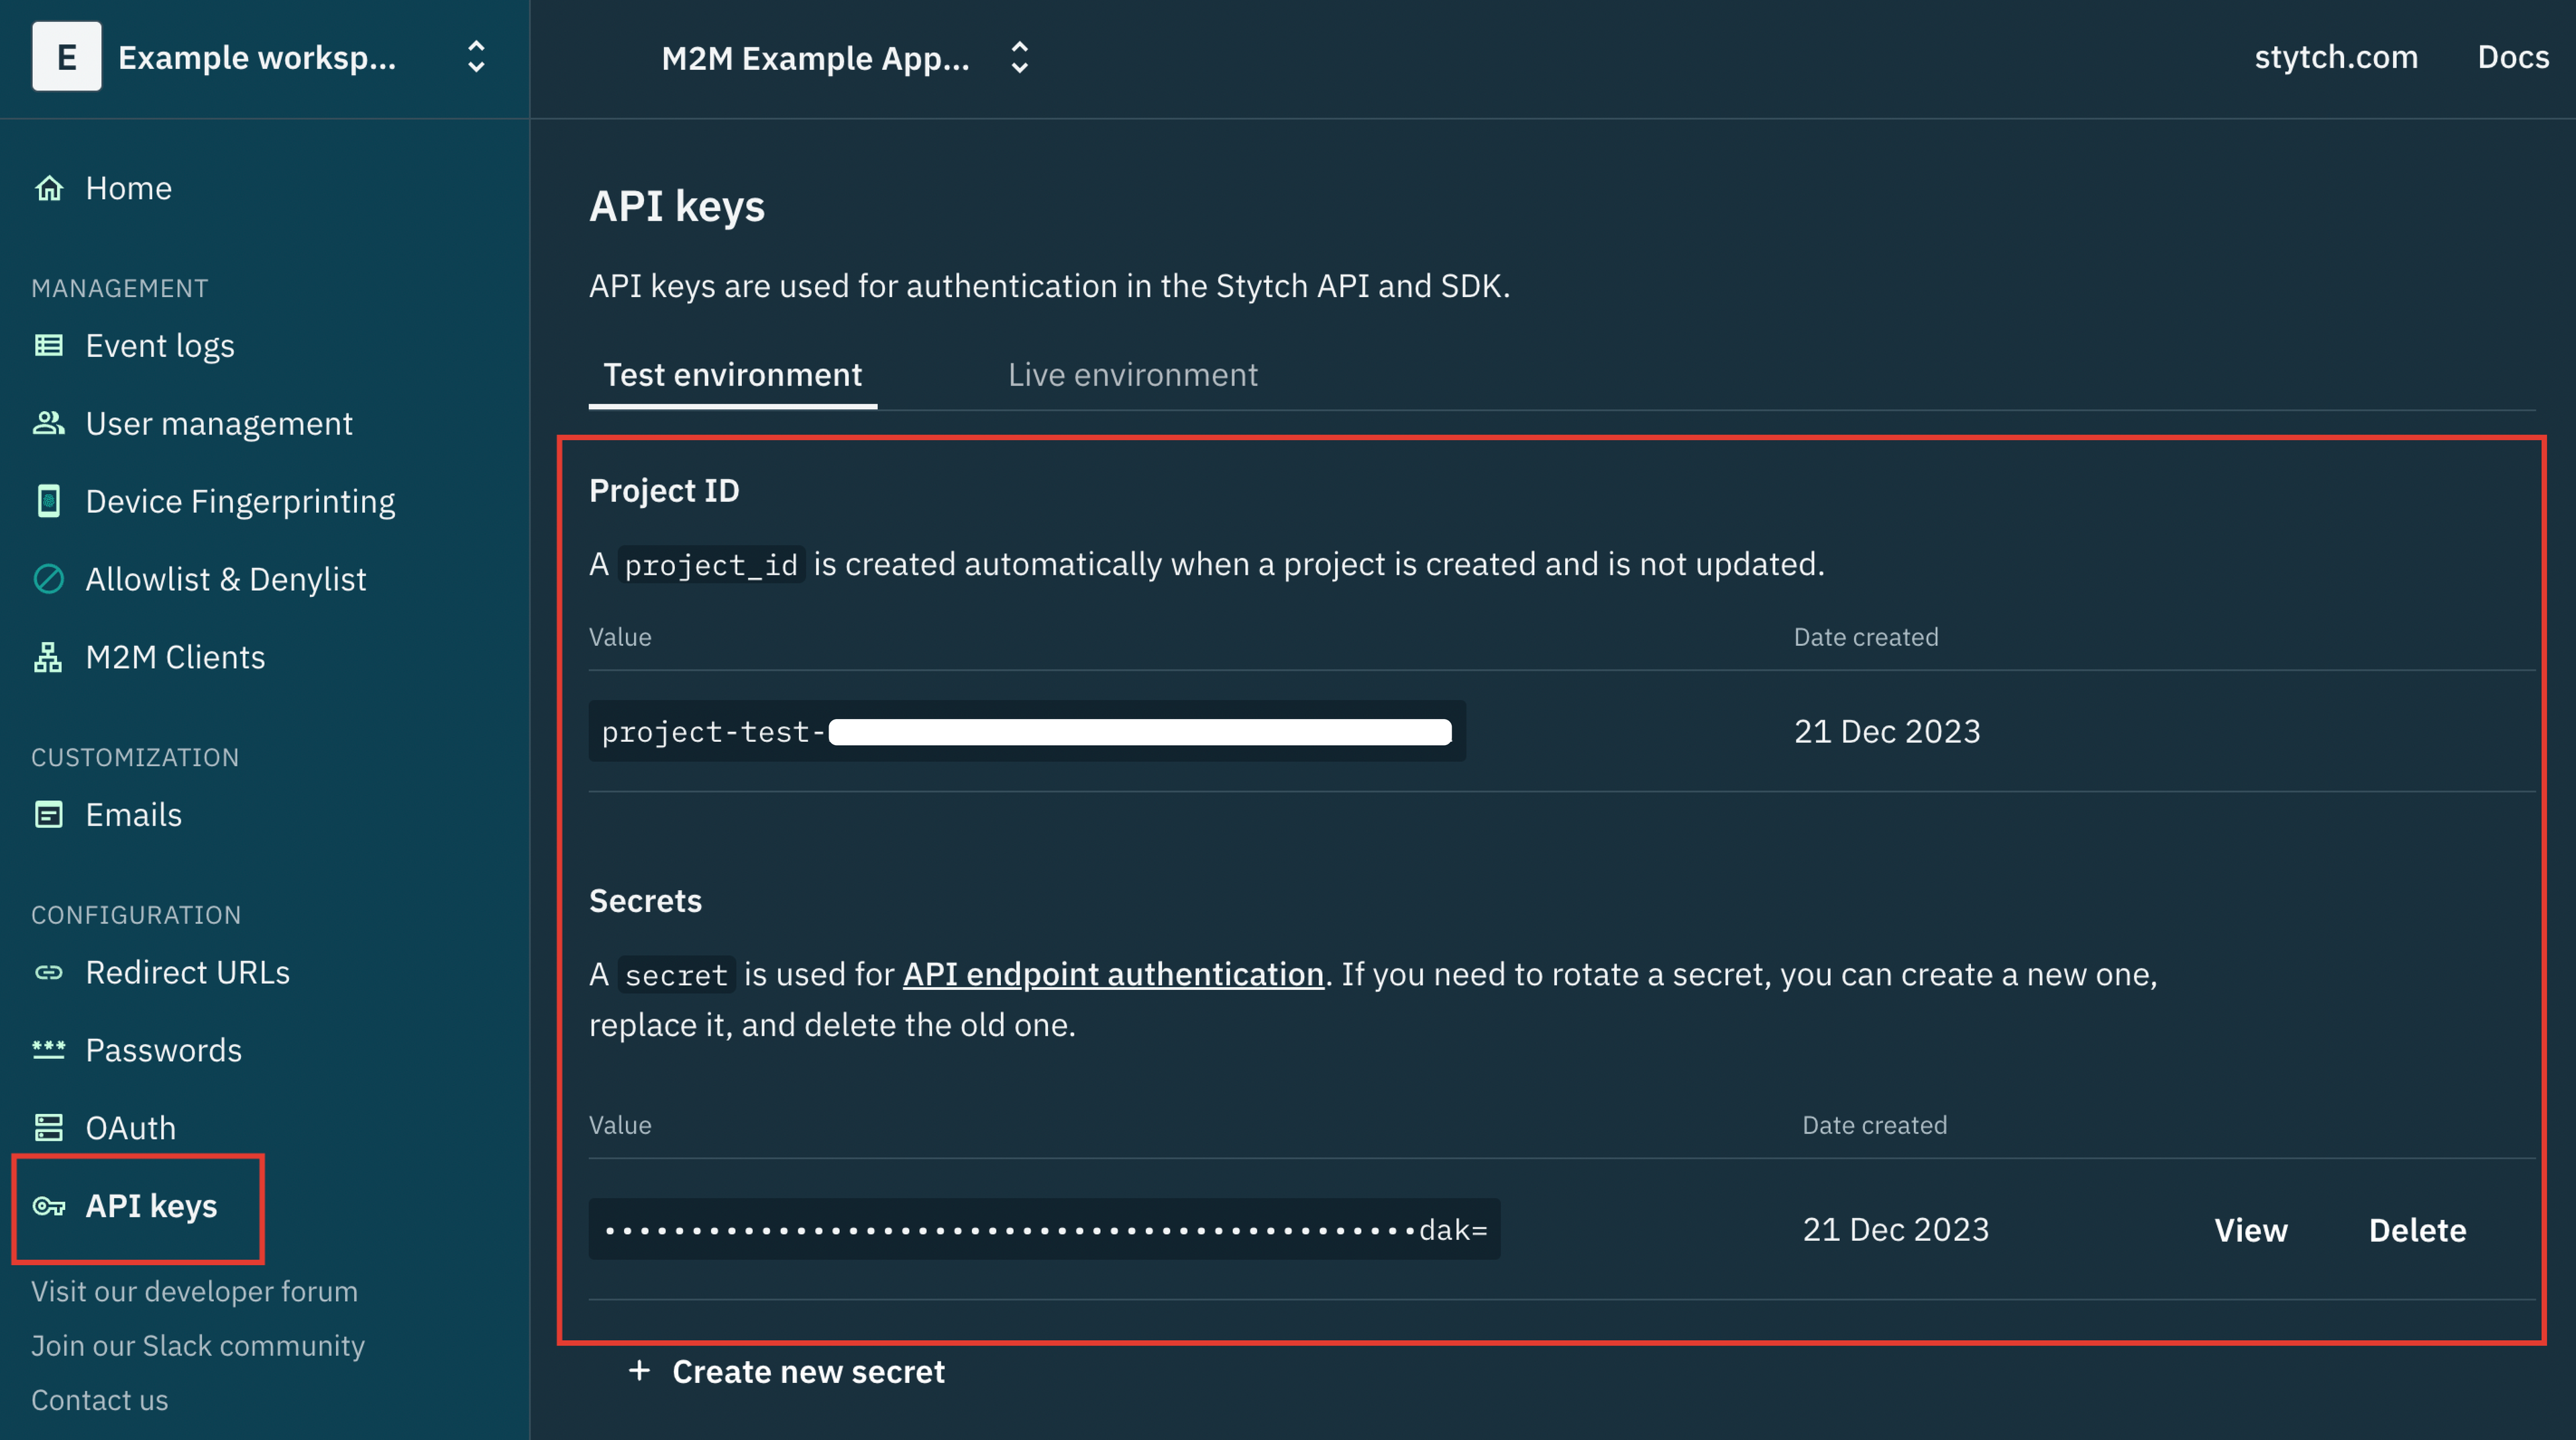
In the Dashboard, click API Keys under the Configuration section of the sidenav. For the sake of this tutorial, we’ll be using the Project’s Test environment, so copy your Project’s credentials: the “project_id” and “secret”.
In the root of both the payment-server and wallet-server directories, create a .env file and populate the fields with your Project’s credentials following the key/value format below:
//.env root for payment-server: "stytch-m2m-node-example/payment-server/.env"
PORT = 6000
STYTCH_PROJECT_ID = 'Provide Your Stytch Project Id'
STYTCH_SECRET = 'Provide Your Stytch Project Secret'

//.env root for wallet-server: "stytch-m2m-node-example/wallet-server/.env"
PORT = 4000
STYTCH_PROJECT_ID = 'Provide Your Stytch Project ID'
STYTCH_SECRET = 'Provide Your Stytch Project Secret'
Running the example app locally
After completing all the previous steps, you can run each of the servers with the following command:
// Run the payment-server (Path: "stytch-m2m-node-example/payment-server")
npm start

// Run the wallet-server (Path: "stytch-m2m-node-example/wallet-server")
npm start
The payment-server (the Client) will be available at http://localhost:6000, and the wallet-server (the Resource) will be available at http://localhost:4000 when you run them locally on your machine.
Breaking down the Node app structure
Now that you have the app up and running, let’s take a look at the high-level architecture and build of the code.
The example application has two main directories: a payment-server that’s responsible for processing outgoing debits from a PayPal customer’s wallet, and a wallet-server that holds the protected resource (“walletInfo”) that the payment-server needs to access.
The payment-server (Client)
The payment-server directory contains a helper directory that holds the stytch.js file with our Stytch implementation, except for authorizing access tokens.
The payment-server also houses a server.js file that serves as the directory’s entry point, mounts the “/initiate-payment” route to process outward payments, and handles M2M client requests via stytch.js.
// payment-server directory structure
/payment-server
  /helper
    stytch.js
  server.js
The wallet-server (Resource)
The wallet-server directory holds a middleware directory that contains an authorizeToken.js file. This file authorizes access tokens with the necessary scopes before granting access to the protected resource.
The wallet-server also contains a server.js file that holds the protected resource (“walletInfo”) and mounts the “/api/check-balance” route to return a requested customer’s wallet details, specifically their “walletId” and “walletBalance”.
// wallet-server directory structure
/wallet-server
  /middleware
    authorizeToken.js
  server.js
Initializing Stytch on both servers
Next, in the root of the payment-server directory, find the stytch.js file in the helper directory, and initialize Stytch with your “project_id” and “secret”.
You can find these values in your Stytch Dashboard, under the Configuration section, after clicking on API Keys. In this case, you only need to fill out the STYTCH_PROJECT_ID and STYTCH_SECRET env variables with these values.
// Initialize Stytch client in the stytch.js file (Path: "stytch-m2m-node-example/payment-server/helper/stytch.js")
const client = new stytch.Client({
    project_id: process.env.STYTCH_PROJECT_ID,
    secret: process.env.STYTCH_SECRET
});
Also, in the root of the wallet-server directory, find the authorizeToken.js file in the middleware directory and initialize Stytch with your “project_id” and “secret” just as you did above. Fill out the STYTCH_PROJECT_ID and STYTCH_SECRET env variables with these values.
// Initialize Stytch client in the authorizeToken.js file (Path: "stytch-m2m-node-example/wallet-server/middleware/authorizeToken.js")
const client = new stytch.Client({
    project_id: process.env.STYTCH_PROJECT_ID,
    secret: process.env.STYTCH_SECRET
});
Creating your M2M client
After initializing Stytch on both servers, you have to create your M2M client application directly from your Stytch project dashboard. Stytch also provides a Create M2M Client endpoint that you can use to programmatically create M2M clients. However, for the sake of this tutorial, we’ll be manually provisioning our M2M client and storing the client credentials as env variables.
On the dashboard, navigate to M2M Clients under the Management section of the sidenav and click the “Create” button. Then, enter a name for your M2M client (payment-service) and add a new scope (read:user).

Afterward, copy the current client_secret and hit the “Save” button to save the M2M client you just created.
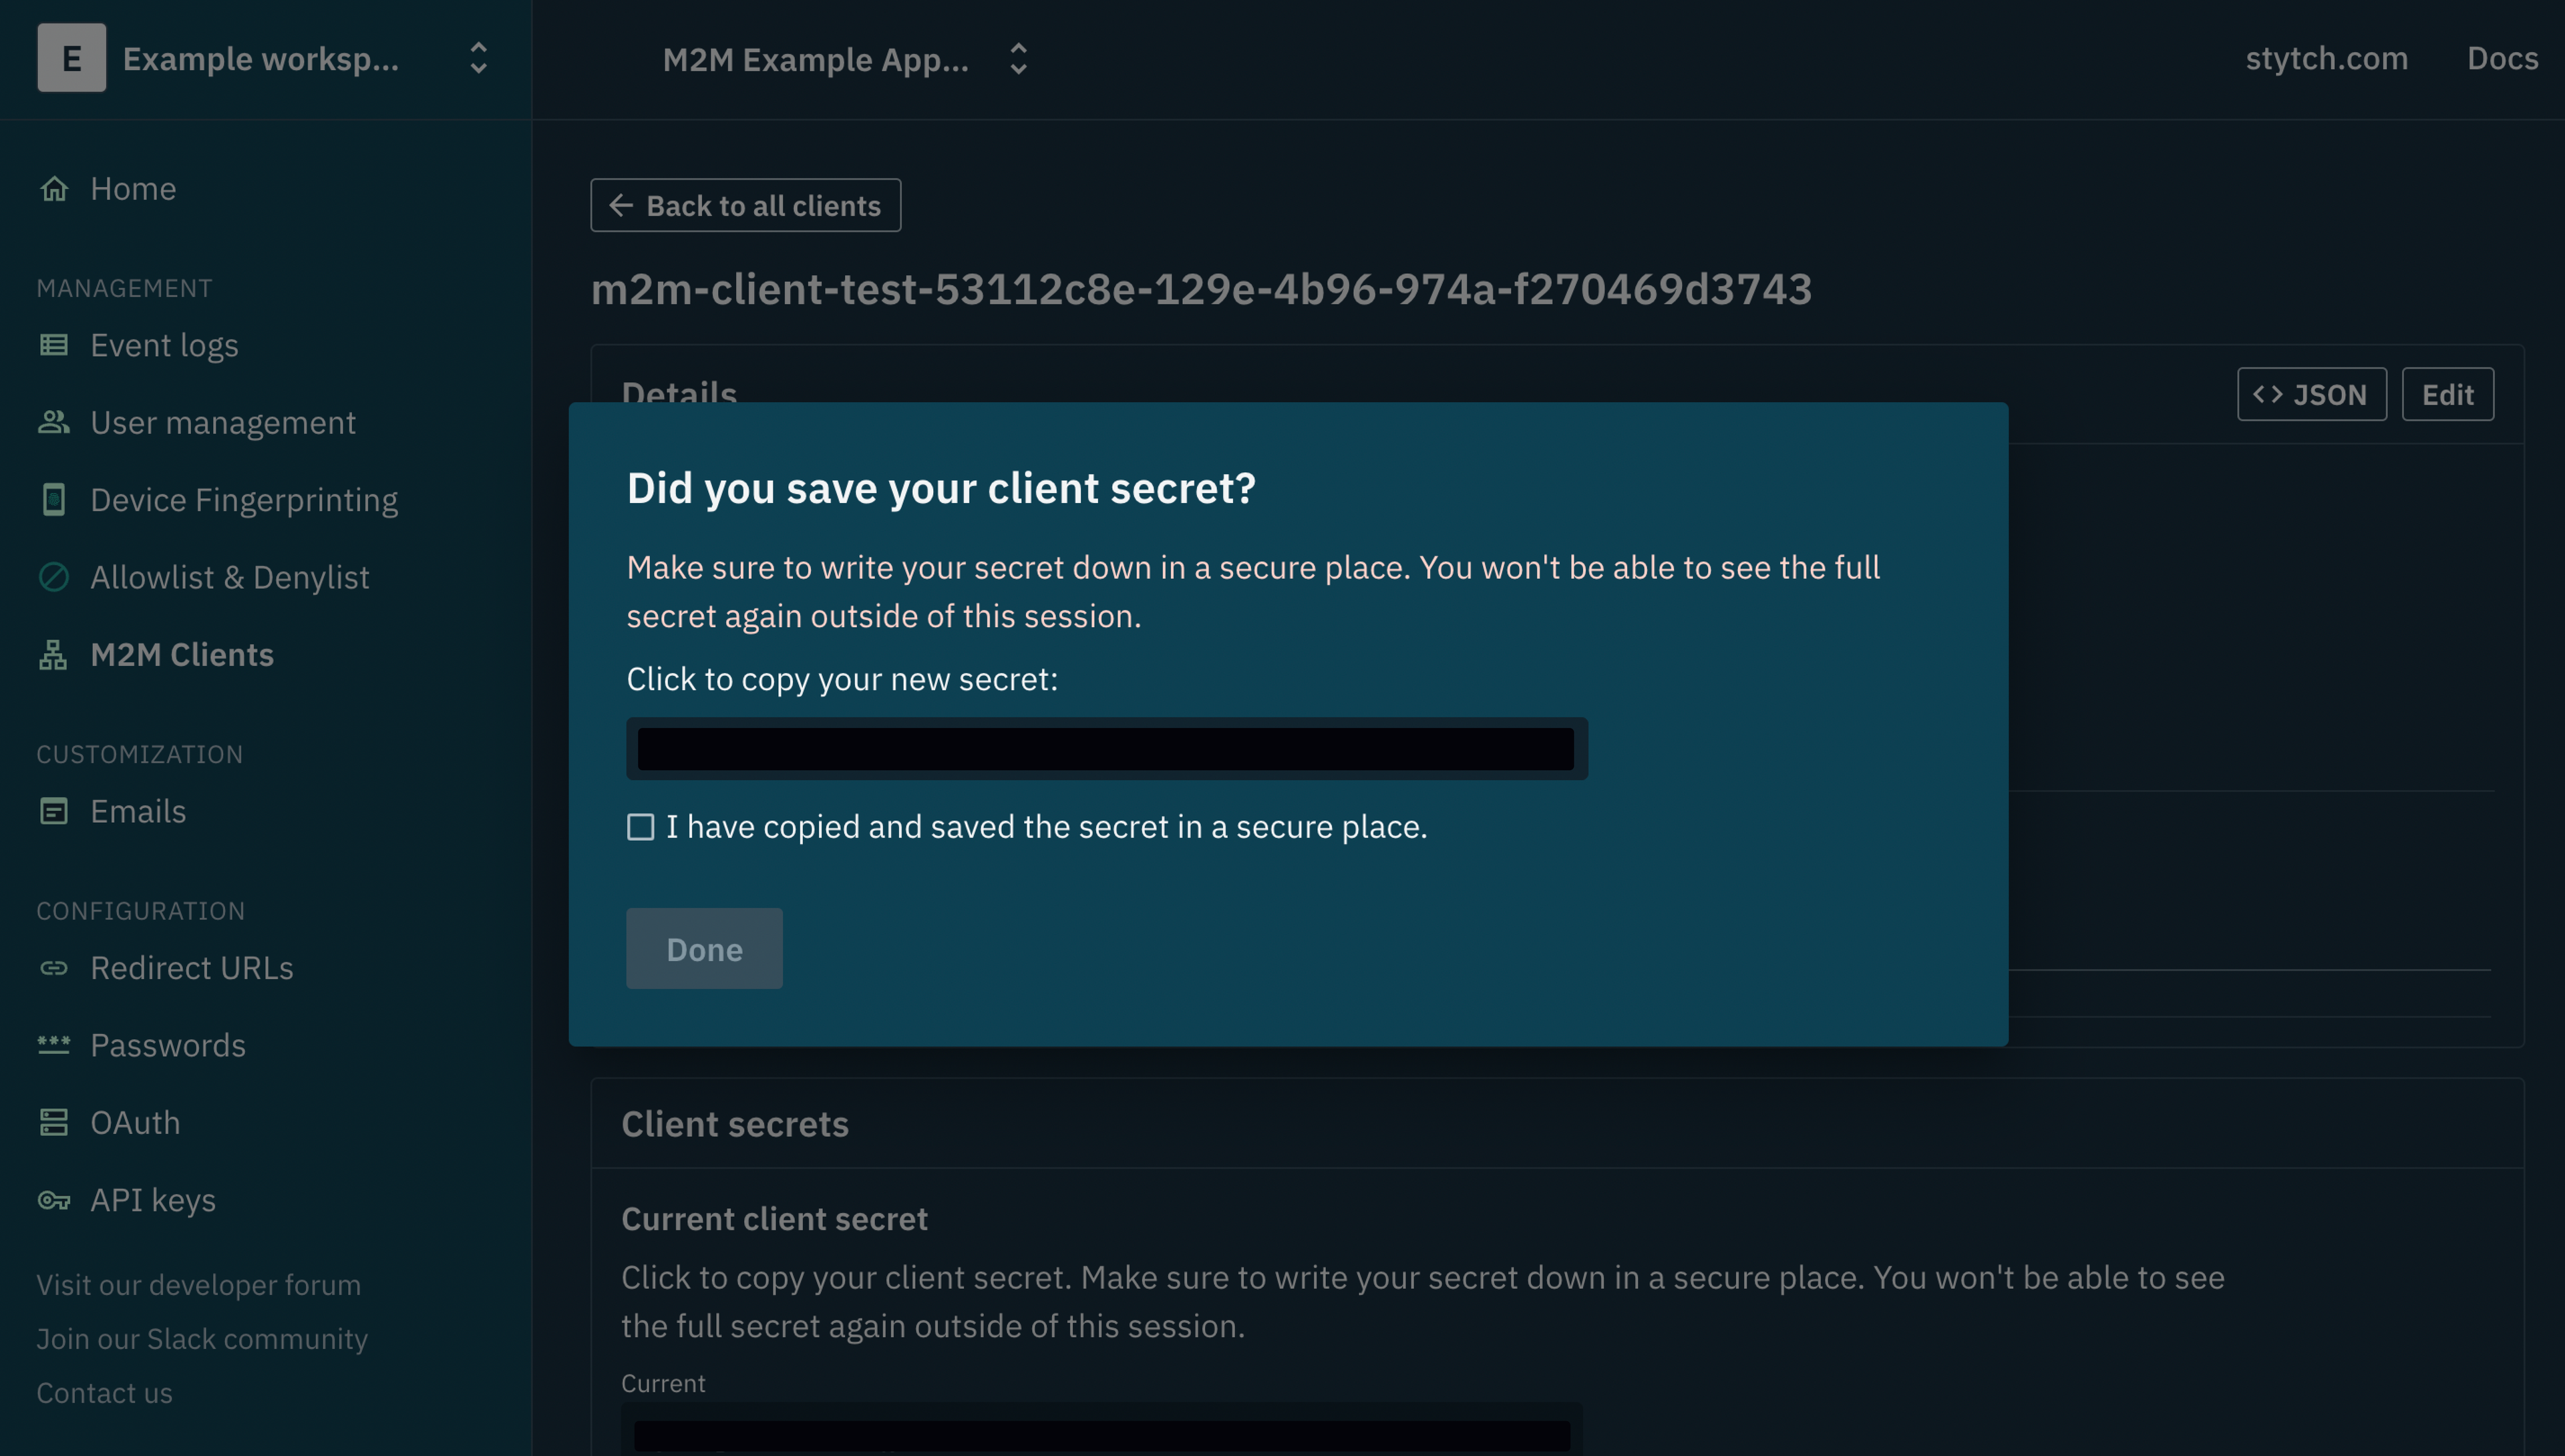
This is the only time the client_secret will be available to you because Stytch only saves a hash of this client_secret for security and credibility reasons. You can choose to store the client_secret in a secure vault or secrets manager, depending on your security requirements in production.
Now, go to the .env file you created in the root of the payment-server directory and populate the client_id and client_secret fields with your M2M client credentials following the key/value format below
//.env root for payment-server: "stytch-m2m-node-example/payment-server/.env"
PORT = 6000
STYTCH_PROJECT_ID = 'Provide Your Stytch Project Id'
STYTCH_SECRET = 'Provide Your Stytch Project Secret'
CLIENT_ID = 'Provide Your M2M Client Id'
CLIENT_SECRET = 'Provide Your M2M Client Secret'
Obtaining an M2M access token on the payment-server
Once you’ve created your M2M client, the next step is to obtain an M2M access token. The client must make a call to the authorization server, sending along their client secret, client ID, and specified scopes, and the authorization server must validate these credentials before returning a signed JWT token.
This JWT token will be used to authenticate your client (payment-server) when requesting access to a customer’s wallet information like “walletId” and “walletBalance” from the wallet-server. In our case, this token is obtained by calling Stytch’s Get Access Token endpoint with the following parameters provided in the body of the request: client_id, client_secret, scopes, and grant_type.
After the authorization server validates your request, you’ll receive a response that includes the “access_token” and the “expires_in” parameter, which will define the validity period and lifespan of the access token. You need to securely store the access_token in memory (node-cache) so that you can provide it for authentication whenever you send a request to the wallet-server, or request for a new token from Stytch if the current expires_in date has passed.
// Get M2M access token (Path: "stytch-m2m-node-example/payment-server/helper/stytch.js")
async function getM2MAccessToken(clientId, clientSecret) {
    try {
        // Get M2M access token from node-cache
        const accessTokenInfo = myCache.get('accessToken');
        if (accessTokenInfo) return accessTokenInfo;
        // If the cached token is expired, request a new one
        const params = {
            client_id: clientId,
            client_secret: clientSecret,
            scopes: ['read:users'], // Adjust scopes as needed
            grant_type: 'client_credentials'
        };
        const response = await client.m2m.token(params);
        // Save new access token to node-cache
        myCache.set('accessToken', response.access_token, response.expires_in);
        return response.access_token;
    } catch (err) {
        console.error('Error getting M2M access token:', err.response);
        throw err;
    }
}
Sending requests from the payment-server to the wallet-server
Now, with the available access token, the next step is for you to make a secure call to the wallet-server requesting access to the customer’s “walletInfo”. The “paymentInfo” object of the debit transaction you are attempting to process must be included in the body of the request, along with the “access_token” within the header.
The wallet-server must authenticate and authorize your request from the payment-server by validating the access_token before granting access to the specified wallet details. We’ll demonstrate how this happens in a moment.
If your request is successful, you’ll receive a response from the wallet-server that includes the customer’s current “walletBalance”. And if the wallet balance is sufficient to complete the pending debit of the specified “debitAmount” in the “paymentInfo” object, the transaction will be processed successfully by the payment-server.
// Initiate the payment process (Path: "stytch-m2m-node-example/payment-server/server.js")
async function initiatePayment(accessToken) {
    const walletServerUrl = 'http://localhost:4000/api/check-balance'; // Replace with your wallet-server URL
    try {
        // Request customer balance from wallet server
        const response = await axios.post(walletServerUrl, paymentInfo, {
            headers: {
                'Authorization': `Bearer ${accessToken}`,
                'Content-Type': 'application/json'
            }
        });
        const {customerName, walletBalance} = response.data;
        // Check if the balance is sufficient for the transaction
        if (walletBalance >= paymentInfo.debitAmount) {
            // Proceed with the transaction logic
            console.log('Transaction successful!');
            return `${customerName} your payment of ${paymentInfo.debitAmount} to ${paymentInfo.destinationWalletId} was successful!`;
        }
        console.log('Insufficient balance. Transaction failed.');
        return 'Insufficient balance. Transaction failed.';
    } catch (error) {
        console.error('Error connecting with the wallet server:', error.response ? error.response.data : error.message);
        throw error;
    }
}
Authorizing the JWT access token via authorizeToken.js on the wallet-server
Before you receive a successful response to your client request in the step above, Stytch’s Node SDK must first validate the access_token you provided in the request.
As such, you have to implement a middleware function that will intercept all requests made to the wallet-server and authorize the provided access_token, alongside the required scope. Your middleware (authorizeToken.js) handles authorization using Stytch’s SDK by calling the Authenticate Access Token method with the provided “access_token” and the “required_scope” that the token must contain to be valid.
A successful response will include the M2M client’s client_id, scopes, and custom claims. At this point, the payment-server is considered authorized and is granted access to the customer’s wallet details (“walletInfo”).
// Middleware for authorizing access token (Path: "stytch-m2m-node-example/wallet-server/middleware/authorizeToken.js")
const authorizeTokenMiddleware = (requiredScope) => {
    return async (req, res, next) => {
        try {
            const token = req.headers.authorization && req.headers.authorization.split(' ')[1];
            if (!token) {
                return res.status(401).json({ error: 'Unauthorized' });
            }
            // Validate the token using Stytch
            const params = {
                access_token: token,
                required_scopes: [requiredScope]
            };
            const response = await client.m2m.authenticateToken(params);
            console.log(response);
            next();
        } catch (error) {
            console.error('Error in middleware:', error);
            res.status(error.response ? error.response.status : 500).json({
                error: error.response ? error.response.data : 'Internal server error'
            });
        }
    };
};
// Customer's wallet details on the wallet-server (Path: "stytch-m2m-node-example/wallet-server/server.js")
const walletInfo = [
{ customerId: '67uhjio098uhgt6l', customerName: 'john_doe', walletId: 'oipk9ifgl7yto9w', walletBalance: 1790 },
{ customerId: 'plu8iio0t3uhh06h', customerName: 'jane_doe', walletId: 'ui099jlolrrao6g', walletBalance: 970 },
];
// Check balance route
app.post('/api/check-balance', authorizeToken('read:users'), (req, res) => {
const {customerId} = req.body;
const customer = walletInfo.find((customer) => customer.customerId === customerId);
if (customer) {
res.json({customerName: customer.customerName, walletId: customer.walletId, walletBalance: customer.walletBalance});
} else {
res.status(400).json({error: 'Invalid customer'});
}
});Rotating client secrets via stytch.js
For security reasons and compliance with industry best practices, Stytch allows you to regularly rotate your client secrets. By rotating your secrets at scheduled intervals, you can prevent compromised credentials from being used by attackers for extended periods without notice.
Navigate to the payment-sever and find your stytch.js file. The next step would be to start a secret rotation by calling Stytch’s Start Secret Rotation endpoint, providing the “client_id” of your M2M client. A successful response will include all the details of your M2M client. But at this point, both the “client_secret” and “next_client_secret” in the provided response will be active.
Now, you’ll have to update the CLIENT_SECRET stored in your env variable by changing the previous “client_secret” to the “next_client_secret” gotten from your response. This is the only time that the “next_client_secret” will be made available to you.
// Start client secret rotation in stytch.js (Path: "stytch-m2m-node-example/payment-server/helper/stytch.js")
router.get('/start-secret-rotation', async (req, res) => {
    try {
        const clientId = process.env.CLIENT_ID;
        // Start the secret rotation
        const params = {
            client_id: clientId
        };
        const response = await client.m2m.clients.secrets.rotateStart(params);
        // Switch the old client_secret for the next_client_secret
        res.json (response.m2m_client.next_client_secret);
    } catch (err) {
        console.error('Error starting secret rotation:', err.response);
        throw err;
    }
});
Complete secret rotation via stytch.js
Now that you have a “next_client_secret” from successfully starting the secret rotation, the next step would be to complete the secret rotation process so that the “next_client_secret” becomes the active “client_secret”, and the old “client_secret” becomes inactive. After starting a secret rotation, both the client_secret and the next_client_secret become active until you complete the rotation.
To complete the rotation you’ll have to call Stytch’s Rotate M2M Client Secret endpoint, providing the “client_id” of your M2M client. A successful response will include the details of your M2M client. At this point, the old client_secret will become inactive and the new one will be active.
// Complete client secret rotation (Path: "stytch-m2m-node-example/payment-server/helper/stytch.js")
router.get('/complete-secret-rotation', async (req, res) => {
    try {
        const clientId = process.env.CLIENT_ID;
        // Permanently switch the client_secret for the next_client_secret
        const params = {
            client_id: clientId
        };
        await client.m2m.clients.secrets.rotate(params);
        res.json({ message: 'Secret rotation completed successfully' });
    } catch (err) {
        console.error('Error completing secret rotation:', err.response);
        throw err;
    }
});
Managing M2M clients (search and update)
Managing the M2M clients you create within a Stytch project is very straightforward from your dashboard. However, Stytch also provides REST endpoints that allow you to search for your M2M clients and update these clients as needed.
Search for M2M clients via stytch.js
Back to your stytch.js file in the payment-server, you have to call out to Stytch’s Search M2M Client endpoint to search for the M2M clients in your Stytch project.
In the query parameter, you have to optionally provide the limit attribute which specifies the number of results you want Stytch to provide you per page. You also have to provide an operator in the query object (AND, OR) and the operands that will filter your result.
// Search for M2M clients via stytch.js (Path: "stytch-m2m-node-example/payment-server/helper/stytch.js")
router.get('/search-m2m-client', async (req, res) => {
    try {
      // Call Stytch endpoint to search for the M2M client
      const params = {
        limit: 100,
        query: {
            operator: 'OR',
            operands: [
                {
                    filter_name: 'client_name',
                    filter_value: ['payment-service'],
                }
            ],
        },
      };
      const response = await client.m2m.clients.search(params);
      res.json({
        search_Result: response,
      });
    } catch (err) {
      console.error('Error searching for M2M client:', err.response ? err.response.data : err.message);
      res.status(err.response ? err.response.status : 500).json({
        error: err.response ? err.response.data : 'Internal Server Error',
      });
    }
  });
Update M2M clients via stytch.js
Still in your stytch.js file, you have to call out to Stytch’s Update M2M Client endpoint to update details of the M2M clients that are within your project. Stytch allows you to update details like “client_name”, “client_description”, “scopes”, “trusted_metadata”, and “status”.
The next step will be to update the status of your M2M client to “inactive”. This will deactivate the M2M client from being able to request new access tokens until it is reactivated by updating the status back to “active”. However, deactivating the M2M client doesn’t deactivate any existing tokens. It only prevents the client from requesting new ones.
You can call out to the Update M2M Client endpoint by providing the “client_id” in the request param and including the “status” string in the body of your request. A successful response should include the details of your M2M client, with the status field value now changed to “inactive”.
// Update M2M clients via stytch.js (Path: "stytch-m2m-node-example/payment-server/helper/stytch.js")
router.put('/update-m2m-client/:clientId', async (req, res) => {
    try {
      const clientId = req.params.clientId;
      const status = req.body.status;
      console.log(clientId, status)
      // Call Stytch endpoint to update the M2M client
      const params = {
        client_id: clientId,
        status: status,
        // Include any parameters you want to update
        // Example: scopes: ['new:scope'],
      };
      const response = await client.m2m.clients.update(params);
      res.json({
        updated_m2mClient: response,
      });
    } catch (err) {
      console.error('Error updating M2M client:', err.response ? err.response.data : err.message);
      res.status(err.response ? err.response.status : 500).json({
        error: err.response ? err.response.data : 'Internal Server Error',
      });
    }
  });
Machine-to-machine authentication and authorization best practices
OAuth 2.0 is a solid M2M authentication and authorization framework, but the security of your systems depends heavily on how you implement the protocol. If there are flaws or oversights during implementation, it can introduce vulnerabilities that expose your services or APIs to risks.
However, by following industry-proven best practices, adhering to security standards, and staying on top of emerging threats, you can build and maintain a secure architecture that only authorized machines can access.
Whether you need to manage access control for internal or external services, here are some M2M authentication best practices that will help protect your resources from unauthorized access:
- Implement an OAuth 2.0 authorization server that strictly follows the client credentials grant flow, such as Stytch. We provide all the REST APIs required for creating secure M2M applications, requesting and authenticating JWT access tokens, and defining granular permissions with scopes.
- Avoid using the same client credentials for multiple services. It is best to create and use unique client IDs and client secrets for each service. This will help to isolate any potential damage if one service is compromised.
- Implement a credential rotation policy to govern the frequency at which you rotate your client credentials for different services. When creating this policy, consider the purpose of each service, identify any other services or applications that may need to communicate with it, and the cascading level of security required for the service.
- When granting access to sensitive resources, always adhere to the principle of least privilege and implement proper access controls. Only grant each service or entity the permissions it needs to perform its specific function.
- Encrypt every communication channel between your servers, API gateway, and intermediary services using digital certificates, such as Transport Layer Security (TLS). You can also use Mutual TLS (mTLS) if you require mutual authentication from both services.
Wrapping up
At this point, you should have been able to successfully:
- Set up a developer account and a consumer authentication project on Stytch.
- Create two servers (payment-server and wallet-server) demonstrating a typical M2M authentication and authorization flow, using Stytch as the OAuth2.0 authorization server.
- Gain a clear understanding of how machines securely authenticate each other’s identities and grant authorized access to protected resources, without human involvement.
Ready to implement M2M authentication in your project? Check out our Docs and start coding.
If you have any questions, please reach out to us at support@stytch.com or schedule a chat with a member of our team.
Build auth with Stytch
Pricing that scales with you • No feature gating • All of the auth solutions you need plus fraud & risk
Authentication & Authorization
Fraud & Risk Prevention
Resources
Community
© 2020-2026 Stytch. All rights reserved.