Back to blog
A developer’s guide to RFC 7519, part 1: JWT structure and claims
Auth & identity
Mar 28, 2025
Author: Edwin Lim
JSON Web Tokens (JWTs), defined by RFC 7519, are a compact and URL-safe way to transmit claims securely between parties. They’ve become the backbone of stateless authentication in modern applications—especially in web apps, mobile clients, and microservices architecture.
If you're building authentication and authorization in-house, it’s essential to understand how JWT implementations need to be built according to spec for security and compliance.
This article series will cover everything you need to know about JWTs as defined in RFC 7519, from the foundational principles to example implementations in Node.js. In this first entry, we’ll break down what JWTs are, when to use them, and their data structure.
Let’s dive in.
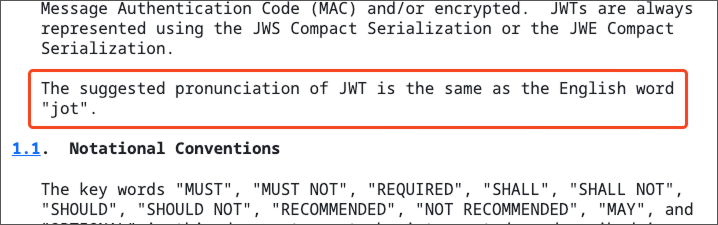
First, how do you pronounce JWT?
So is it “J-W-T”? According to the RFC 7519 spec, it’s pronounced “jot”.
What is a JWT
A JWT is a compact, URL-safe way of representing claims and transporting them securely between two parties. In essence, it's a JSON object that is encoded and digitally signed, allowing you to verify that the claims within it haven't been altered after issuance.
eyJhbGciOiJIUzI1NiIsInR5cCI6IkpXVCJ9.eyJzdWIiOiIxMjM0NTY3ODkwIiwibmFtZSI6IkpvaG4gRG9lIiwiaWF0IjoxNTE2MjM5MDIyfQ.SflKxwRJSMeKKF2QT4fwpMeJf36POk6yJV_adQssw5c

// what a JWT literally looks like
By encoding identity information and permissions directly within the token itself, JWTs allow systems to make authentication and authorization decisions.
Advantages of JWTs
JWTs offer several significant technical advantages for developers building systems:
- Statelessness: Unlike session-based authentication, JWTs don't require server-side storage of session information, reducing database lookups and improving scalability.
- Cross-domain and cross-service: JWTs can be issued by one service and verified by another, making them ideal for microservices architectures.
- Compact: Their encoded format allows them to be sent through URLs, POST parameters, or HTTP headers efficiently.
- Self-contained: All necessary information is contained within the token itself, reducing the need for additional database queries.
These benefits and advantages will become clearer as we dive deeper into the series and explore more JWT concepts in RFC 7519.
What are JWTs used for in authentication and authorization
Major platforms and services including Google and countless enterprise applications rely on JWTs as their token format of choice.
Their popularity stems from their versatility and efficiency. They eliminate the need for server-side session storage, reduce database lookups, and facilitate cross-domain authentication, making them ideal for scalable, distributed architectures where traditional session-based authentication would be impractical. They are widely used in various authentication scenarios like:
- Session management for web applications
- Single sign-on (SSO)
- API authorization frameworks like OAuth 2.0
- Machine-to-Machine (M2M) authentication
Let’s walk through a few use cases.
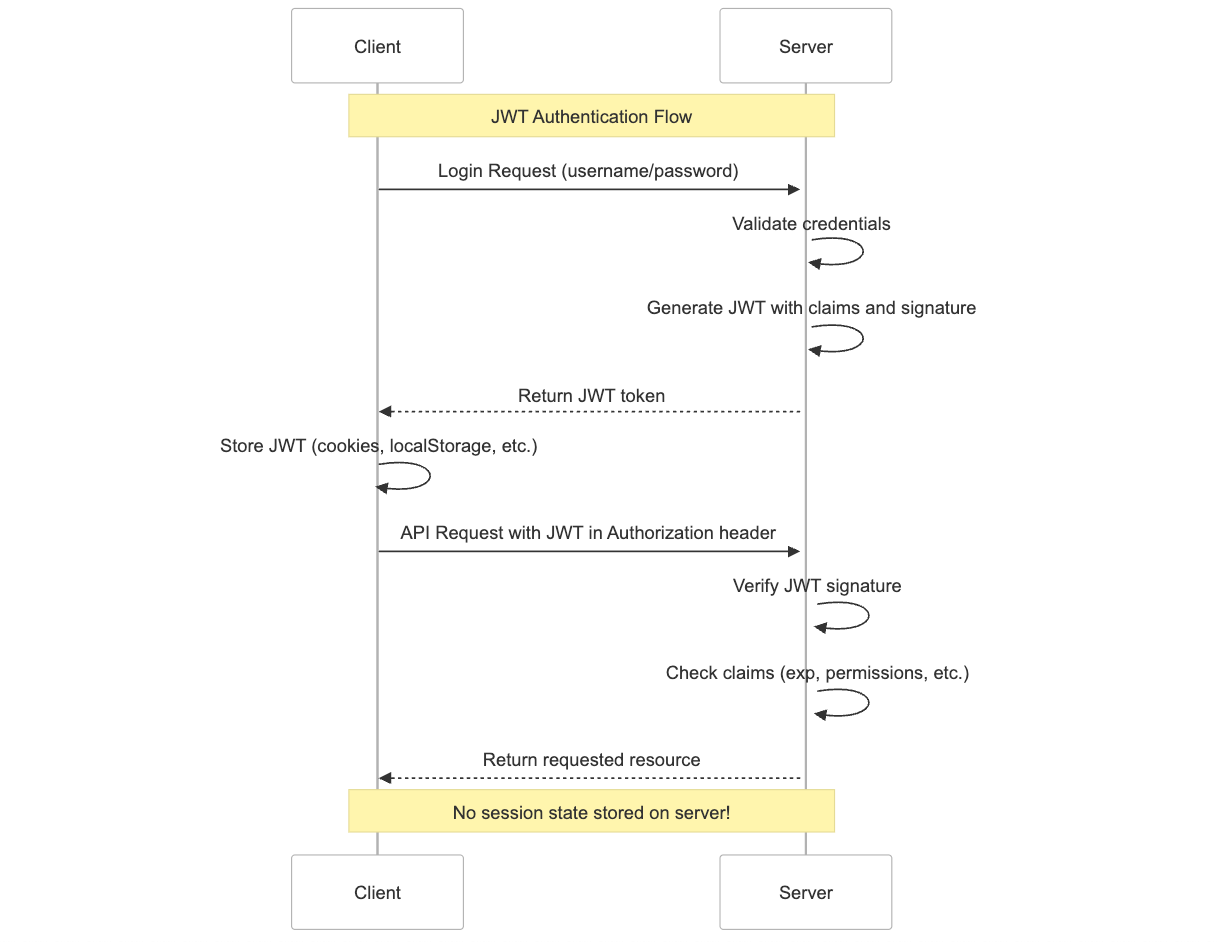
Session management for applications
JWTs enable fully stateless session management by eliminating the need for server-side session storage. Simply, JWTs are great for staying logged in to an app.
In web and mobile applications, the client can store the JWT—typically in an HttpOnly cookie or secure localStorage—and include it with each request to authenticate the user (e.g., bearer token). This removes the need for the server to look up session data in a database on every request. As long as the token is valid and properly signed, the server can verify it and trust the claims it contains, allowing the user to remain authenticated without a traditional session store.
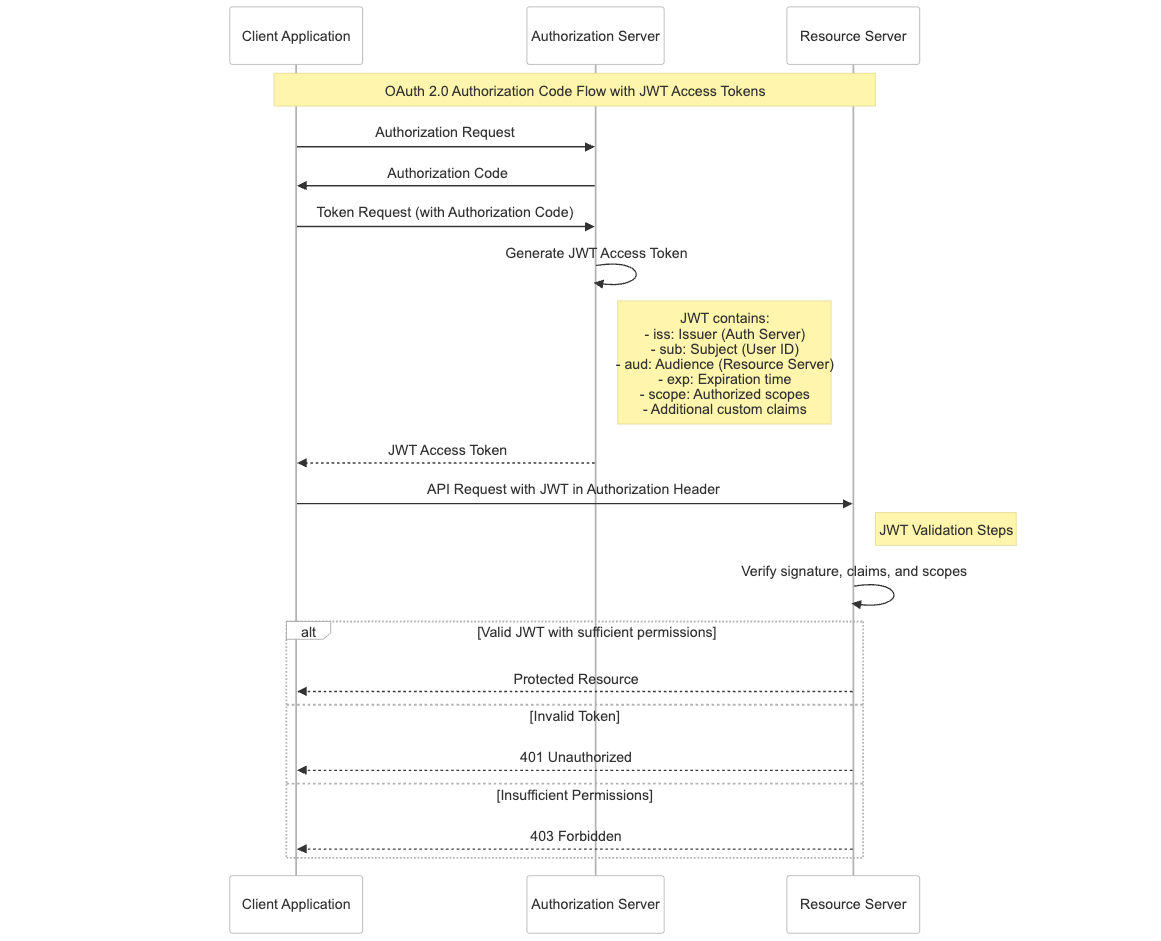
Social login and single sign-on with OAuth and OIDC
JWTs are an ideal standard for representing access tokens in OAuth 2.0 and identity tokens in OpenID Connect (OIDC). When a client authenticates, the server issues a JWT containing the client's identity and permissions, which can then be used to authorize access for protected resources across multiple applications.
This enables powerful authentication flows such as social login (e.g., login via Google, Facebook, or Apple) and SSO to create secure, seamless access across multiple applications and domains using a verifiable token.
Delegated authorization across backend services and machine-to-machine authentication
Just like the previous use case, OAuth and JWTs are leveraged to secure autonomous interactions in M2M integrations, such as APIs, backend services, servers, background processes, or command line interfaces (CLIs) that don’t require human users.
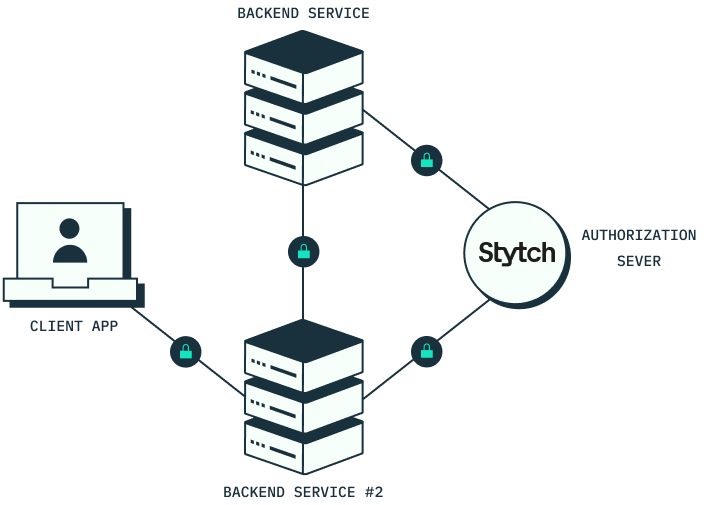
JWTs facilitate secure, convenient communication between machines to verify identity and permissions across multiple services.
The JWT structure
The JWT specification defines three distinct parts separated by periods in a JWT structure:
<Header>.<Payload>.<Signature>The JWT header contains metadata about the token, including the token type and the encryption algorithm used. The token type helps parsers or downstream systems identify the token format.
{
  "alg": "HS256",
  "typ": "JWT"
}
The payload contains the claims which are statements about an entity which are called claims (we’ll cover this in the next section).
{
  "sub": "1234567890",
  "name": "John Doe",
  "iat": 1516239022,
  "exp": 1516242622
}
The signature used to verify the token hasn't been altered or modified:
HMACSHA256(
  base64UrlEncode(header) + "." +
  base64UrlEncode(payload),
  secret
)
Each section is Base64URL encoded and concatenated with periods to form the complete JWT.
eyJhbGciOiJIUzI1NiIsInR5cCI6IkpXVCJ9.eyJzdWIiOiIxMjM0NTY3ODkwIiwibmFtZSI6IkpvaG4gRG9lIiwiaWF0IjoxNTE2MjM5MDIyfQ.SflKxwRJSMeKKF2QT4fwpMeJf36POk6yJV_adQssw5cThe JWT payload and claims
The payload section of a JWT contains its claims—pieces of information asserted about the token, the user, or the application. These claims typically fall into two primary categories: registered claims and custom claims.
Registered claims
RFC 7519 defines several predefined claims, which are not mandatory but are used to standardize meanings across systems to ensure consistency. These JWT claims are effectively reserved.
iss— Issuer of the token (e.g., https://your-auth.company.com)sub— Subject of the token (e.g., a user ID)aud— Audience the token is intended for (e.g., https://your-api.company.com)exp— Expiration time (Unix timestamp)nbf— Not valid before (Unix timestamp)iat— Issued at time (Unix timestamp)jti— JWT ID (unique identifier for the token)
Custom claims
These are user-defined claims that can be shared across systems. Because they are user-defined, these JWT claims can be customized to whatever your application’s context requires.
{
  "sub": "user_123",
  "role": "admin", // custom claim
  "userTier": "gold", // custom claim
  "featureAccess": ["analytics", "priority-support"], // custom claim
  "iat": 1711670000,
  "exp": 1711673600
}
Custom claims will fall into two additional categories:
- Public custom claims are designed to be shared across systems. To avoid naming conflicts, a public claim should be either registered with IANA or namespaced, typically using a URI as a prefix.
- Private custom claims are intended for use only between parties that have an agreed-upon understanding of their meaning. Since these JWT claims aren't shared outside those systems, namespacing isn’t required.
JWT signatures and algorithms
The token signature is what makes a JWT trustworthy. It ensures the integrity of the token by signing the header and payload using the cryptographic algorithm specified in the JWT header. This prevents tampering—if any part of the token is altered, the signature check will fail.
The JWT spec supports multiple signing algorithms:
- HMAC algorithms (HS256, HS384, HS512): Symmetric key algorithms that use the same secret key for signing and verification.
- RSA algorithms (RS256, RS384, RS512): Asymmetric algorithms that use a private key for signing and a public key for verification.
- ECDSA algorithms (ES256, ES384, ES512): Similar to RSA but using elliptic curve cryptography, offering the same security with smaller key sizes.
In order to create a JWT signature, the high level steps are to:
- Encode the header and payload using Base64URL
- Concatenate them with a dot: header.payload
- Sign the string with a secret or private key using the algorithm specified by the header's
alg
Note: RFC 7519 also defines alg: none which disables signing entirely. This was included for unsecured JWTs, but should never be accepted in production. Always enforce cryptographic algorithm validation and signature verification when verifying tokens.
How to create and sign a JWT with Node.js
Now that we’ve covered the structure and components of a JWT, let’s put it all together. This code example shows how to create a JWT manually using Node.js and the built-in crypto module according to RFC 7519.
To construct a valid JWT, we’ll follow these steps:
- Define the header and payload
- Encode the header and payload using base64
- Create a signature by cryptographically signing both parts with a secret and the header’s
alg - Concatenate the header, payload, and signature separated by periods
const crypto = require('crypto');

const secret = 'your-secret-key';
const payload = {
  sub: '1234567890',
  exp: Math.floor(Date.now() / 1000) + 3600, // expires in 1 hour
  paidTier: 'gold' // custom claim
};

function createJWT(payload, secret) {
  const header = { alg: 'HS256', typ: 'JWT' };

  const encodedHeader = Buffer.from(JSON.stringify(header)).toString('base64url');
  const encodedPayload = Buffer.from(JSON.stringify(payload)).toString('base64url');

  const signature = crypto
    .createHmac('sha256', secret)
    .update(`${encodedHeader}.${encodedPayload}`)
    .digest('base64url');

  return `${encodedHeader}.${encodedPayload}.${signature}`;
}

const myJWT = createJWT(payload, secret);

console.log(myJWT);
For real-world use, you can use a standard library like jsonwebtoken, which abstracts all of this logic and makes it even easier to code.
const jwt = require('jsonwebtoken');
const secret = 'your-secret-key';
const payload = {
sub: '1234567890',
paidTier: 'gold' // custom claim
};
const myJWT = jwt.sign(payload, secret, { expiresIn: '1h' });
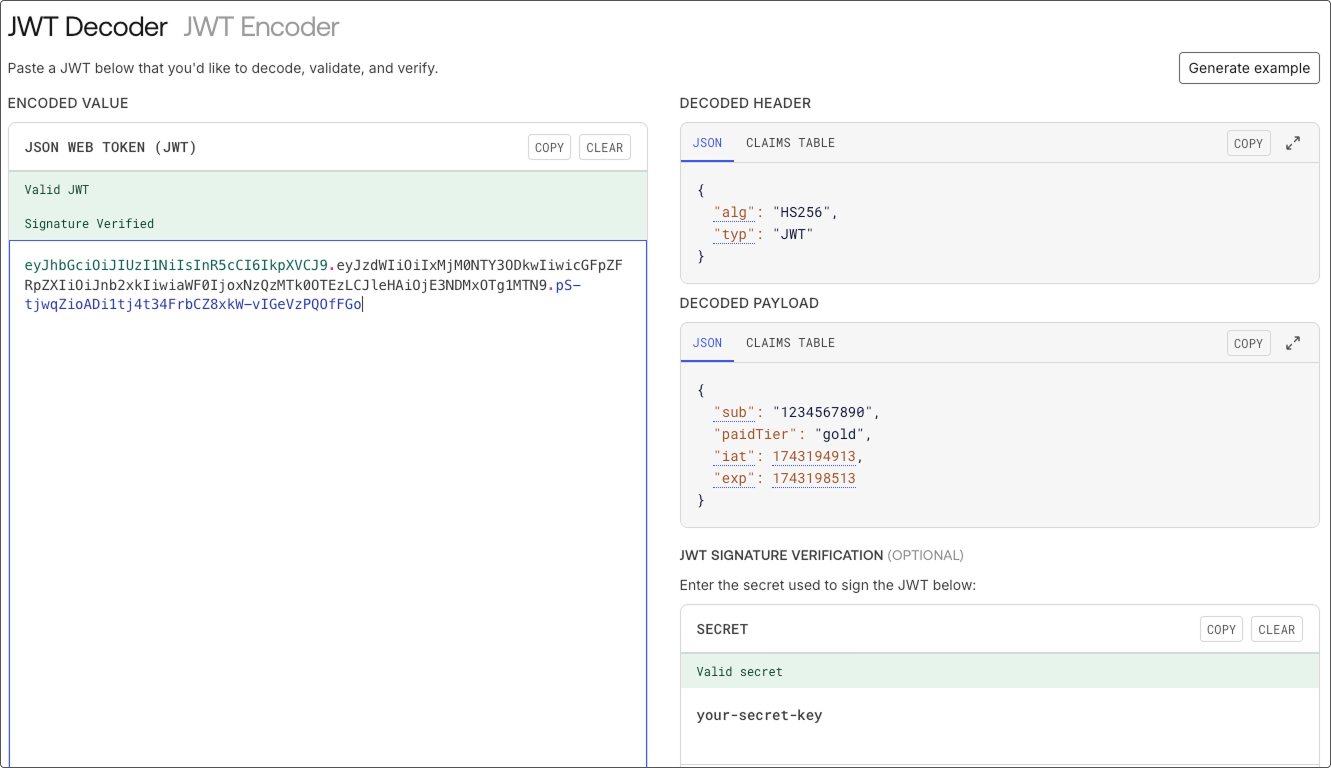
console.log(myJWT);If you want to decode the JWT to see the payload and verify the signature, you can use tools like token.dev and jwt.io to validate the JWT you created.
Conclusion
JWTs are built on a powerful, yet simple structure. Understanding the components defined in RFC 7519—header, payload, and signature—gives you the foundation to build secure, scalable auth flows powered by JWTs.
In the next entry, we’ll learn more about decoding JWTs and validating and verifying their claims.
Ready to implement JWTs for sessions, single sign-on, or M2M? Sign up for a free Stytch developer account or visit our quickstart guides to start building secure, scalable authentication for your application.
Build with Stytch
APIs and SDKs for authentication, authorization, security and fraud prevention

Authentication & Authorization
Fraud & Risk Prevention
© 2020-2026 Stytch. All rights reserved.