Back to blog
Webhooks security best practices
Auth & identity
Engineering
Jun 28, 2024
Author: Isaac Ejeh
Author: Edwin Lim
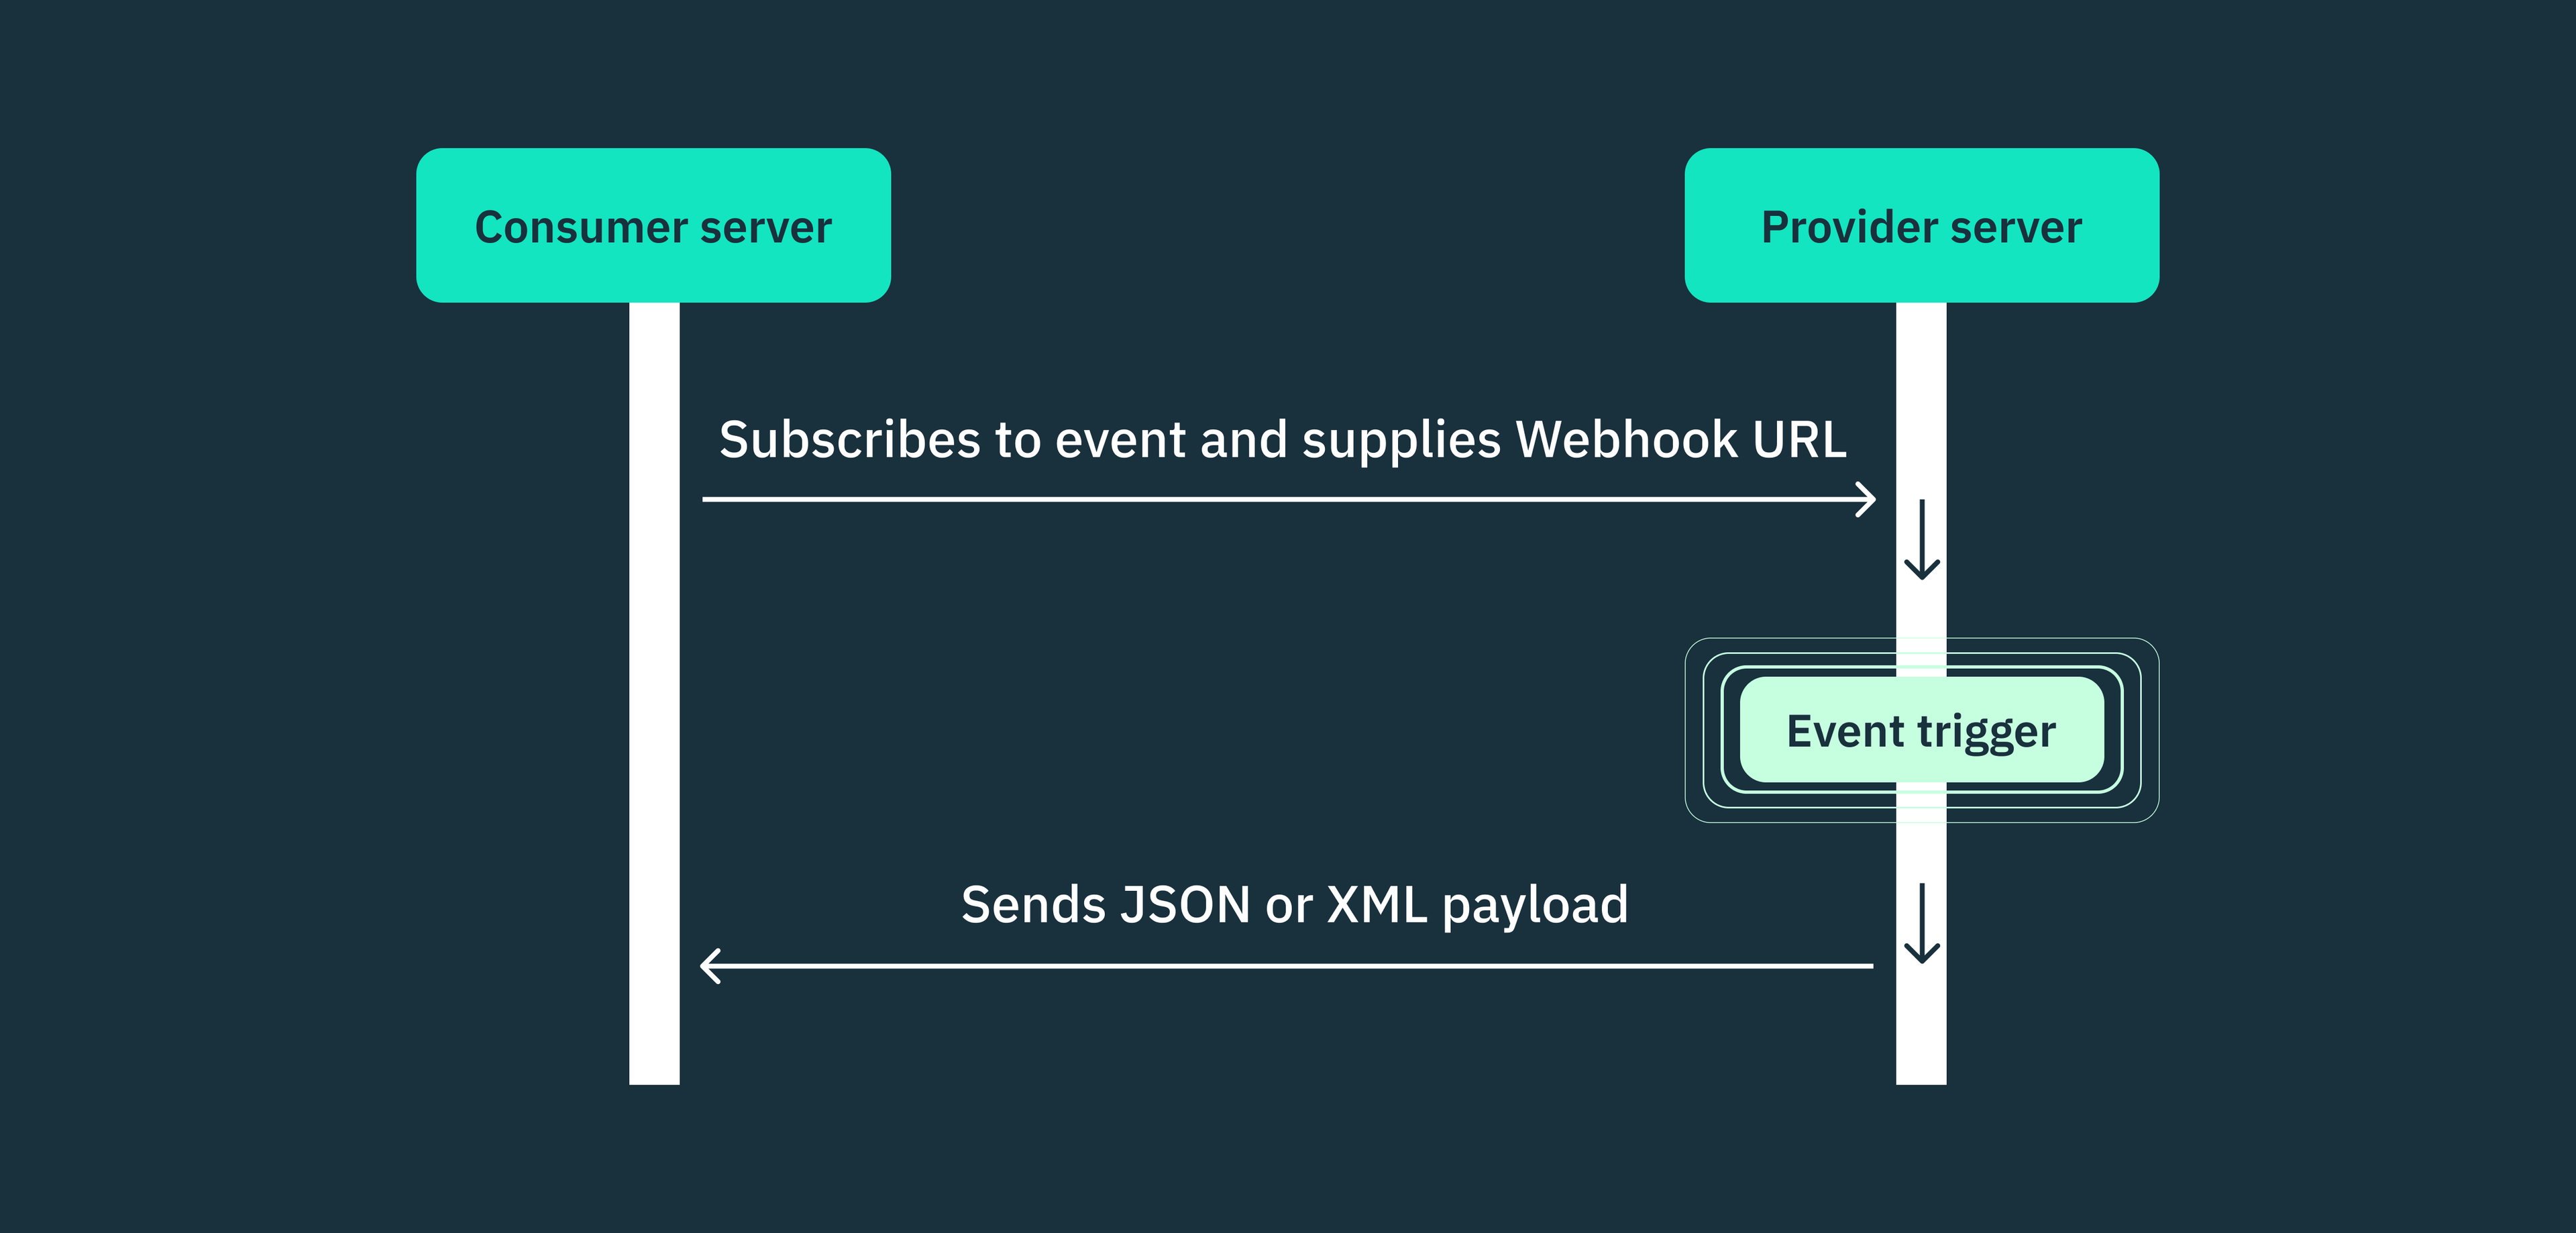
There are several reasons why webhook deliveries fail. It could be due to request timeouts, server errors from the receiver’s end, or even an expired SSL certificate.
There are also numerous reasons why webhook requests can be intercepted, or a webhook provider can be impersonated. The thing is, if you've ever handled webhooks at scale, whether on the provider or consumer side, you’re likely familiar with the complexities and potential cost of poor and insecure webhook implementations.
In this article, we’ll explore the most common webhook security best practices for handling webhooks in production. We’ll also explore our webhooks setup at Stytch, demonstrating how we use webhooks to provide a seamless auth experience for our customers.
Best practices for sending and receiving webhooks
If you're new to using webhooks, we have a separate article that covers the most common webhook vulnerabilities you need to plan for and the best ways to mitigate these security risks. You can find it here.
Now, let’s dive into the other best practices here.
SSL/TLS/mTLS encryption
Since webhook requests are transmitted over HTTP, which is a plain-text protocol, all data sent between the source and destination is easily readable by default. Attackers can intercept these messages and exploit any sensitive information they contain, such as authentication data or the payload data itself.
To mitigate this risk, it’s important to ensure that all webhook communication occurs over HTTPS, the secure version of HTTP. HTTPS encrypts all data transferred between the client and the server, making it much harder for attackers to interpret the information.
As the receiving web server (webhook consumer), you must install a valid SSL/TLS certificate to establish secure connections. This certificate provides security at the transport layer, ensuring all communication is encrypted and protected against various attacks, such as DDoS and Man-in-the-Middle attacks. Moreover, most webhook providers will only connect to secure HTTPS URLs with valid SSL/TLS certificates signed by a globally trusted certificate authority.
While SSL/TLS secures the communication from the webhook consumer’s end, mutual TLS (mTLS) takes security a step further by ensuring that traffic is secure and trusted in both directions.
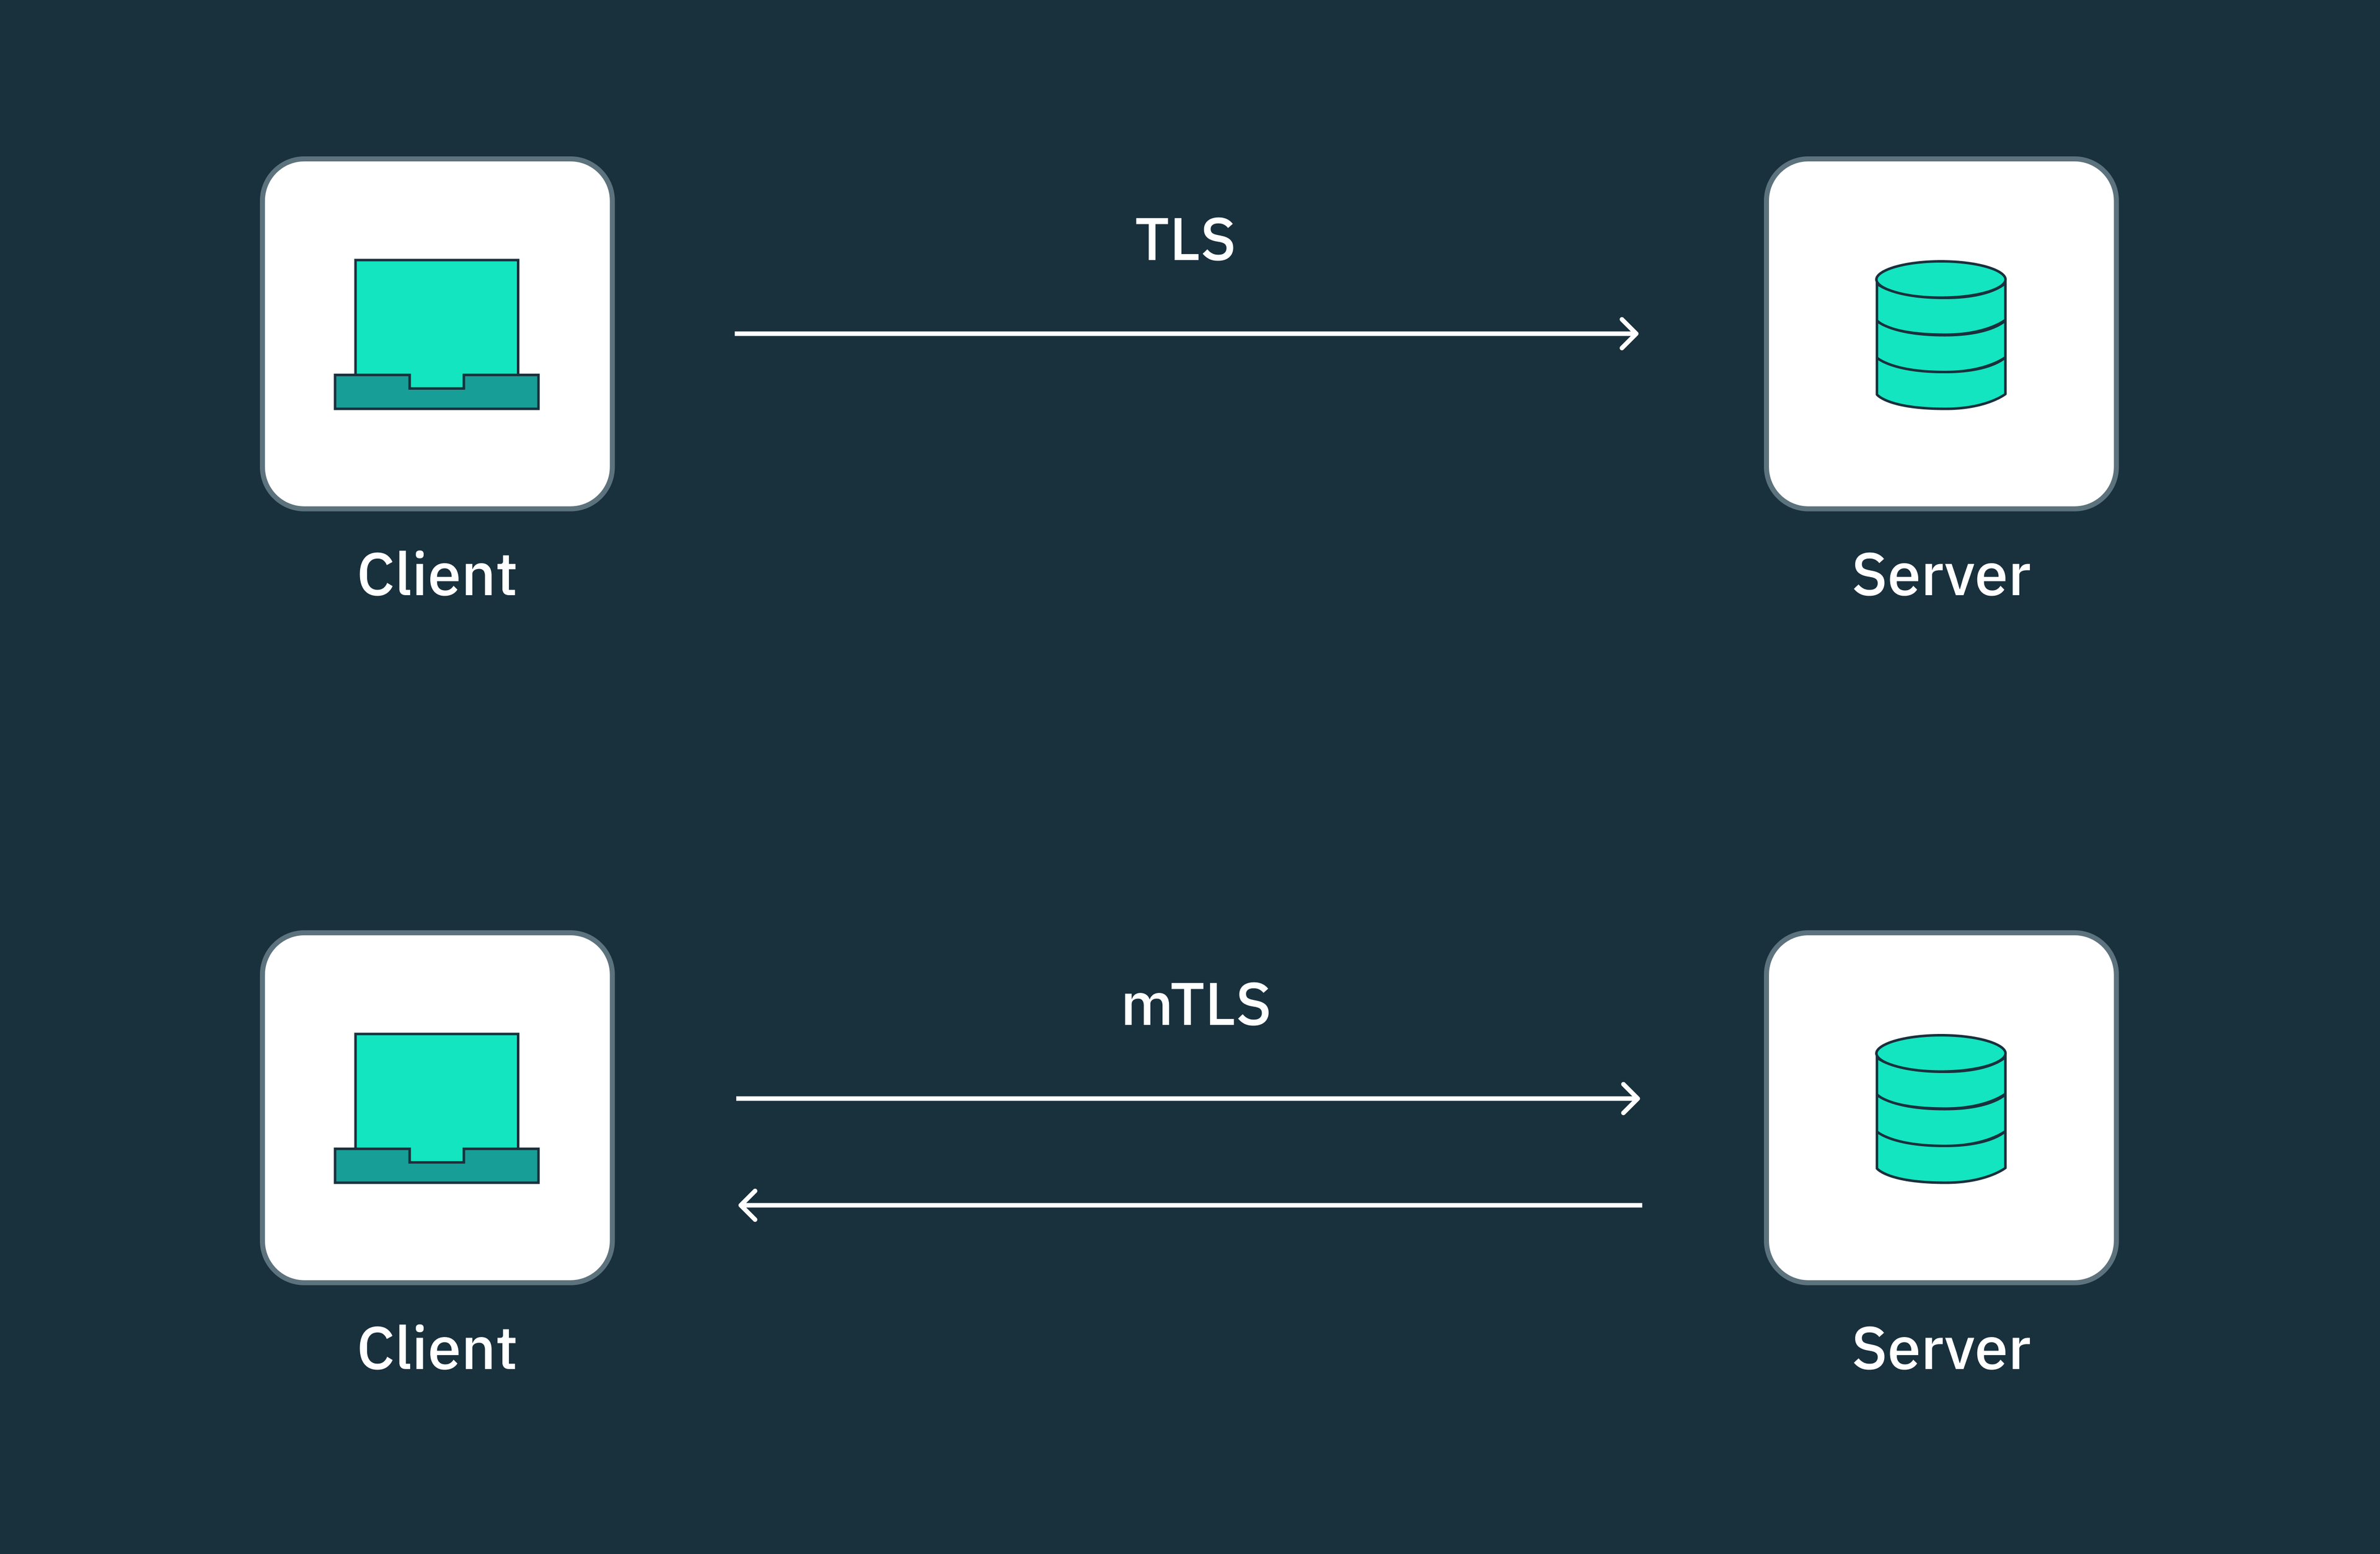
With mTLS, both the webhook provider and the consumer must authenticate each other using their respective TLS certificates before a webhook message is sent. If either party fails to present a valid certificate, the authentication will fail, preventing unauthorized access and ensuring that sensitive information only reaches the intended recipient.
However, it’s important to note that mTLS can be challenging to configure and maintain, especially as your webhook infrastructure grows. Managing mTLS certificates and keys for multiple clients and webhook endpoints can become a significant burden, and lead to potential misconfigurations or certificate expirations.
For most use cases, signing the webhook payload is a more suitable alternative to mTLS because webhook signatures are simpler to implement and maintain. This approach involves creating a unique signature for each payload using a shared secret key. By including this signature in the webhook request, the consumer can verify the authenticity of the payload without having to deal with complex mTLS certificates.
Enforce secret and signature validation
To ensure the authenticity and integrity of requests, webhook consumers need to verify the sender’s identity before processing any request. Since webhooks are essentially HTTP POST requests, attackers can easily impersonate legitimate providers by sending fraudulent webhooks.
Most webhook providers mitigate this risk by signing each payload with a secret key and including the resulting signature in the request header. This signature allows the webhook consumer to verify the origin of a request before processing it or not.
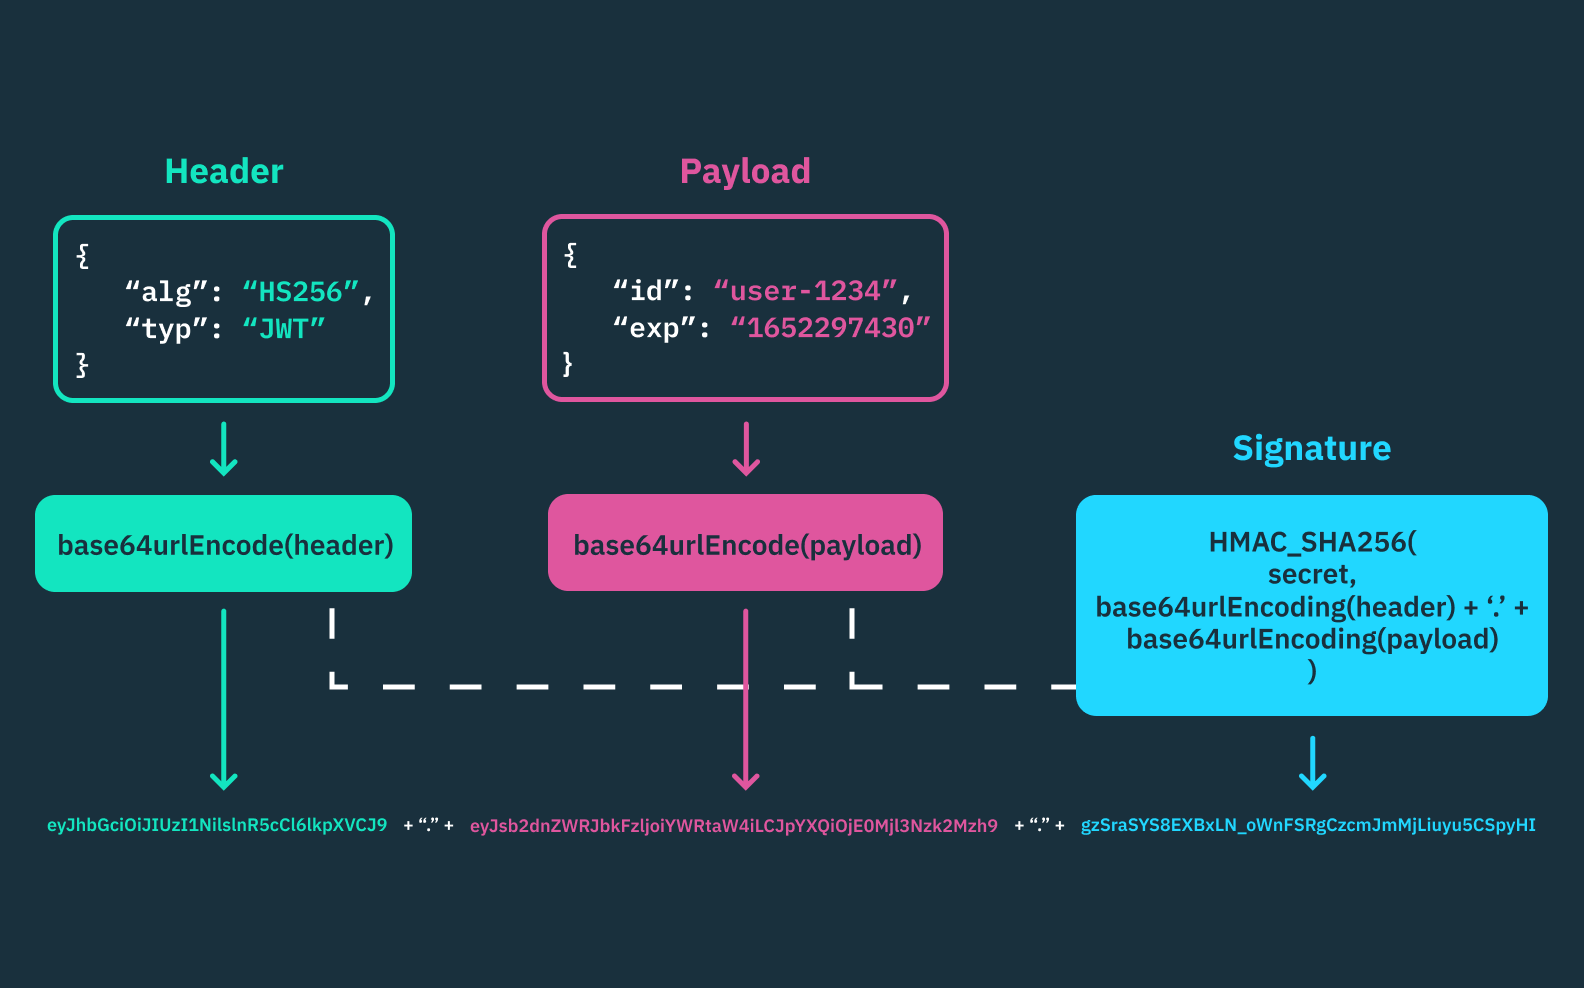
This signature validation process typically involves the following steps:
- When subscribing to a webhook on the provider’s dashboard, some providers allow the consumer to enter a custom secret token, as long as it’s a random string with high entropy. Alternatively, other providers allow the webhook consumer to automatically generate secret keys directly from their dashboard.
- The webhook provider then uses this secret token to create an HMAC (Hash-based Message Authentication Code) signature of the payload using a hashing algorithm like SHA-256, and also includes this signature in the request header (“X-Provider-Signature”).
- Upon receiving the webhook request, the consumer has to calculate the HMAC of the payload using the same hashing algorithm and the shared secret token. Afterward, they can then compare the calculated HMAC with the one received in the header. If the signatures match, the payload is considered legitimate and untampered.
Using HMAC signatures ensures the integrity of every webhook request and prevents unauthorized parties from sending legitimate requests without having access to the shared secret key. It’s more secure than using basic authentication methods because the shared secret is not transported with the request, offering an extra layer of security. However, webhook consumers have to securely store their secret keys and regularly rotate them to maintain integrity.
In addition to HMAC signatures, some webhook providers may use standard protocols like OAuth 2.0 (JWTs and JWKs) to protect the identity of their webhooks. In this approach, the webhook provider authorizes itself against an OAuth authorization server to issue access tokens, which must be validated by the consumer to ensure the request is legitimate.
Logging requests, failures and errors
Whether you’re a webhook provider or consumer, having a robust logging and monitoring system is the only way to find and fix webhook errors in real-time, especially in production. Logging webhook requests and responses create an audit trail that allows you to easily detect what must have gone wrong, where it happened, and make informed decisions on how to debug or investigate the incident.
A comprehensive logging system should record the most important information about each webhook request and response, such as the timestamps for each event, identity information (e.g., IP addresses, hostnames), HTTP status codes, and even error messages.
However, when logging sensitive requests, it's important to limit your log exposure by only showing HTTP status codes in user-facing logs and avoid displaying headers or body content that may contain confidential data.
On the other hand, webhook consumers must be prepared to handle scenarios where incoming webhooks fail, whether it’s due to malformed requests, invalid webhook URLs, or unexpected exceptions. When a webhook consumer encounters an error while processing a request, it's important to return the appropriate status code because providers rely on this status code to determine whether a webhook has been successfully processed or not.
For example, if a consumer returns a 2xx status code (which indicates success) instead of a 4xx or 5xx status code (which indicates an error), the provider may assume that the request was successfully processed and move on to the next webhook, and this can lead to data inconsistencies and missing events.
To mitigate webhook failures, most webhook providers have robust retry systems that can detect failures based on the status code received in the response and resend the failed webhooks according to a predefined retry schedule. By implementing proper error handling, robust retry systems, and comprehensive logging, webhook providers and consumers can ensure the reliability and integrity of their webhook infrastructure, even as the volume of webhook requests scales.
Using message queues and horizontal scaling
When you consume large volumes of webhooks in production, it's easy to exceed your server's capacity if you try to process all the requests simultaneously. If your server receives too many requests at once, it might shut down, and you won't be able to process any more webhooks that your core functionalities may rely on.
To avoid this problem, you can use a message queue that sits between the webhook provider and your server, acting as a buffer. It stores all incoming webhooks and sends them to your server at a rate that won't overload it.
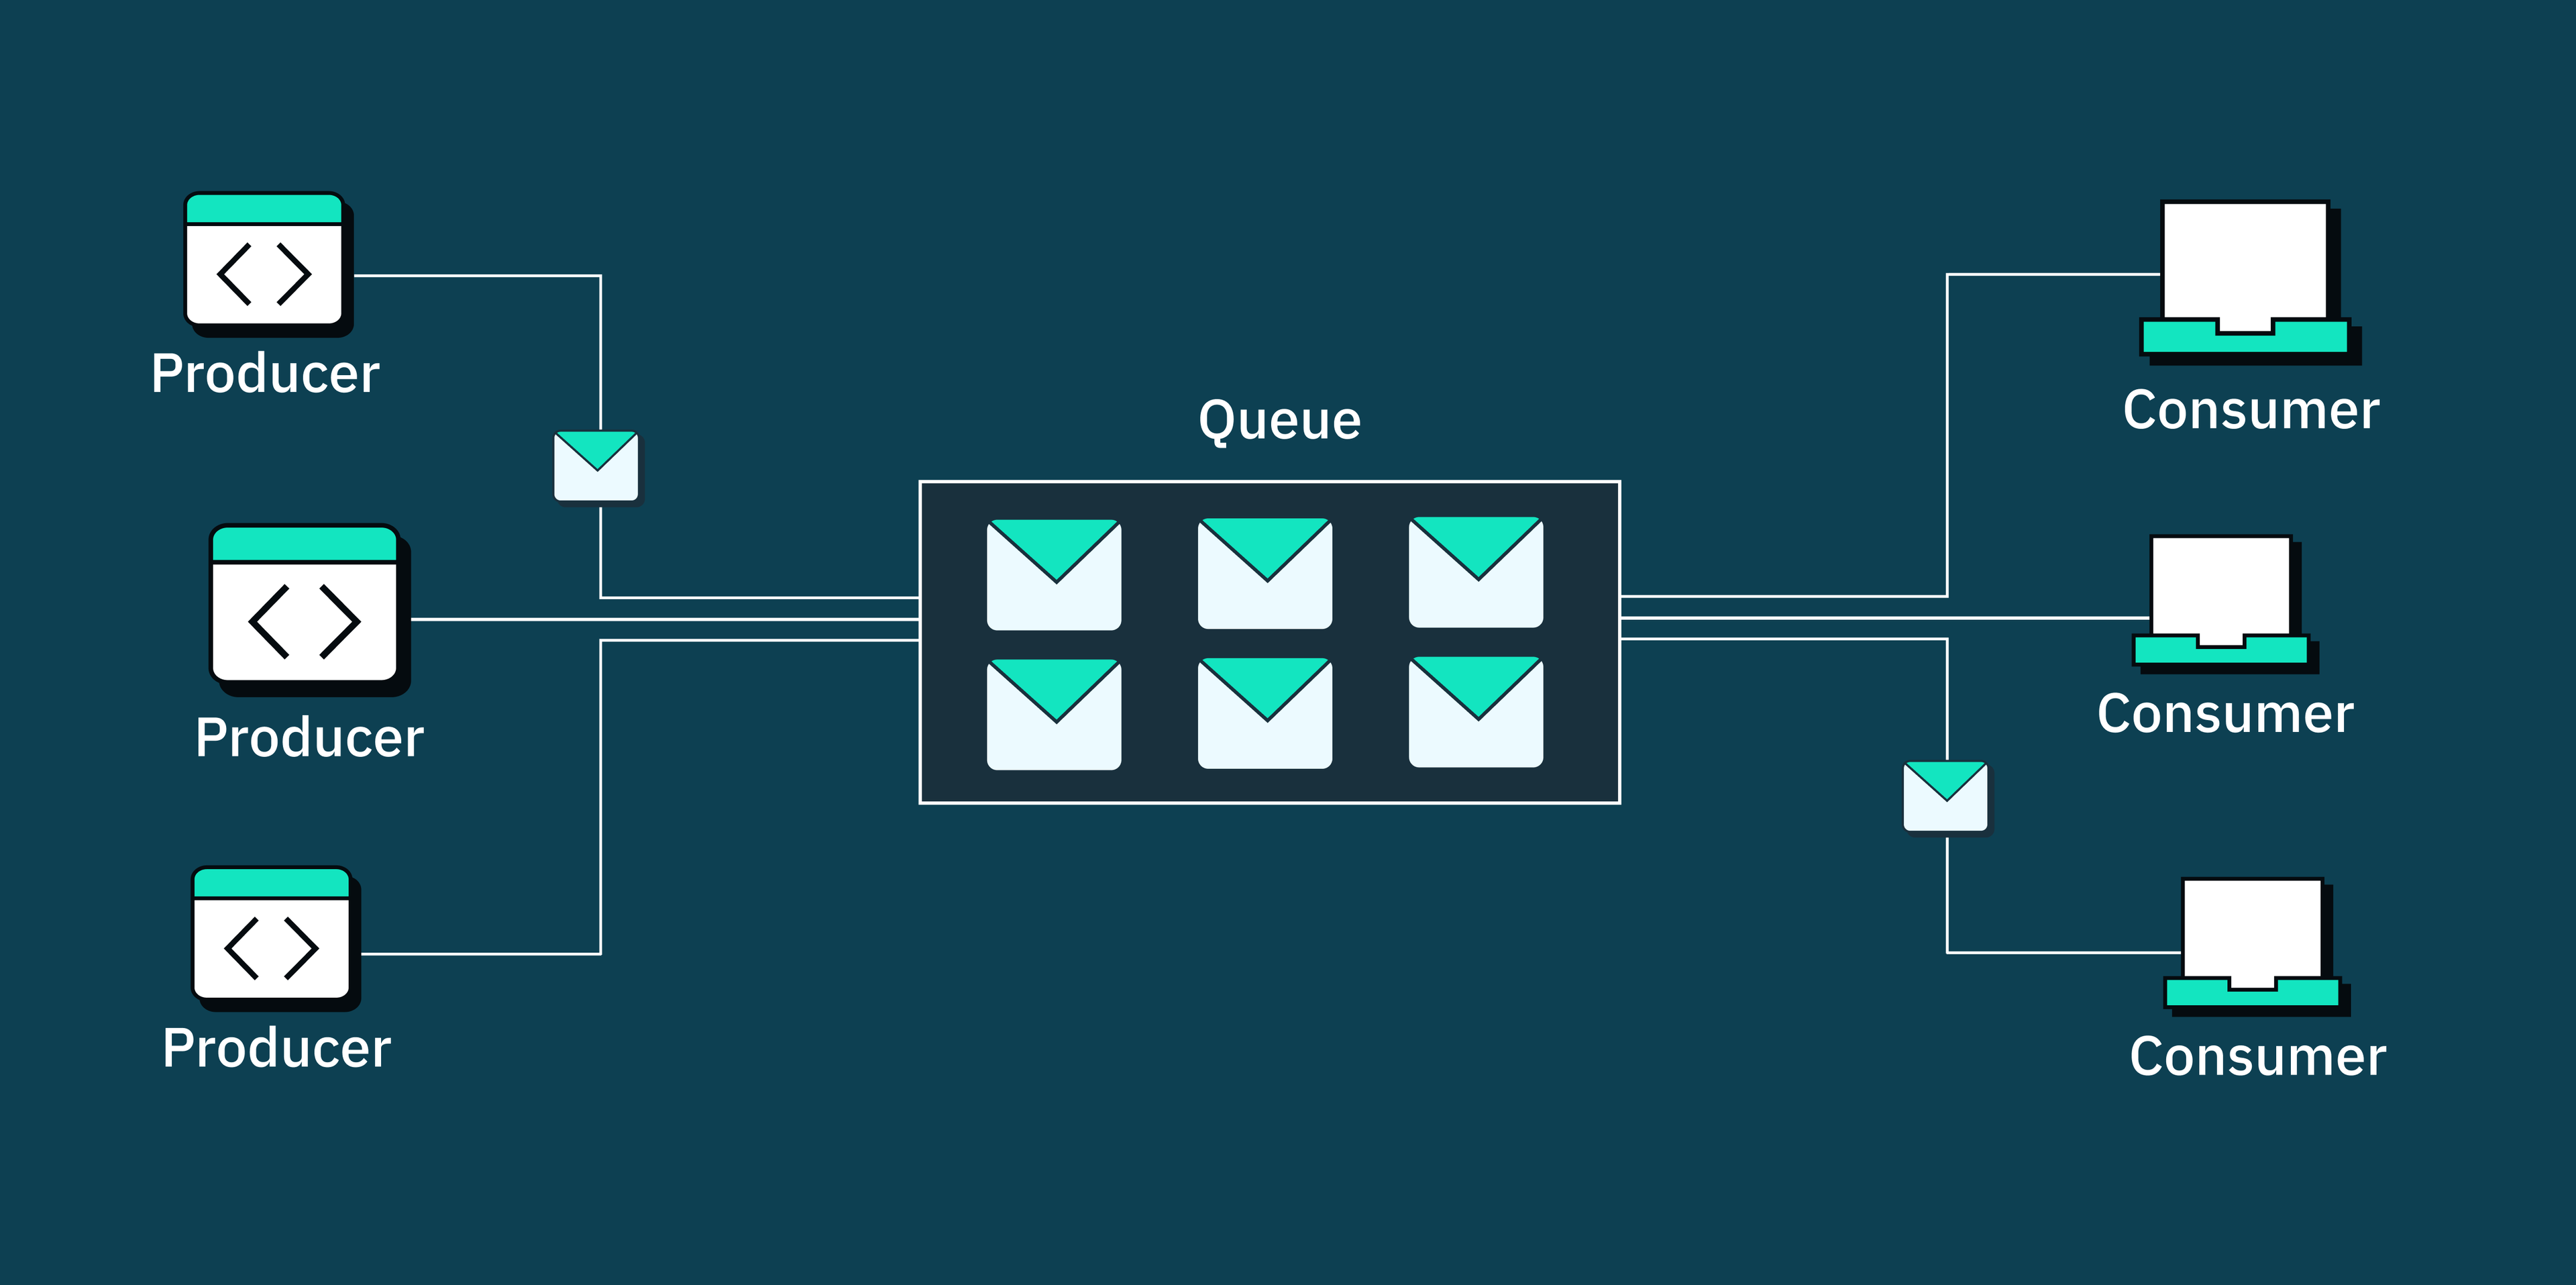
You can set up message queues using tools like RabbitMQ, Apache Kafka, or Google PubSub. These tools allow you to create a robust and scalable queuing system that can handle high volumes of webhook requests. However, it's important to note that implementing a message queue adds an extra layer of complexity to your architecture. As traffic levels increase, you may need to scale your message queue infrastructure to avoid potential bottlenecks and ensure reliable delivery of webhook requests.
In addition to using message queues, horizontal scaling is another effective strategy for handling high webhook traffic. Horizontal scaling involves distributing your incoming webhook requests across multiple copies of your server. By placing a load balancer between the webhook provider and your server pool, you can evenly distribute webhook traffic using various load balancing algorithms, whether it’s round-robin, least connection, or weighted round-robin algos depending on your use case. This approach reduces the burden on any single server and allows you to process a larger volume of webhook requests concurrently.
While it's possible to build and maintain this infrastructure in-house, leveraging webhooks-as-a-service providers like Hookdeck or Svix can greatly simplify this process without you having to worry about writing code or maintaining the architecture. These services sit between your webhook provider and your processing server, queuing up requests and delivering them based on the load your API can handle. They also offer extra features such as request tracing, logging, webhook retries, and error handling, all accessible through an intuitive dashboard and APIs. By using a webhooks-as-a-service provider, you can benefit from a highly performing and scalable webhook infrastructure without the need to maintain complex queuing systems yourself.
How we use webhooks at Stytch
At Stytch, developers leverage our webhook functionality to keep their internal systems up to date with all the changes that occur in their Stytch accounts. As such, when you set up a webhook URL in your Stytch Dashboard, you can choose to receive all events or filter down to the specific events you need at any given time.
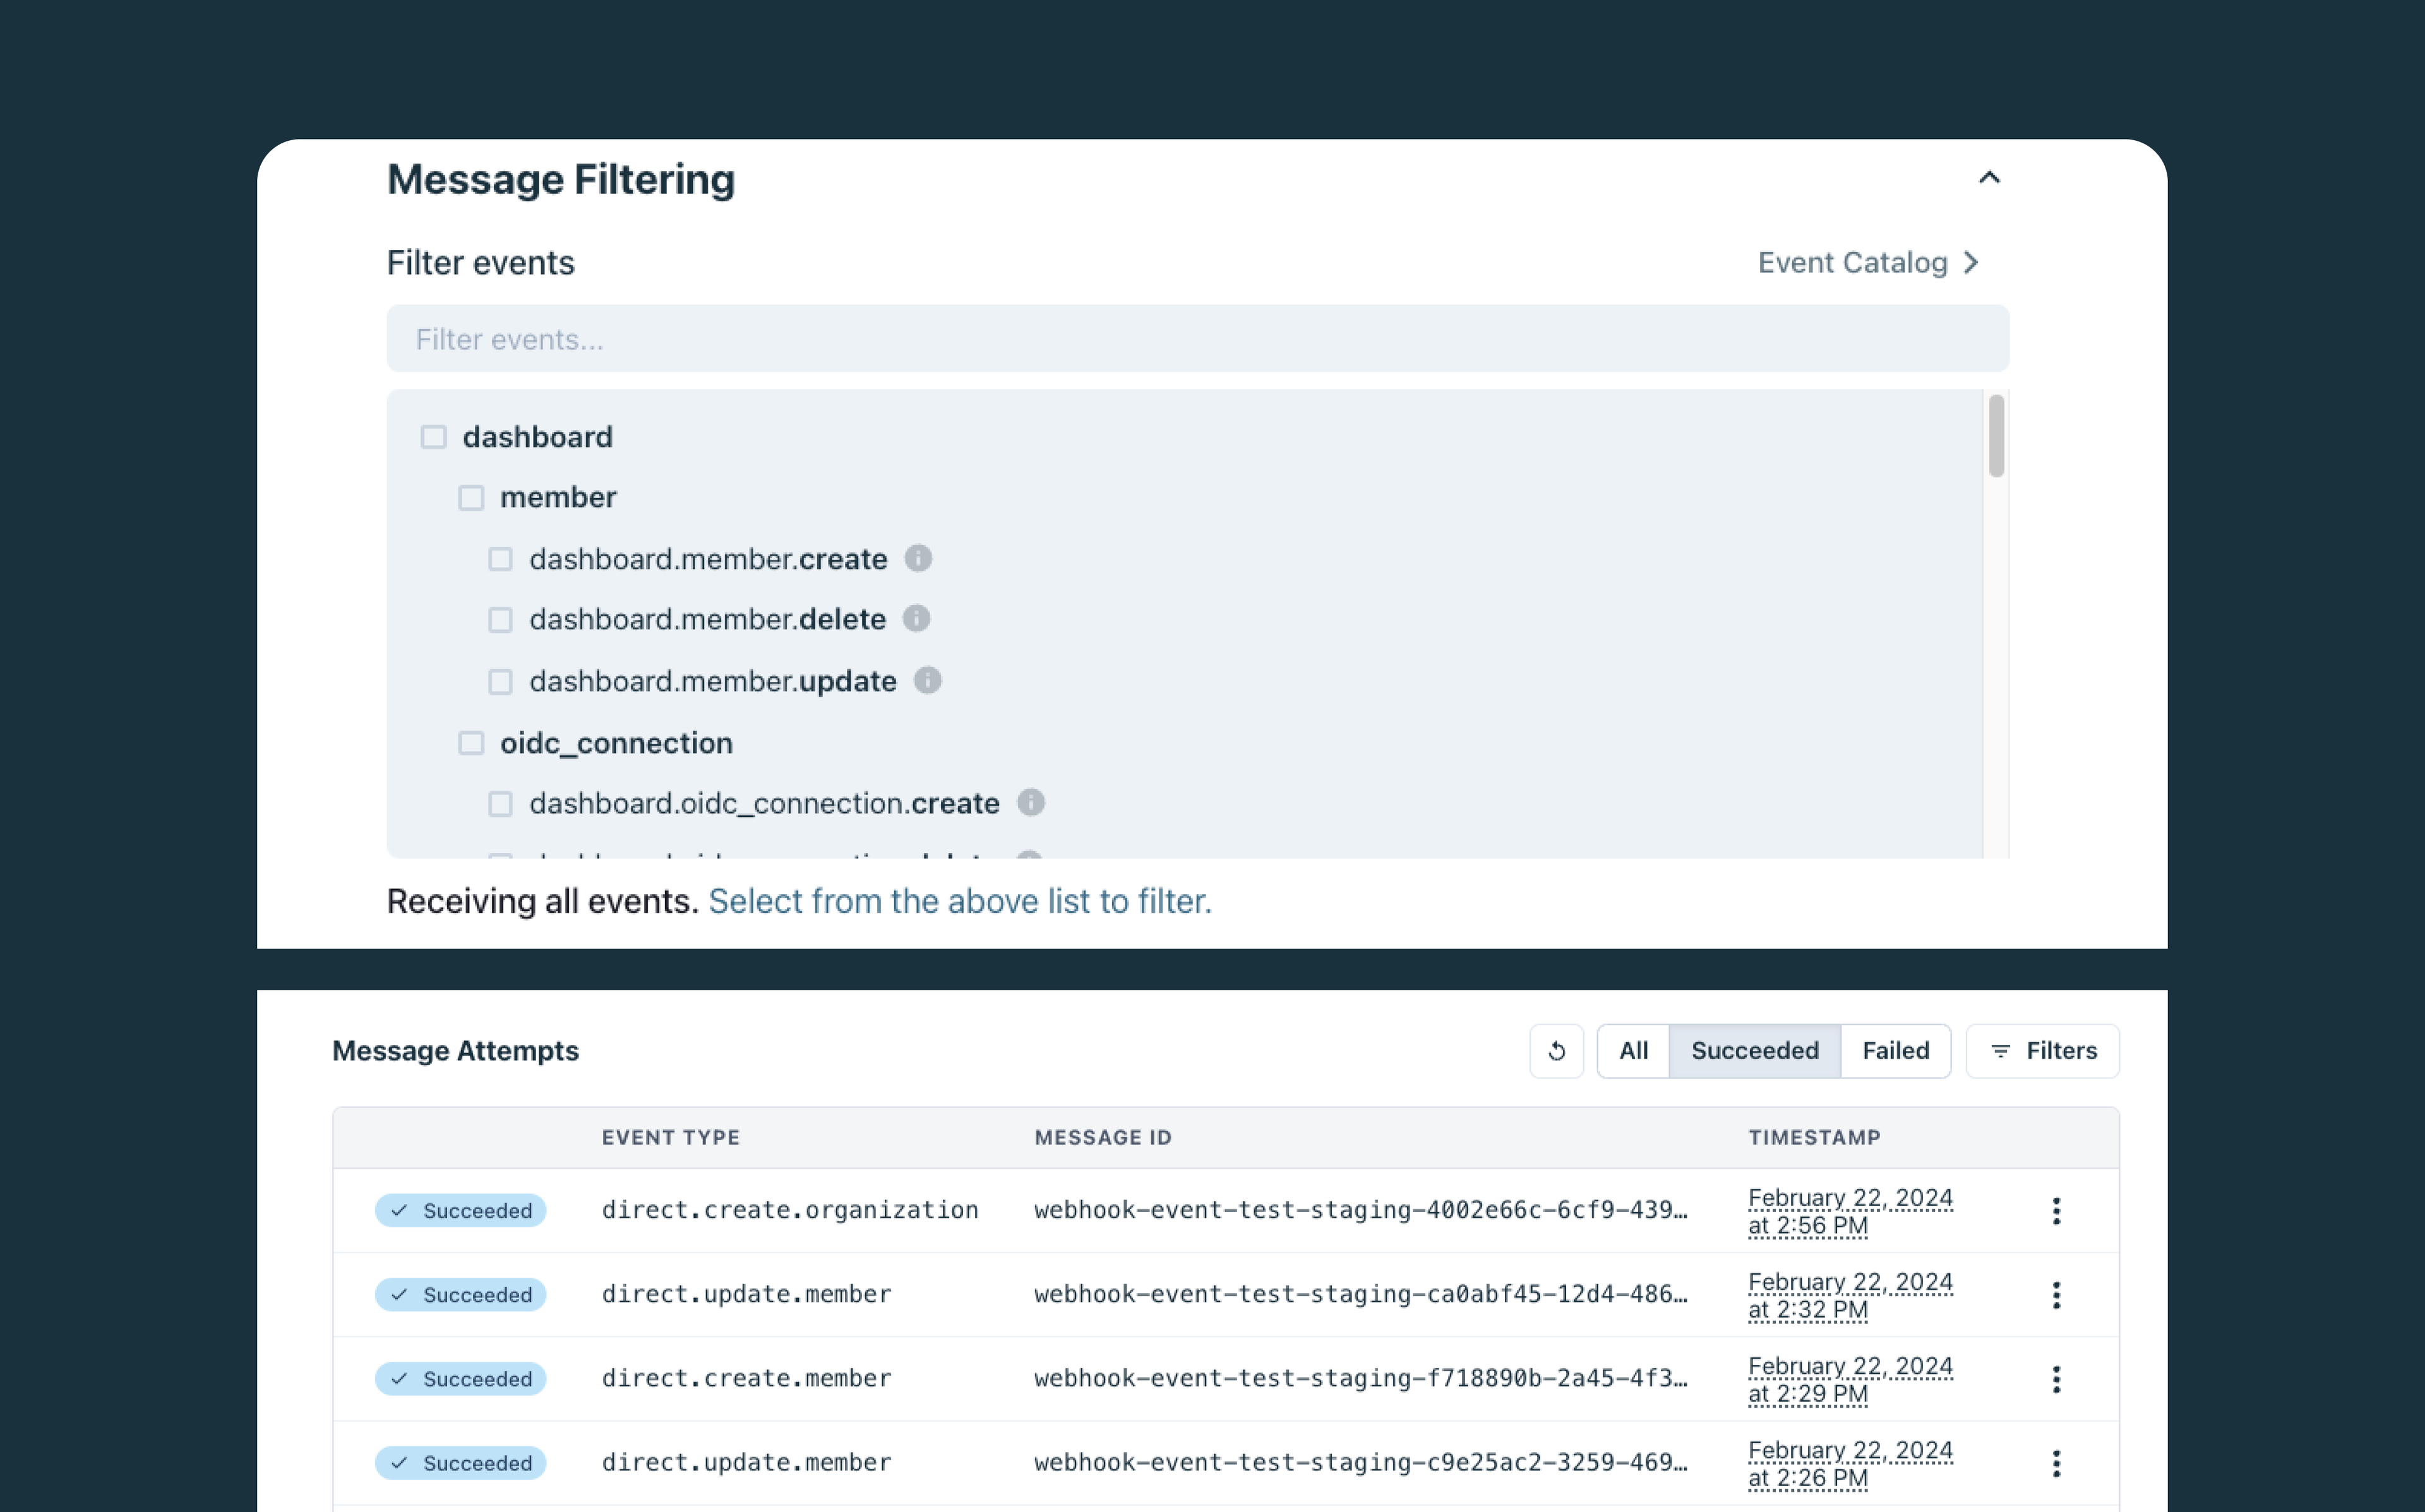
We've designed the naming convention of our webhook event types to be straightforward and informative, making it easy for development teams to understand the context and nature of the events they receive. Our webhook event types are composed of three segments: the origin of the trigger (source), the type of entity being acted upon (object_type), and the type of action taken (action).
These three segments combine to form our standard event type identifier that follows this structure: source.object_type.action. For example, direct.organization.create means an organization was created using our API or SDK, while dashboard.update.member means a member was updated using the Stytch Dashboard.
// Example organization create via dashboard (dashboard.organization.create)
{
    "project_id": "project-live-123-...",
    "event_id": "event-live-123-...",
    "action": "CREATE",
    "object_type": "organization",
    "source": "DASHBOARD",
    "id": "organization-live-123-...",
    "timestamp": "2024-03-07T18:49:32.760777783Z",
    "organization": { ... }
}

// Example update member event via SCIM (scim.member.update)
{
    "project_id": "project-live-123-...",
    "event_id": "event-live-456-...",
    "action": "UPDATE",
    "object_type": "member",
    "source": "SCIM",
    "id": "member-live-123-...",
    "timestamp": "2024-03-07T18:49:32.760777783Z",
    "member": { ... }
}

// Example delete SAML connection event via JS SDK or API (direct.saml_connection.delete)
{
    "project_id": "project-live-123-...",
    "event_id": "event-live-789-...",
    "action": "DELETE",
    "object_type": "saml_connection",
    "source": "DIRECT",
    "timestamp": "2024-03-07T18:49:32.760777783Z",
    "id": "saml-connection-live-123-..."
}
To start receiving webhooks, you need to navigate to the webhooks section in the Stytch Dashboard and click on "Add Endpoint." This is where you'll provide the endpoint URL that Stytch will use to send webhook events to your app. The endpoint you specify should be set up on your server to receive POST requests, as this is how Stytch will send the event payload. However, this feature is only available to Stytch customers who are on the B2B Pro tier or above.
Each webhook event sent by Stytch comes with a payload that contains all the necessary information that will help development teams process and act upon events effectively. The payload includes the Stytch ProjectID associated with the event, a unique UUID for the event itself, the type of action taken, the type of entity affected, the origin or source of the trigger, the UUID of the entity the action was performed on, and an ISO 8601 timestamp indicating when the event was sent by Stytch.
To start building authentication with Stytch, check out our documentation and sign up for a developer account. If you have any questions, please don't hesitate to contact us at support@stytch.com.
Build auth with Stytch
Pricing that scales with you • No feature gating • All of the auth solutions you need plus fraud & risk
Authentication & Authorization
Fraud & Risk Prevention
Resources
Community
© 2020-2026 Stytch. All rights reserved.