Back to blog
An engineer's guide to mobile biometrics: step-by-step
Engineering
May 3, 2023
Author: Dan Loman
In 2013 Apple introduced TouchID, marking the first integration of biometric authentication into a major commercial product. Since then, biometric technology has rapidly accelerated.
As of 2022, 80% of smartphones now have biometrics enabled. Today, biometric technology is the de facto standard for mobile authentication. At Stytch, we uncovered a variety of interesting challenges and oft-overlooked choices when building our mobile biometrics product. Each problem required us to think deeply about security implications, architecture, and mobile development patterns.
This is the first post of a three-part series on mobile biometric authentication. We’ll share what we learned and experienced throughout our development process. This content is intended for engineers or folks interested in diving deeper into mobile biometrics implementation.
In this post, we’ll cover how mobile biometric authentication works end-to-end, how to build it with code examples, and what you need to consider during development.
Part one | An engineer's guide to mobile biometrics: step-by-step
Part two | An engineer's guide to mobile biometrics: event- vs. result-based
Part three | An engineer's guide to mobile biometrics: Android Keystore pitfalls and best practices
Table of contents
What are mobile biometrics
Why use mobile biometrics
How mobile biometrics work as an auth factor
How to build mobile biometric auth with example code
What else you need to know
A great authentication choice
What are mobile biometrics?
In the field of authentication, we generally talk about auth factors as breaking down into three categories:
- Something-you-know (SYK)
- Something-you-have (SYH)
- Something-you-are (SYA)
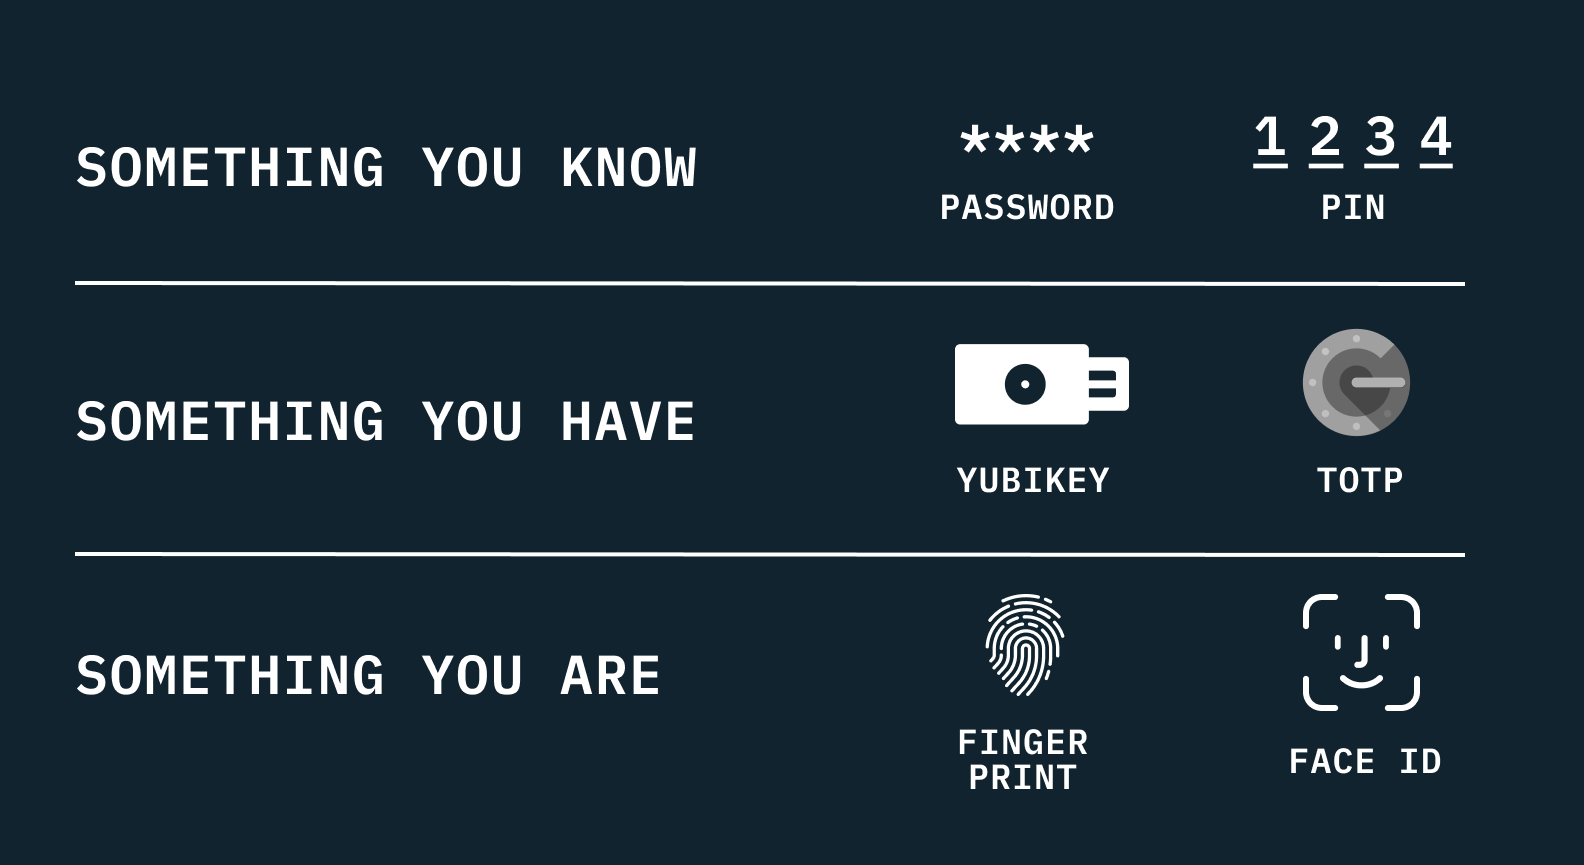
Historically, digital authentication has relied heavily on something-you-know in the form of passwords and PINs. More recently, something-you-have has also become a common tool via the introduction of devices like YubiKeys and auth methods like TOTP.
Though biometrics have existed in some form for a number of years now — think fingerprint readers, iris scanning tools, DNA testing — these “something-you-are” technologies were predominantly an expensive on-premise tool used for the highest levels of security or the futuristic props of sci-fi movies. But with the advent of smartphones, biometrics have become widely accessible to everyday technology users.

A biometric fingerprint scan is used to get into one’s home in Total Recall (1990), a science fiction film
If you want a comprehensive history and high-level overview of biometrics, also check out our All about biometrics post.
Why use mobile biometrics?
Biometrics are generally an ideal authentication tool for both companies and their users: they are fast, easy to use, and are highly resistant to attacks from bad actors. Users love the speed and ease of use as they allow them to do what they want quickly (vs. spending extra time authenticating) and without trying to remember the complex password they were forced to enter when signing up. Businesses, by the same token, want their users to spend time in their applications utilizing or purchasing their products and want to avoid the conversion issues associated with many other authentication factors.
Both users and businesses appreciate the higher levels of security associated with biometrics. Not only are biometrics great in the ways listed above, they are also highly useful because users tend to have their smartphone (a portable biometric reader) everywhere they go.

That said, as the general populace has used biometrics more often, minor inconveniences have become more obvious — namely the fact that, due to the nature of how this information is stored (more on this later), biometrics are limited to the specific device on which they’ve been registered.
If a user switches from their iPhone to an unregistered device like their iPad or to their Macbook, they will have to authenticate through other means like username/password (yuck) and re-register biometrics on that device. In addition to its benefits, an engineer must account for all the pitfalls and inconveniences when implementing mobile biometrics for primary authentication.
A note: passkeys provide the benefits of biometrics while circumventing the historic device-specific limitations of mobile biometrics, and as a result are gaining traction.
How mobile biometrics work as an auth factor
Biometrics on mobile devices work by locally storing a user’s biometric data, like a fingerprint or face scan. This is stored and managed by the operating system, and your biometric data never actually leaves the device. Because biometric data is never transferred over the wire, users needn’t be concerned about a man-in-the-middle attack wherein a bad actor could steal their biometric data and later use that to authenticate as that user. The operating system uses these scans to confirm “device ownership” at the time of need via a biometric prompt where the user’s face/finger is compared to the stored value. The system can use the result of this biometric check in one of two ways:
- To return a verdict of pass or fail, acting like a gatekeeper.
- To return some form of associated data like a credential or cryptographic key.
This choice has major security architecture implications (which we will cover in depth in the next article of this series). In many cases, you’ll want to go with the second route of storing data behind the biometrics prompt (which is the route we’ve chosen here at Stytch), because it strengthens security by requiring additional user interaction in order to use the associated data. After making a decision, you must also determine what kind of data you want the system to store behind the prompt. Your options are generally between:
- Storing credentials themselves (username/password), or
- Storing an asymmetric key pair so the device can perform public key authentication with the server (challenge/signature).
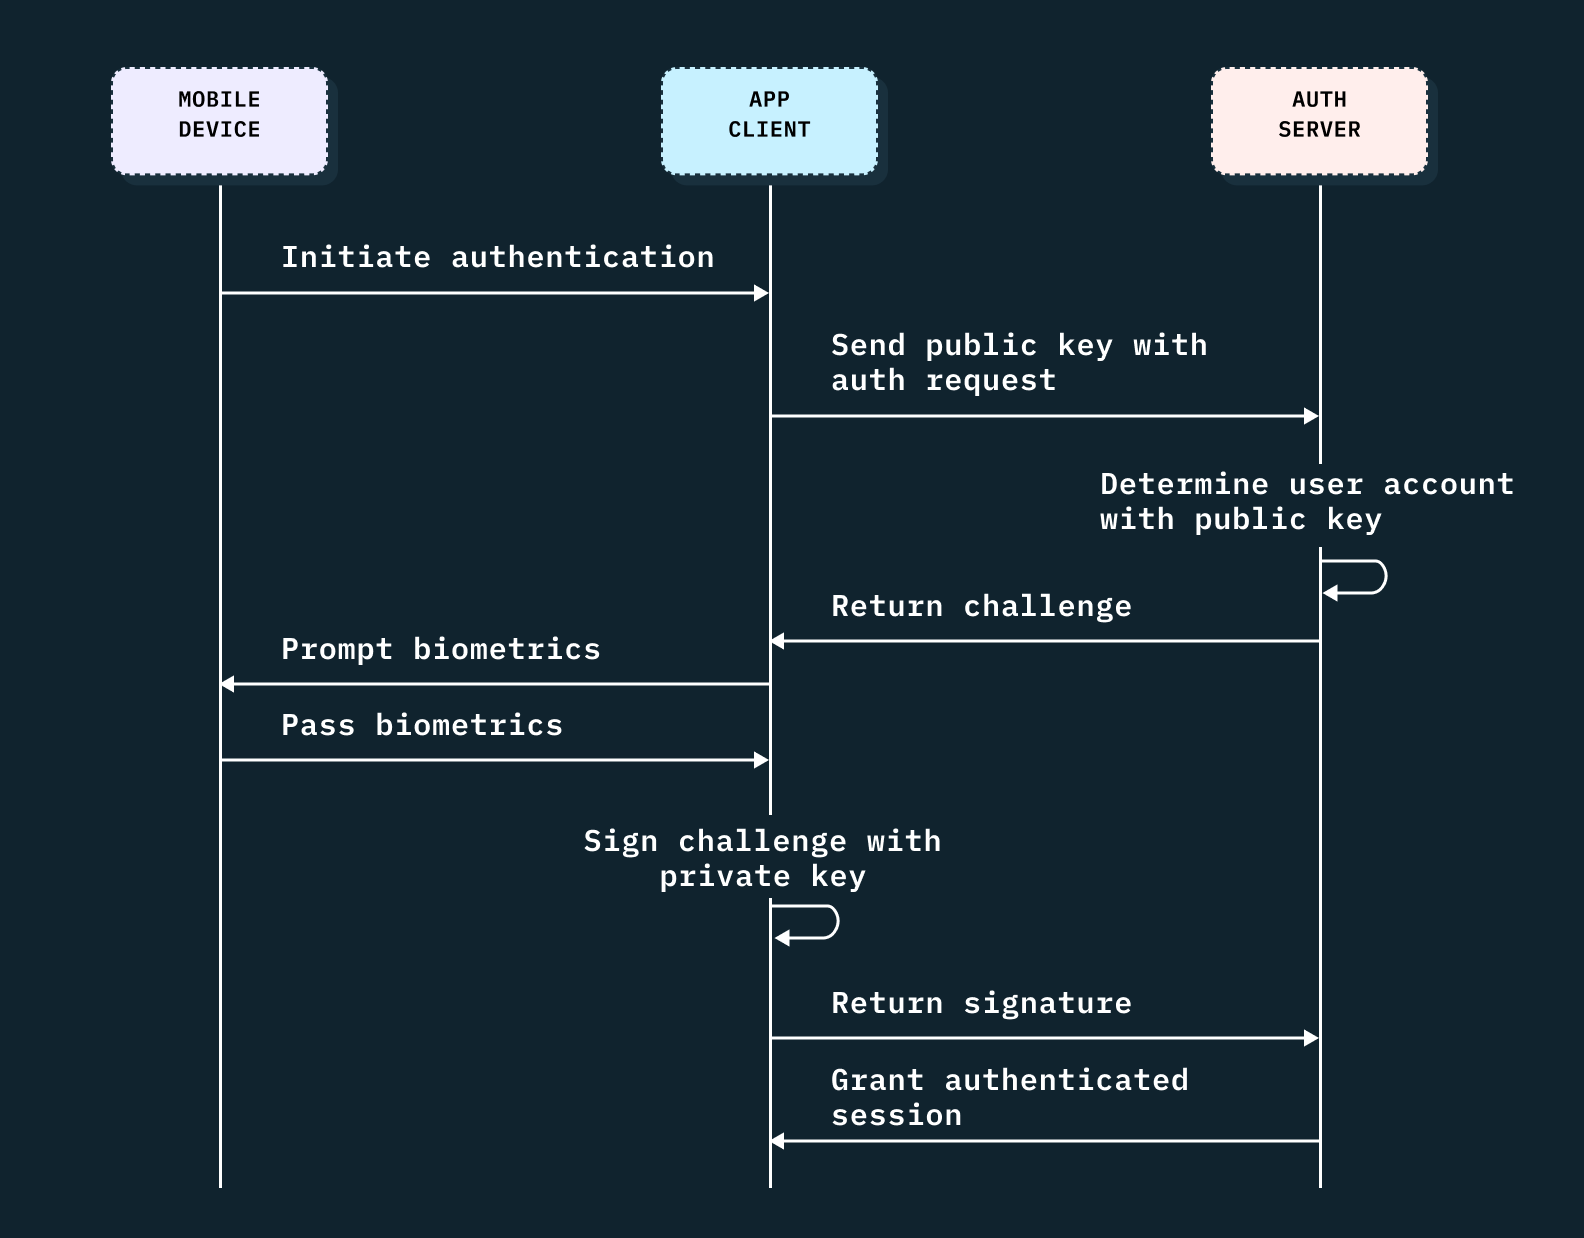
At Stytch, since we are an auth platform that offers customers myriad authentication options, we can’t guarantee that a user will consistently have credentials like a username and password. Because of this, we chose instead to provide the ability to register a public key for a given user and utilize public key authentication as the backing mechanism to power our biometrics product. In practice, the full end-to-end mobile biometric authentication flow looks something like this:
How to build mobile biometric authentication with example code
To implement biometric authentication on iOS, we can walk through the following example code step-by-step:
- The first thing you’ll need to do when you initiate authentication is retrieve the data stored with your key, in this case by calling
'keychainClient.get(privateKeyRegistration)'. In this example we’ve stored a single private key for biometric authentication behind a `.deviceOwnerWithBiometrics` access policy. This forces the system to challenge the user with a biometric prompt prior to returning the associated data. - After we’ve retrieved the data, which is an array of bytes representing the private key, we can use that to derive the public key.
'cryptoClient.publicKeyForPrivateKey(privatekey)'. - We can then send the public key to our server to allow the backend to look up the user associated with the public key and return a challenge for the client to sign.
- Upon receiving the challenge, we can sign it with the private key,
'cryptoClient.signChallengeWithPrivateKey(startResponse.challenge, privateKey)', and return the signature to our servers in a final `authenticate` call. - Once the server can verify the signature is valid, it can issue a session for that user and return the session information in the response.
// Swift syntax
public func authenticate(parameters: AuthenticateParameters) async throws -> AuthenticateResponse {

    // step one
    guard let queryResult: KeychainClient.QueryResult = try keychainClient.get(.privateKeyRegistration).first else {
        throw StytchError.noBiometricRegistrationsAvailable
    }

    // step two
    let privateKey = queryResult.data
    let publicKey = try cryptoClient.publicKeyForPrivateKey(privateKey)

    // step three
    let startResponse: AuthenticateStartResponse = try await router.post(
        to: .authenticate(.start),
        parameters: AuthenticateStartParameters(publicKey: publicKey)
    )

    // step four and five
    return try await router.post(
        to: .authenticate(.complete),
        parameters: AuthenticateCompleteParameters(
        signature: cryptoClient.signChallengeWithPrivateKey(startResponse.challenge, privateKey),
        biometricRegistrationId: startResponse.biometricRegistrationId,
        sessionDurationMinutes: parameters.sessionDuration
        )
    )
}
What else you need to know
Once you understand the overall mobile biometric auth flow, you’re ready to get into the weeds. To actually implement mobile biometrics, you’ll also need to factor in a few important decisions during development.
1. Choosing a signing algorithm
When you’ve settled in on using public-key cryptography, you’ll notice there are many algorithms and curves to choose from, leaving you with yet another difficult choice.
Generally the industry is moving away from RSA and DSA and toward misuse resistant and deterministic elliptical-curve-based signature schemes. These are not areas where you want to roll your own solution, so you should leverage hardened libraries provided by the system or by an industry supported vendor and maintainer.
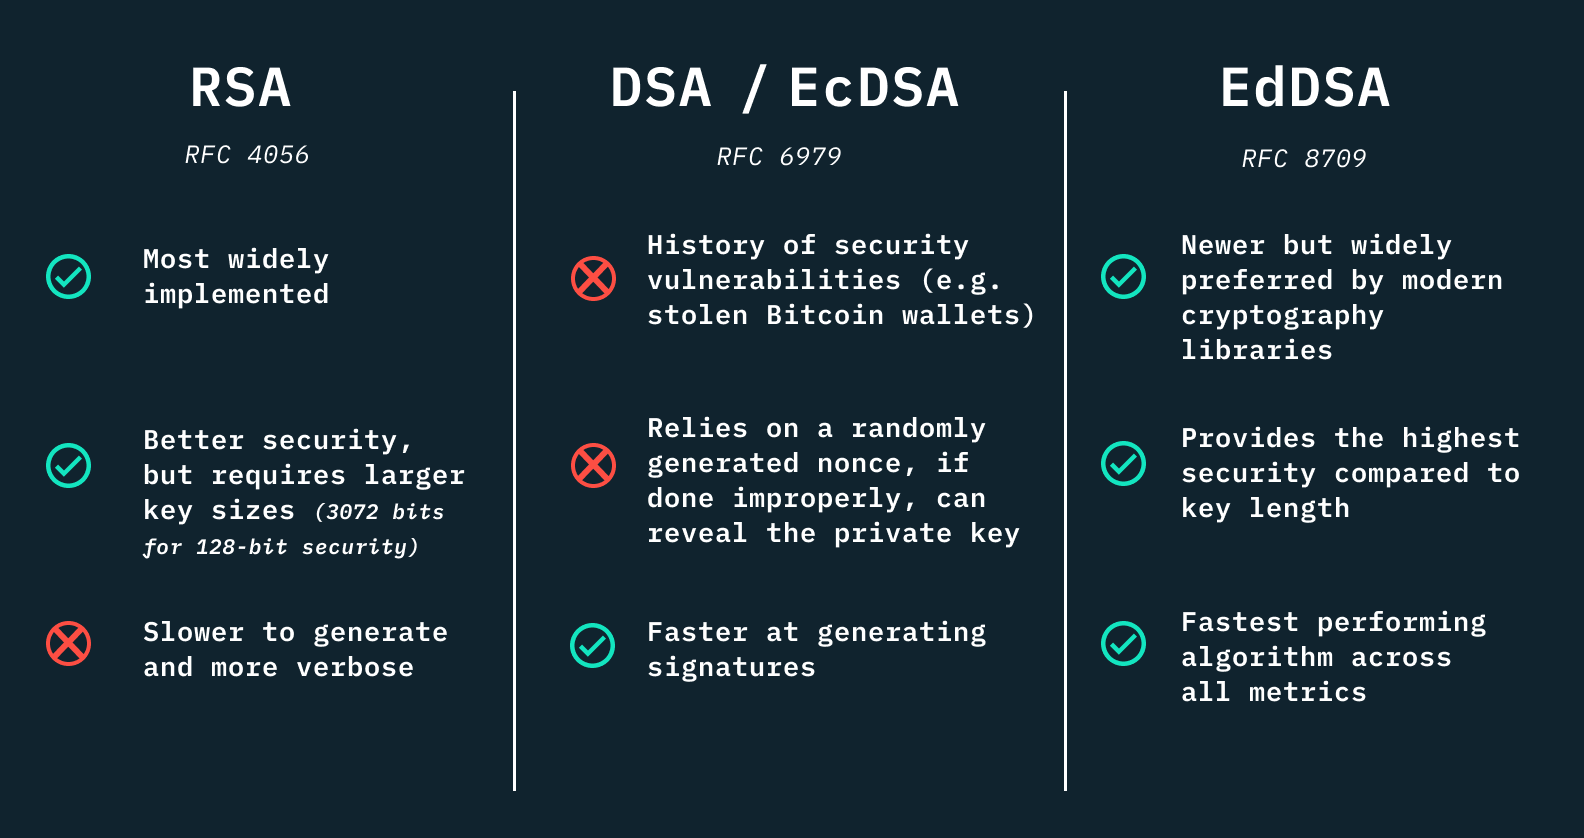
RFC sources for each signature family: RFC 4056, RFC 6979, and RFC 8709
For this reason, Stytch chose Ed25519 signatures, from the family of EdDSA signature schemes. We utilize the system-provided CryptoKit library on iOS andindustry-trusted BouncyCastle library on Android.
2. Falling back to the device PIN code
As was mentioned above, the operating system treats biometrics as a means of determining device ownership. There is, however, an alternative way to confirm device ownership — namely falling back to the device PIN code.
For the purposes of biometric authentication, we must choose whether we believe the PIN code is sufficient to access the data secured by biometrics. To explore this further, let’s think about certain scenarios a user might encounter:
Imagine a user is on a roadtrip with friends and their phone is playing music for the car. The device owner may choose to share their PIN with their friend to allow them to adjust the music. They are likely OK with providing access to their music player; however, there’s a good chance they’d frown if that same PIN gave their friend full access to their banking app.
You can imagine a similar situation with a parent providing their young child with the PIN to their phone — similarly, they would likely want to restrict their child from being able to make expensive purchases with their PIN.
At Stytch, we’ve chosen to default to proof of device ownership with biometrics, with the ability to override this choice if it’s safe for their application to do so. We want our customers to make the safe choice by default and allow overriding that default only if they’ve explicitly decided that falling back to PIN is a safe choice for their data and their application.
// You can omit `accessPolicy:` which will use a default value of `.deviceOwnerAuthenticationWithBiometrics`, or you can do the following to allow falling back to a device PIN
let registerResponse = try await StytchClient.biometrics.register(parameters: .init(idenfitier: email, accessPolicy: .deviceOwnerAuthentication))
As general guidance here, access to financial, medical, and other sensitive info should almost certainly stick with the more secure default choice. In cases where an application is storing less sensitive data, and a streamlined fallback like device PIN is desirable for ease of use or conversion reasons, that may be a case where overriding the default is a good option to consider.
Want mobile biometrics for your app? Switch to Stytch.
Pricing that scales with you • No feature gating • All of the auth solutions you need plus fraud & risk
3. Local storage and operating systems
Whether you are storing credentials or asymmetric key pairs, the data stored in these transactions are sensitive and need to be persisted in some form of secure storage. The local storage options and details will be specific to the operating system your application is running on (or the framework you’re using as a go between); namely, iOS and Android, or React Native.
iOS
On iOS, this choice is straightforward: the Keychain is the tried and true method of securely storing small bits of data on behalf of the user. Not limited to just passwords, the Keychain can not only save information a user explicitly cares about, such as credit card information, but also items the user needs but may not be aware of, like the cryptographic keys we need to enable secure communication for our mobile biometric authentication flow.
public func register(parameters: RegisterParameters) async throws -> RegisterCompleteResponse {
    let (privateKey, publicKey) = cryptoClient.generateKeyPair()
    let startResponse: RegisterStartResponse = try await router.post(
        to: .register(.start),
        parameters: RegisterStartParameters(publicKey: publicKey)
    )
    let finishResponse: Response = try await router.post(
        to: .register(.complete),
        parameters: RegisterFinishParameters(
            biometricRegistrationId: startResponse.biometricRegistrationId,
            signature: cryptoClient.signChallengeWithPrivateKey(
                startResponse.challenge,
                privateKey
            ),
            sessionDuration: parameters.sessionDuration
        )
    )
    let registration: KeychainClient.KeyRegistration = .init(
        userId: finishResponse.user.id,
        userLabel: parameters.identifier,
        registrationId: finishResponse.biometricRegistrationId
    )
    try keychainClient.set(
        key: privateKey,
        registration: registration,
        accessPolicy: parameters.accessPolicy.keychainValue
    )
    return finishResponse
}
ANDROID
On Android, however, the choice is a bit more complicated. The Android landscape is much more fragmented since there are multiple options for storage (flat file stored in sandbox, preferences, or database). Some secure guarantees may not hold up on certain devices or versions of Android. A good option that works safely and consistently (and the option we’ve chosen here at Stytch) is to use SharedPreferences in conjunction with the Keystore. You can generate and use a key from the Keystore to encrypt the data stored in shared preferences, and can manage access to encryption Keystore keys to ensure they are secured via biometrics.
val (publicKey, privateKey) = EncryptionManager.generateEd25519KeyPair()
val encryptedPrivateKeyBytes = cipher.doFinal(privateKey.toBase64DecodedByteArray())
val encryptedPrivateKeyString = encryptedPrivateKeyBytes.toBase64EncodedString()
val startResponse = api.registerStart(publicKey = publicKey).getValueOrThrow()
val signature = EncryptionManager.signEd25519Challenge(
    challengeString = startResponse.challenge,
    privateKeyString = privateKey
)

api.register(
    signature = signature,
    biometricRegistrationId = startResponse.biometricRegistrationId,
    sessionDurationMinutes = parameters.sessionDurationMinutes,
).apply {

    if (this is StytchResult.Success) {
        storageHelper.saveValue(
        LAST_USED_BIOMETRIC_REGISTRATION_ID,
        startResponse.biometricRegistrationId
    )

    storageHelper.saveValue(PRIVATE_KEY_KEY, encryptedPrivateKeyString)
    storageHelper.saveValue(CIPHER_IV_KEY, cipher.iv.toBase64EncodedString())
    storageHelper.saveBoolean(ALLOW_DEVICE_CREDENTIALS_KEY, parameters.allowDeviceCredentials)
    }

    launchSessionUpdater(dispatchers, sessionStorage)
}
REACT NATIVE
React Native, given it covers both iOS and Android, has to consider both of the scenarios described above. You may be able to utilize existing libraries which abstract these concerns, though if these don’t meet your needs, you can also create your own “native module” and handle platform-specific code in a more custom manner.
At Stytch, we decided to go down this path and to leverage slightly-modified versions of our iOS and Android solutions in a custom native module.
A great authentication choice
When it’s all said and done, it’s difficult to come up with an authentication flow use case where biometrics would not be a good choice for your application. It’s convenient, easy to use, and is both safe and trusted by consumers.
Next up in the series, we’ll break down the two different mobile biometric architectures that use the application sandbox. This choice of architecture, which we alluded to earlier in the How mobile biometrics work as an auth factor section, has a major security impact on mobile biometrics.
Not ready to build mobile biometrics from the ground up? Try Stytch’s mobile SDKs for iOS, Android, or React Native, and get started with mobile biometrics with just a few lines of code.
Check out our career page if solving problems and reading topics like this interest you!
Authentication & Authorization
Fraud & Risk Prevention
Resources
Community
© 2020-2026 Stytch. All rights reserved.