Back to blog
Log in with Passkeys: an example app using React and Stytch’s frontend SDK
Engineering
Product
Dec 5, 2023
Author: Stytch Team
Today, Stytch launched Passkeys with the most complete and intuitive developer toolkit available. Our Passkeys offering includes:
- REST API endpoints
- Backend SDKs for Go, Ruby, Python, and Node.js
- Mobile SDKs for Android, iOS, and ReactNative
- Frontend SDKs for vanilla JavaScript, React, and Next.js
- Pre-built UI components that can be easily configured and customized
For those unfamiliar, passkeys are a biometrics-based, phishing-resistant, replacement for passwords. They are already being used by industry leaders such as Google, Github, Amazon, Uber, Shopify, LinkedIn and more.
For developers, it’s essential to implement the most secure and convenient authentication methods – like passkeys – for your applications to protect your users’ account while still delivering a frictionless user experience. However, passkeys implementation can be quite complicated, and developers need tools they actually like working with and solutions that will integrate with their architectures. This is where Stytch steps in, empowering developers to easily build passkey-based authentication flows into any stack or code base.
In this article, we’ll walk you through a React example app that can log in users in with passkeys, powered by the Stytch frontend SDK and its pre-built UI components. We’ll focus on the key steps and important parts of the app’s code, including:
- The developer environment.
- The React app structure.
- The login page for authenticating with passkeys.
- The dashboard page where you can register and manage your passkeys.
The full example app code is open-sourced and available on Github.
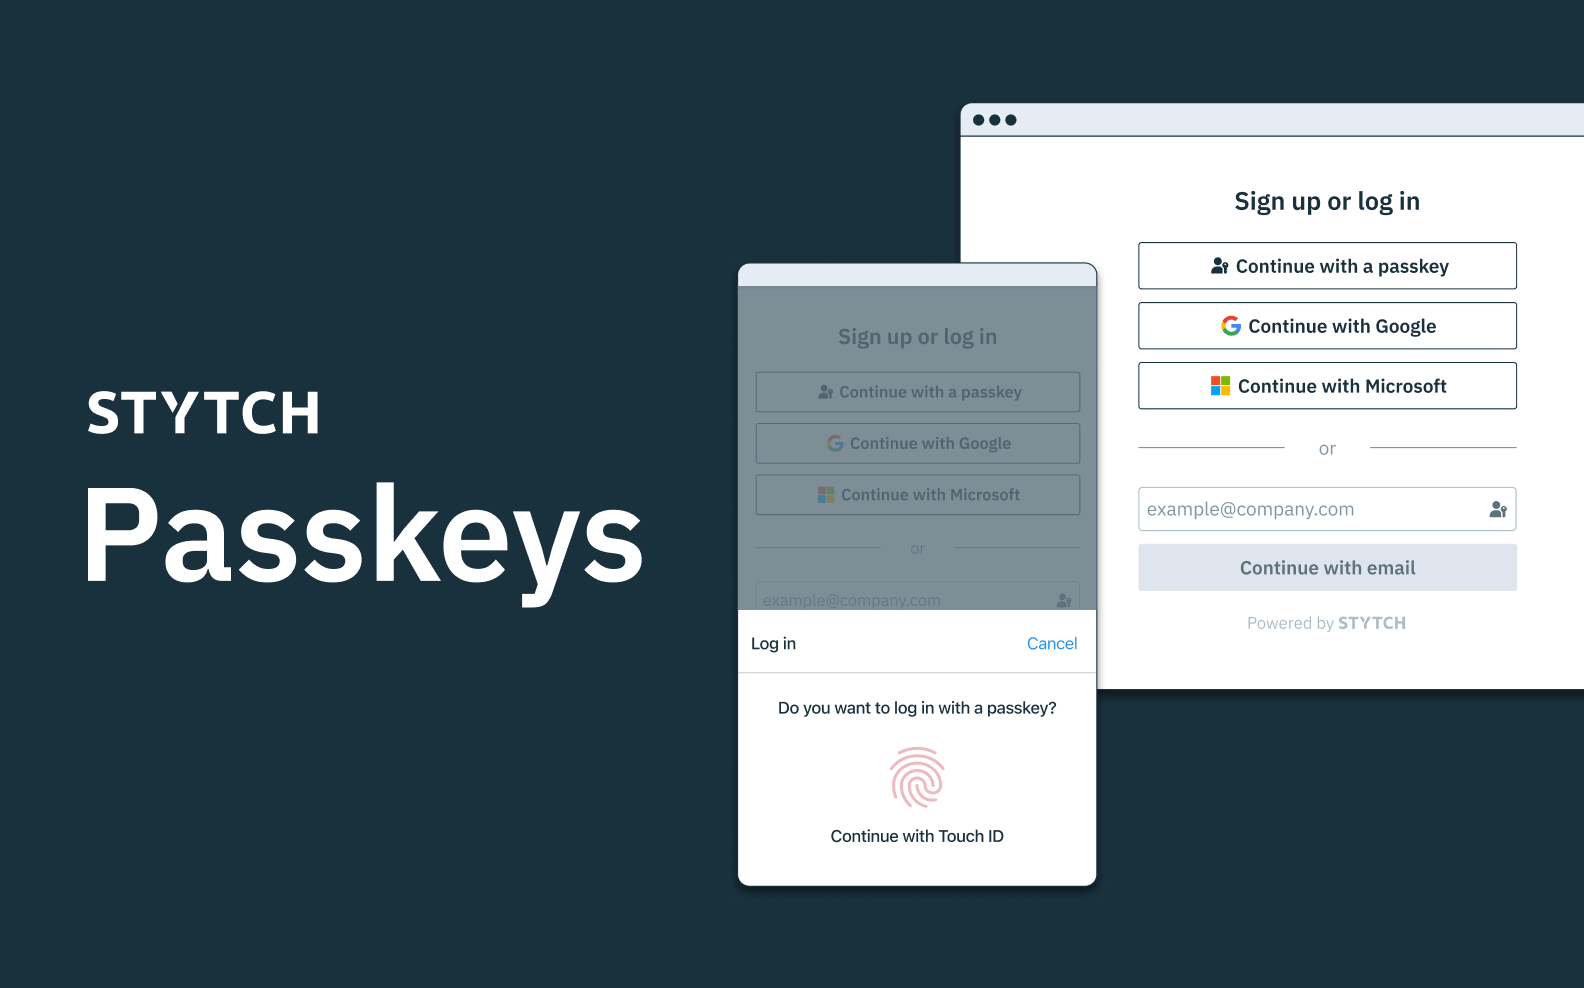
A sneak preview of Passkeys in action
Before diving, let’s take a peek at what the end-to-end flow looks like. Here is a demo video of our example web application showing the seamless login experience of passkeys across various devices.
Try passkeys for yourself and explore the live demo app hosted at https://stytch-passkey-demo.app.
Setting up the developer environment
Prerequisites
If you want to follow along and run the example app on your machine, make sure you have the following set up:
- A Stytch account. If you don’t have one, sign up to get your API keys.
- A Stytch Consumer Authentication Project.
- Node.js installed.
Clone the example app
Run the following commands in the terminal to clone the example app repo. The example app was bootstrapped with create-react-app and has a similar folder structure.
git clone https://github.com/stytchauth/stytch-passkey-react-node-example-app.gitNext, install the dependencies at the example app’s root directory and ./server directory.
cd stytch-passkey-react-node-example-app
npm i
cd server
npm i
Get your Stytch API credentials and enable the SDK
Log in to your Stytch account. If you don’t have one already, create a Consumer Authentication project.
In the Dashboard, click Frontend SDKs under the Configuration section of the sidenav. Then click Enable SDK in Test. We’ll be using the Project’s Test environment, but the steps are identical if you want to use the Live environment.
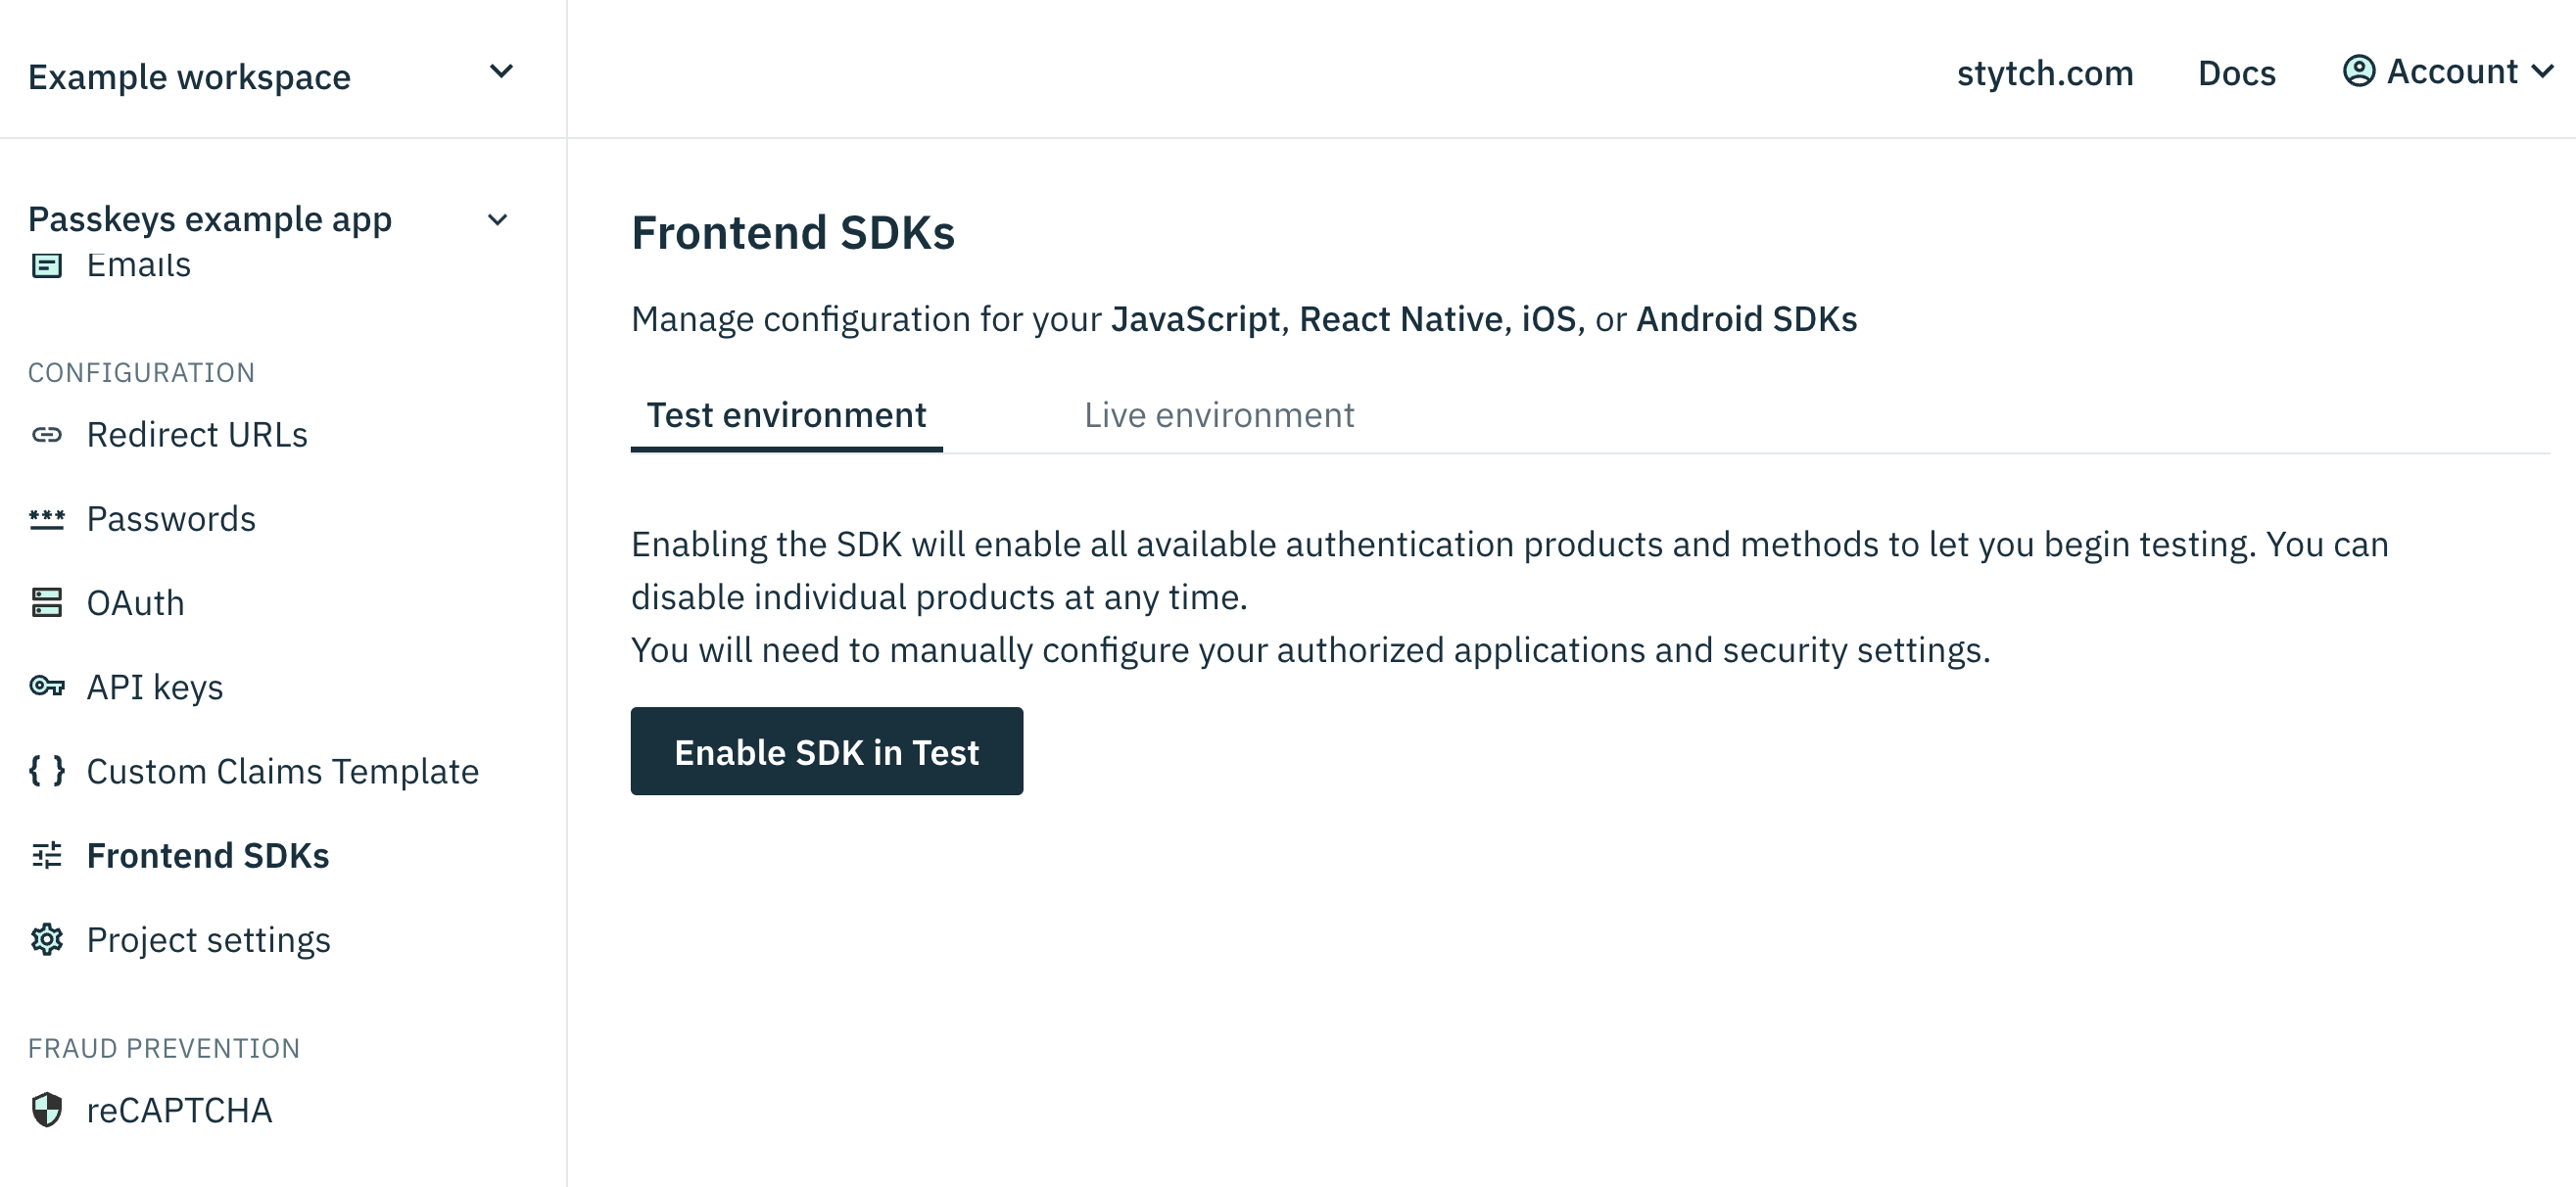
By default, the SDK settings will have localhost:3000 as an authorized domain – which is the port we’ll use to run our React example app. Under Authentication products, make sure the WebAuthn toggle is on and enabled.
Navigate to API Keys in the sidenav and copy your Project’s credentials: the project_id, secret, and public_token. Create a .env.local file and populate the fields with your Project’s credentials with the following key value format:
# this is what a completed .env.local file will look like
REACT_APP_STYTCH_PUBLIC_TOKEN={PUBLIC_TOKEN}
STYTCH_PROJECT_ID={PROJECT_ID}
STYTCH_SECRET={SECRET}

# Ports for the frontend and backend servers
PORT=3000
SERVER_PORT=3001
Running the example app locally
After completing all the setup steps above the application can be run with the command:
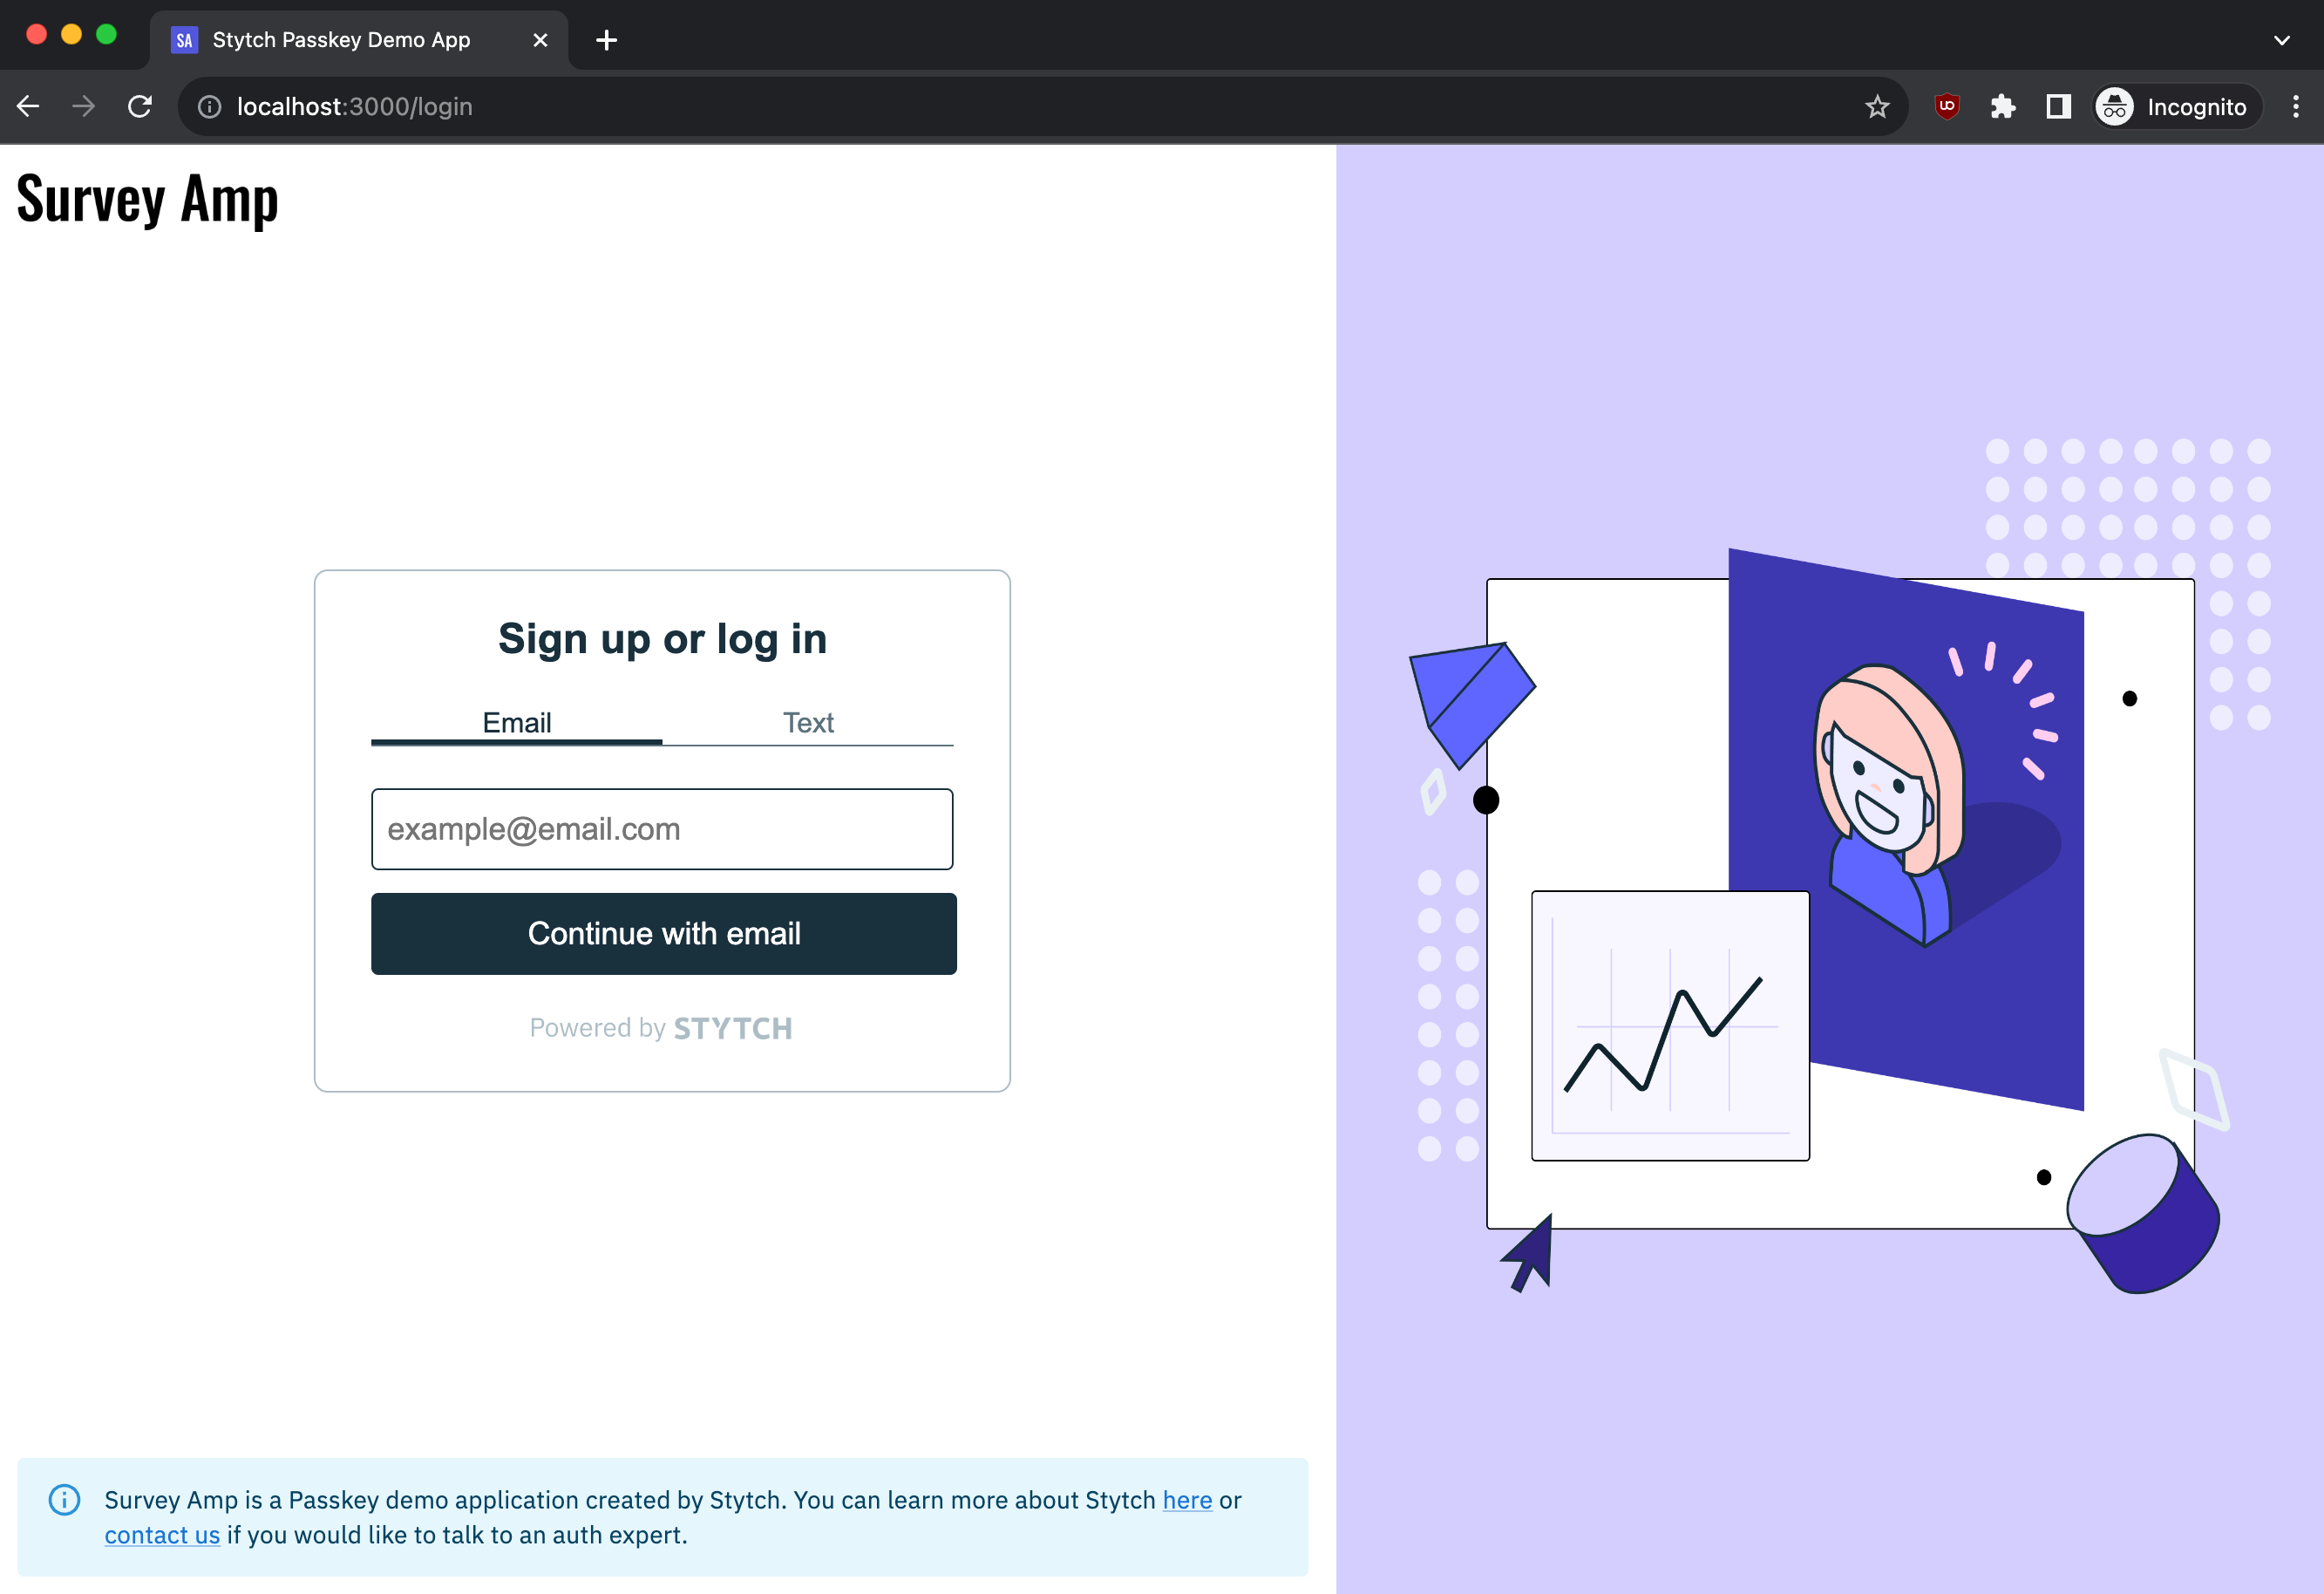
npm run startThe React application will be available at http://localhost:3000 and the Express server will be available at http://localhost:3001.
And voila! You should have a fully functioning website called SurveyAmp running locally on your machine.
Breaking down the React app structure
Now that you have the app running, let’s break down how the code is structured and built at a high-level.
We’ll be analyzing simplified versions of the example app’s code to better explain how the auth flows function.
Three main pages
Open the App.tsx file and you’ll find the React application is organized into three main pages.
- A login.tsx page, which hosts the login component for passkeys.
- A dashboard.tsx page, where you register and manage your passkeys after logging in.
- A home page at the root / directory, which simply redirects you to either the login page or dashboard page if you’re authenticated.
// App.tsx file at the root directory
import React from "react";
import { BrowserRouter as Router, Routes, Route } from "react-router-dom";
import Home from "./pages";
import Login from "./pages/login";
import Dashboard from "./pages/dashboard";

function App() {
  return (
    <Router>
      <Routes>
        <Route path="/" element={<Home />} />
        <Route path="/login" element={<Login />} />
        <Route path="/dashboard" element={<Dashboard />} />
      </Routes>
    </Router>
  );
}

export default App;
Initializing the Stytch SDK client
Open the index.tsx file at the example app’s root directory. There are three Stytch SDK imports we need to be aware of:
- <StytchProvider>, the wrapper component for the SDK client.
- StytchUIClient, the constructor for using pre-built UI components.
- StytchClientOptions, a config object for setting cookie and domain options.
// index.tsx file in the root directory
import { StytchProvider } from "@stytch/react";
import { StytchUIClient } from "@stytch/vanilla-js";
import { StytchClientOptions } from "@stytch/vanilla-js";
Refer to the SDK Reference for a full list of settings you can control with the StytchClientOptions. For the example app, we only need to set the names of the cookies that contain the newly minted JWT sessions after authentication.
The StytchClientOptions object and your Project’s public token, from the .env.local credentials file we just set up, are arguments for the StytchUIClient constructor. The StytchUIClient is then passed to the <StytchProvider> component which wraps the <App> component, ensuring the Stytch SDK is loaded everywhere and can control the authentication state across our application.
The Stytch SDK is officially bootstrapped, which also means we can call the SDK methods headlessly anywhere.
// index.tsx file in the root directory

const stytchClientOptions = {
  cookieOptions: {
    jwtCookieName: `stytch_session_react_passkey_demo_jwt`,
    opaqueTokenCookieName: `stytch_session_react_passkey_demo`,
  },
} as StytchClientOptions;

const stytch = new StytchUIClient(
  process.env.REACT_APP_STYTCH_PUBLIC_TOKEN,
  stytchClientOptions,
);

const root = ReactDOM.createRoot(
  document.getElementById("root") as HTMLElement,
);

root.render(
  <React.StrictMode>
    <ThemeProvider theme={theme}>
      <StytchProvider stytch={stytch}>
        <App />
      </StytchProvider>
    </ThemeProvider>
  </React.StrictMode>
);
Breaking down the login.tsx page
Now that the high-level React structure has been covered, let’s break down the individual app pages starting with the login.tsx page.
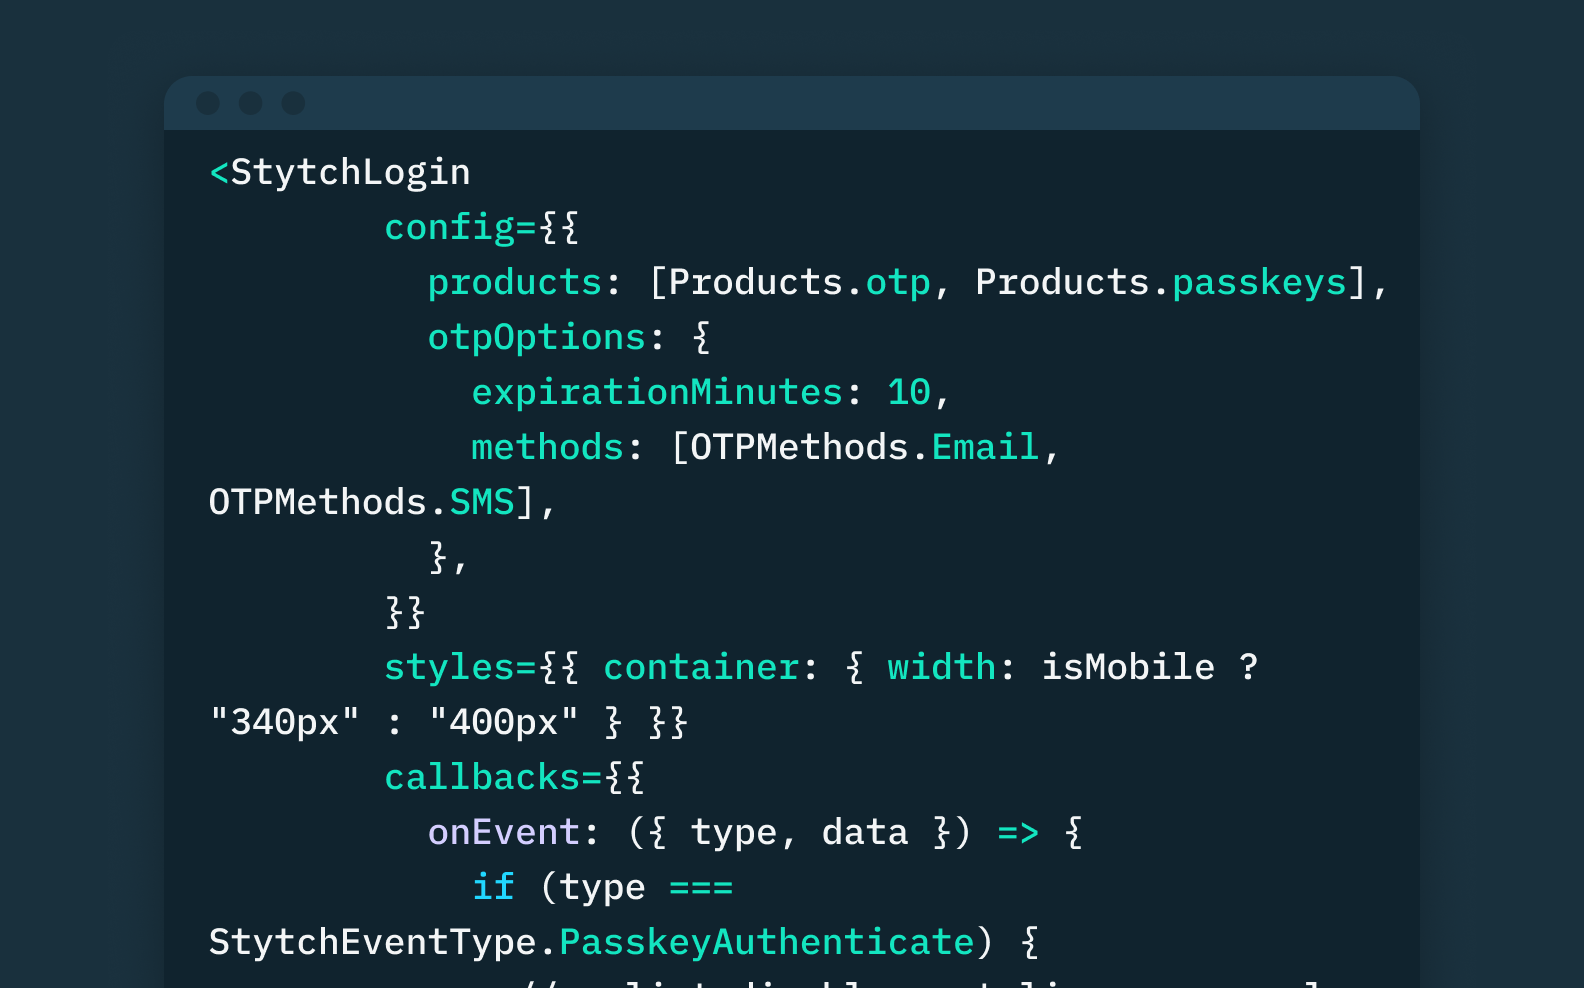
The <StytchLogin> component with passkeys and OTP
The <StytchLogin> component is Stytch’s configurable and customizable login and signup form. Meant to be a complete out-of-the-box experience, the component will handle all the auth logic and requests to the Stytch API. It only needs a few things to get up and running.
A config object: which bootstraps the authentication methods of your choice. For this example app, we’ll use both passkeys and One-Time-Passcodes (OTP) as auth methods.
//login.tsx in the /pages directory
const config={
  products: [Products.otp, Products.passkeys],
  otpOptions: {
    expirationMinutes: 10,
    methods: [OTPMethods.Email, OTPMethods.SMS],
};
Why use OTP? For signup. Stytch Passkeys can only be used for login. In order to ensure account recovery, we recommend and enforce users to have a verified email or phone from primary auth factors like OTP, Magic Links, or OAuth.
A callbacks object: which executes triggered functions of custom logic after specific authentication events. For the login page, we’ll wire navigation functions that will redirect users to the dashboard page after logging in successfully with either OTP or passkeys.
//login.tsx in the /pages directory
const callbacks={
  onEvent: ({ type, data }) => {
    if (type === StytchEventType.PasskeyAuthenticate) {
      console.log("Passkey authenticated", data);
      navigate("/dashboard");
    }
    if (type === StytchEventType.OTPsAuthenticate) {
      console.log("OTP authenticated", data);
      navigate("/dashboard");
    }
};
Putting it all together, the <StytchLogin> component takes the defined config and callbacks objects as props.
//login.tsx in the /pages directory
const LoginComponent = () => {
const navigate = useNavigate();
return (
<>
<StytchLogin
config={config}
callbacks={callbacks}
/>
</>
);
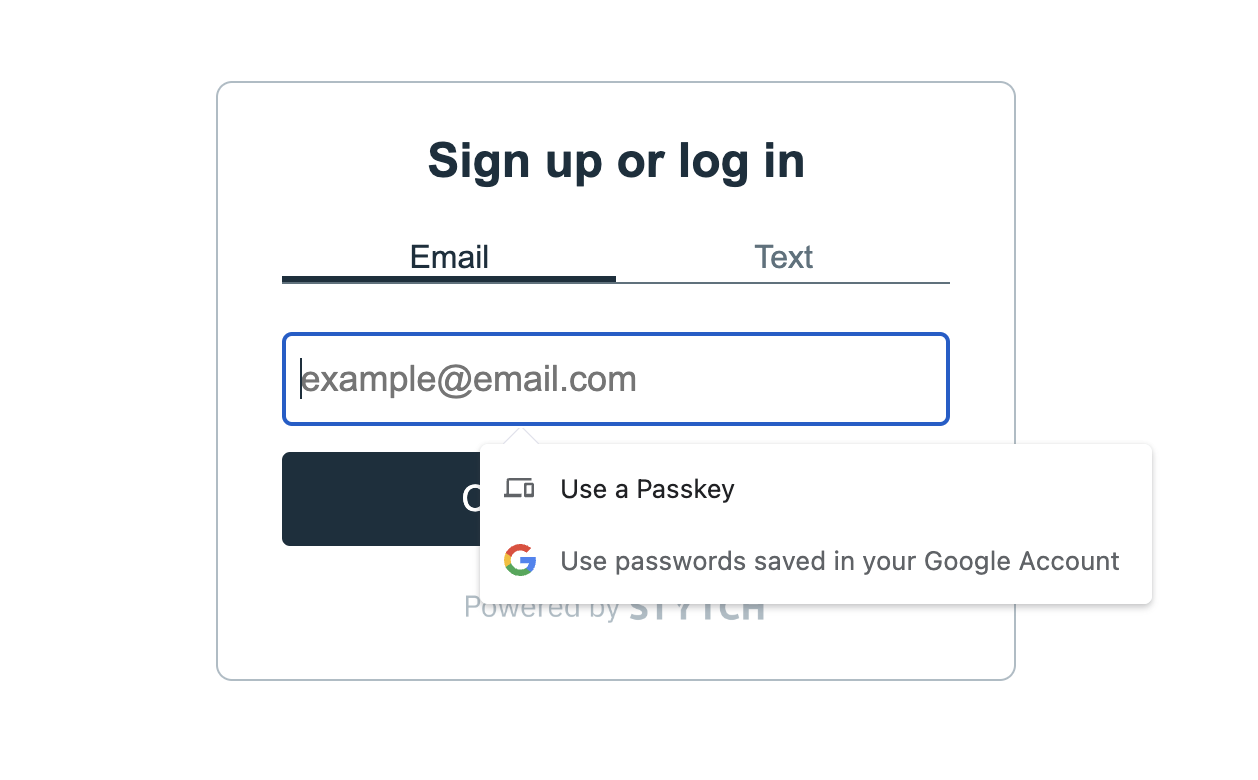
};The <StytchLogin> component renders the fully functional login form UI. For signup and first login, users will enter an email address or phone number and authenticate with OTP which will redirect them to the dashboard page.
If you click on the text input, the autofill behavior will bring up a browser prompt for passkeys.
Breaking down the dashboard.tsx page
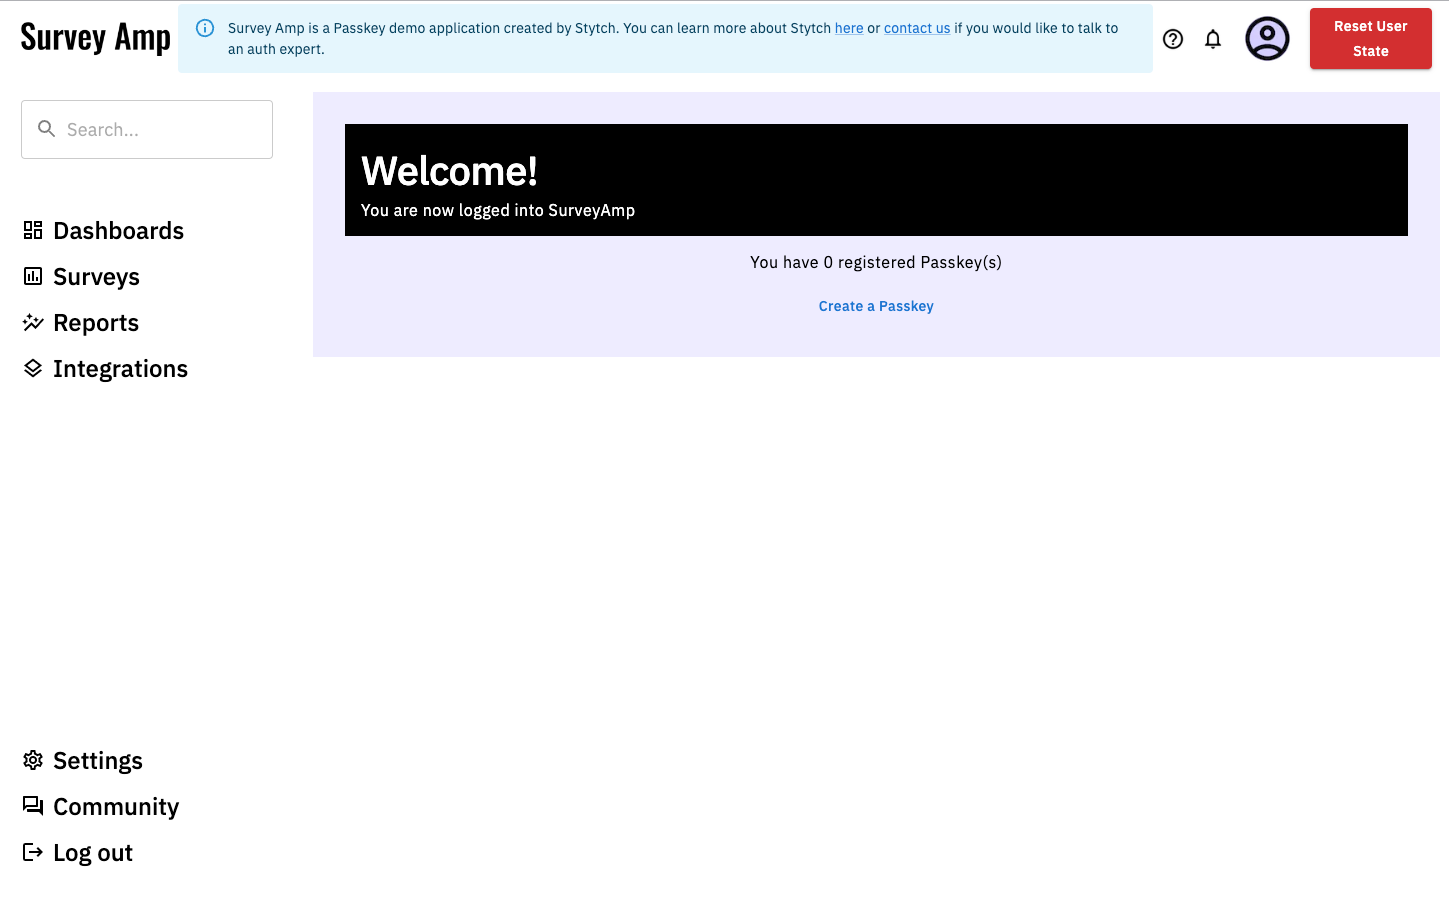
Now that users can signup and login with OTP, let’s move on to the dashboard page which acts as a centralized hub for registering and managing their passkeys. Users must be logged in to access the dashboard.
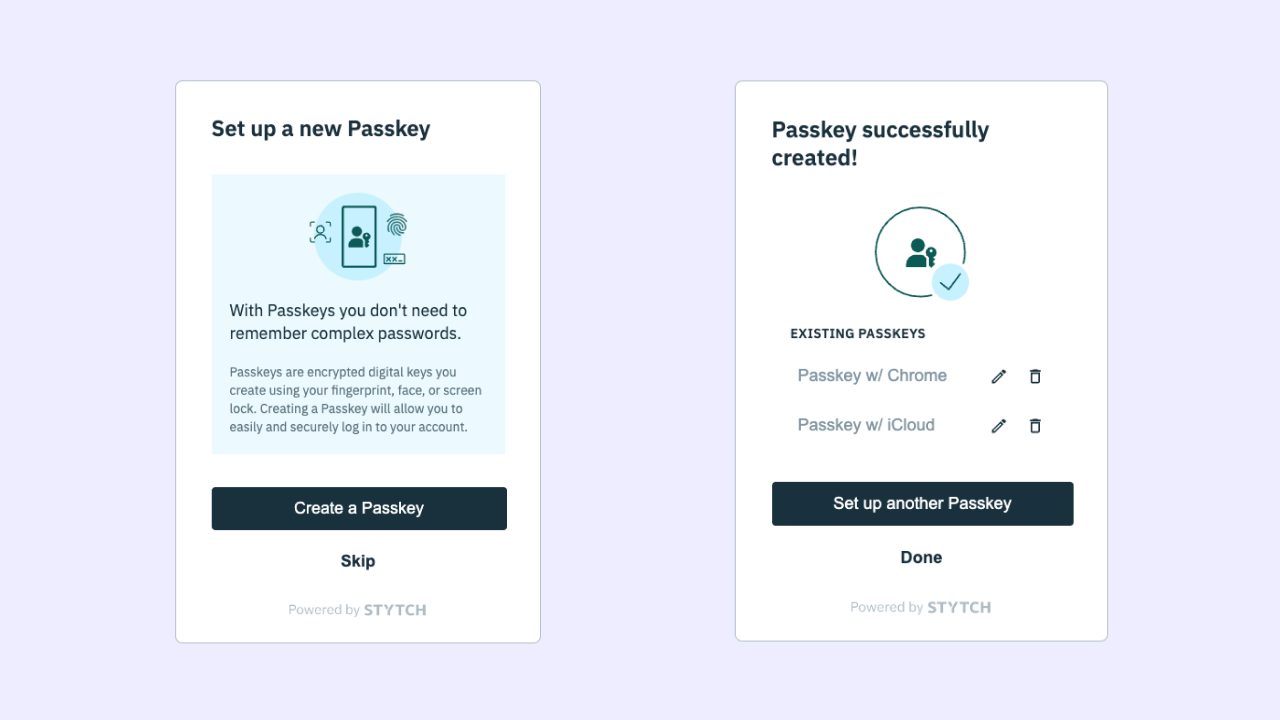
The <StytchPasskeyRegistration> component
<StytchPasskeyRegistration> is another pre-built UI component that will handle all the registration flows for passkeys. Conveniently, it accepts the same props as <StytchLogin>. The view can be as simple as this:
// dashboard.tsx in the /pages directory
function Dashboard() {
  return (
    <>
      <StytchPasskeyRegistration
         config={{ products: [Products.passkeys] }}
         callbacks={{
           onEvent: ({ type, data }) => {
             if (type === 'PASSKEY_REGISTER') {
               console.log("Passkey registered", data);
             } else {
               console.log(type, data)
             }
           },
         }}
       />
    </>
  )
}
With the <StytchPasskeysRegistration> component, users can create multiple passkeys, edit their names and labels, or delete them all together from their accounts. It’s an all-in-one management interface for the web application’s passkeys, automatically handling the public-private key orchestration between the application’s domain, the device, and Stytch – all under the hood.
With just two components, <StytchLogin> and <StytchPasskeyRegistration>, users can create and log into the application using passkeys!
Step-up authentication for extra security
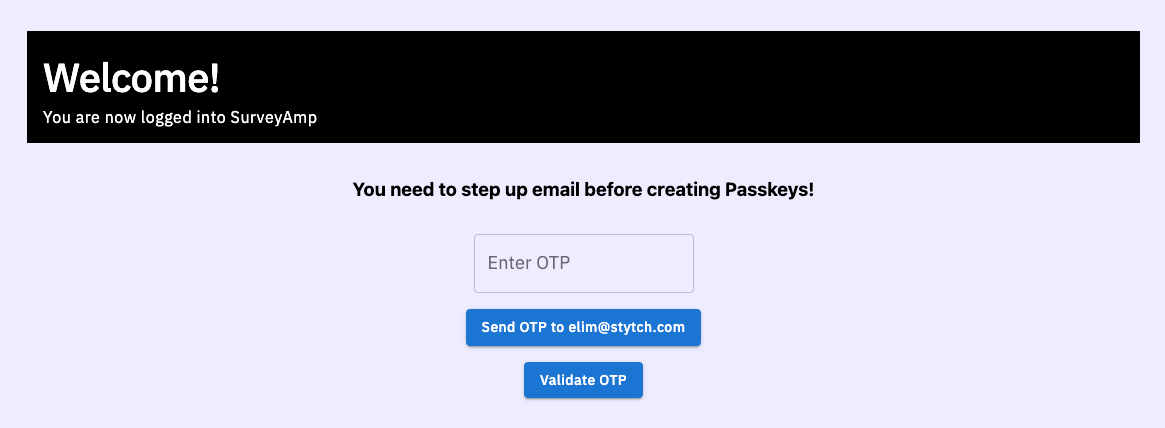
Our dashboard.tsx page also has an extra layer of security and safeguards when managing passkeys. Given their nature as credentials, passkeys need to be treated as highly sensitive and personal information.
In our example app, we’ve integrated app logic where users, when attempting to create new passkeys or modify existing ones, will be prompted to perform step-up authentication. This process involves verifying their session with two distinct auth factors. For example, if a user logs in with passkeys, they’ll be prompted to step up and authenticate with OTP.
Step-up authentication is a crucial security strategy that balances usability with robust protection. Fortunately, Stytch’s SDK makes implementation straightforward and intuitive.
Because we can invoke the Stytch SDK client headlessly, we can simply call any required Stytch auth methods and seamlessly wire them to the UI.
// dashboard.tsx in the pages directory

const StepUp = () => {
  const [inputValue, setInputValue] = useState("");
  const [methodID, setMethodID] = useState("");
  const { user } = useStytchUser();
  const [error, setError] = useState("");
  const stytch = useStytch();

  const handleSendOTPButtonClick = () => {
    stytch.otps.email
      .send(user?.emails?.at(0).email, {
        expiration_minutes: 5,
      })
      .then((resp) => {
        setMethodID(resp.method_id);
      })
      .catch((e) => {
        setError("Error occurred sending email: " + e);
      });
  };

  const validateOTPButtonClick = () => {
    stytch.otps
      .authenticate(inputValue, methodID, {
        session_duration_minutes: 60,
      })
      .catch((e) => {
        setError("Error occurred validating OTP: " + e);
      });
  };

  return (
    <Box
      display="flex"
      flexDirection="column"
      alignItems="center"
      justifyContent="center"
      gap={2}
    >
      <h3>You need to step up {type} before creating Passkeys!</h3>
      <TextField
        label="Enter OTP"
        variant="outlined"
        value={inputValue}
        onChange={handleInputChange}
      />
      <Button
        variant="contained"
        color="primary"
        onClick={handleSendOTPButtonClick}
      >
        Send OTP to{" "}{user?.emails?.at(0).email}
      </Button>
      <Button
        variant="contained"
        color="primary"
        onClick={validateOTPButtonClick}
      >
        Validate OTP
      </Button>
      {error}
    </Box>
  );
};
The Dashboard view
If we extend this step-up logic further to account for any combination of auth factors the application supports, the final Dashboard view will end up looking like this:
function Dashboard() {
  return (
    <>
        {shouldPromptWebauthn && <StepUp type={StepUpType.webauthn} />}
        {shouldPromptPhone && <StepUp type={StepUpType.phone} />}
        {shouldPromptEmail && <StepUp type={StepUpType.email} />}

        {!shouldPromptEmail &&
         !shouldPromptPhone &&
         !shouldPromptWebauthn && (
            <RegisterComponent
              numPasskeys={user?.webauthn_registrations?.length}
            />
        )}
    </>
  )
}
Conclusion
And you’ve done it! Throughout this walkthrough, you’ve gained a comprehensive understanding of the application’s set up, its structure, and the Stytch SDK implementation of passkey authentication and management with the additional security of step-up.
You can explore the live demo site or find the full source code on Github.
Ready to implement passkeys in your project? Check out the Docs and start coding.
Build auth with Stytch
Pricing that scales with you • No feature gating • All of the auth solutions you need plus fraud & risk
Related Articles
Authentication & Authorization
Fraud & Risk Prevention
Resources
Community
© 2020-2026 Stytch. All rights reserved.