Back to blog
SAML example: what is SAML and how do you use It?
Auth & identity
SAML Shield
May 21, 2025
Author: Robert Fenstermacher
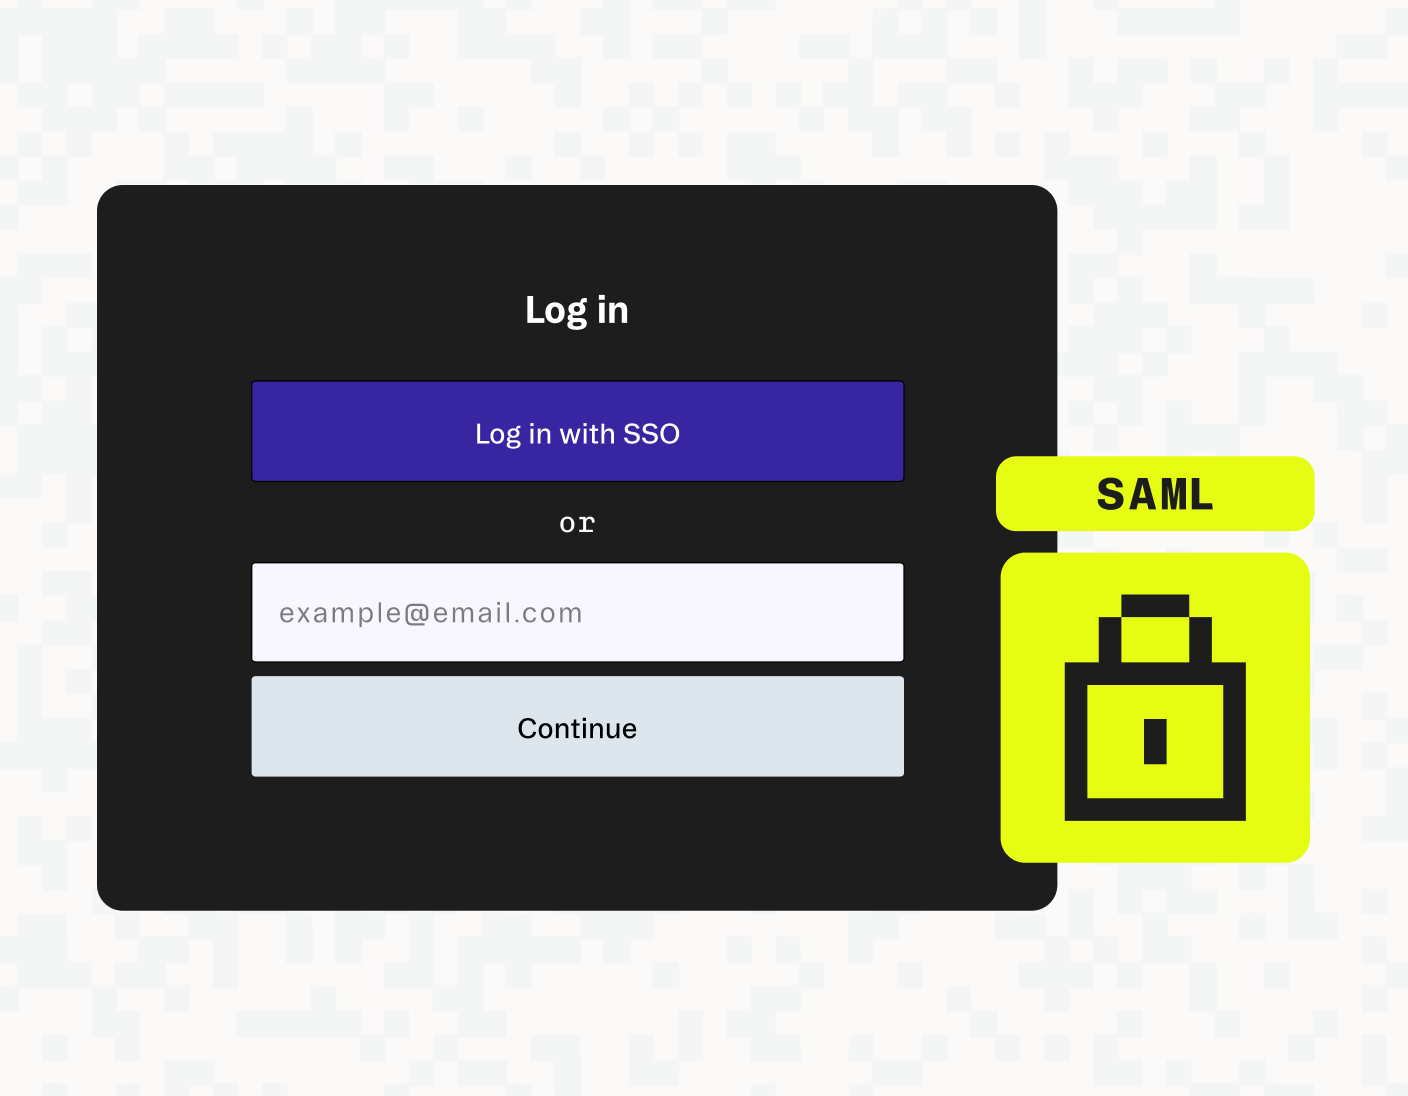
SAML (Security Assertion Markup Language) is an open standard for single sign-on (SSO) that handles authentication and authorization by letting identity providers share login details with service providers. It’s especially popular in enterprise environments where users need fast, centralized access to multiple tools and apps.
In this guide, we’ll walk through detailed examples of how SAML works in real-world authentication flows. You’ll learn how identity providers and service providers interact, how SAML requests and responses are structured, and how to implement SAML in your own apps.
What is SAML and why do you need it?
SAML is an XML-based standard commonly used for single sign-on (SSO), alongside alternatives like OAuth 2.0 with OpenID Connect. SAML works by passing authentication data between an Identity Provider (IdP) and a Service Provider (SP). An Identity Provider is a system that stores user information and performs authentication (such as Active Directory Federation Service), and a Service Provider is any system that relies on the Identity Provider to authenticate users, including internal tools and SaaS apps.
Unlike OAuth 2.0, which relies on JSON and uses tokens for authentication, SAML uses XML assertions. A SAML assertion is an XML-based statement sent from an Identity Provider to a Service Provider in response to an authentication request from the Service Provider. SAML is commonly used for enterprise SSO, whereas OAuth 2.0 (with OpenID Connect) is more popular in modern web, mobile, and SaaS applications.
The SAML authentication examples included in this article explain the SAML authentication request and response XML elements, including a SAML assertion. This will help you understand how SAML works and make it easier to configure and troubleshoot SAML-connected apps. This article also shows you what's involved in implementing your own SAML authentication process with example code.
SAML authentication example flow
One common example of a SAML authentication flow in enterprise environments is using Microsoft Entra ID (formerly Azure Active Directory) as the SAML Identity Provider for managing SSO into Salesforce.
When an employee tries to access Salesforce (the service provider), Salesforce sends a SAML authentication request to Entra ID, asking it to verify the user’s identity. Entra ID checks whether the user already has an active session. If not, it prompts them to log in.
If the user isn’t already logged in, Entra ID prompts them to sign in. After a successful login, Entra ID (as the identity provider) sends a SAML authentication response to the service provider’s designated URL—in this case, a Salesforce endpoint. This URL is included in the original authentication request, so Entra ID knows exactly where to send the response.
The SAML response includes a SAML assertion, an XML-based security token that carries the user’s identity information, and a digital signature that proves it came from Entra ID. The signature is created using Entra ID’s private key, and Salesforce verifies it using Entra ID’s corresponding public key.
You can configure Salesforce so it has access to the public key and information about when it should expire, but a better way to manage this is with certificates. A SAML certificate can optionally be sent with the SAML response that contains the public key, along with metadata like who issued the certificate and when it expires.
Once trust has been established, Salesforce reads the user's details from the SAML assertion and logs them in automatically, using the credentials from Entra ID to create or authenticate with an associated user in Salesforce.
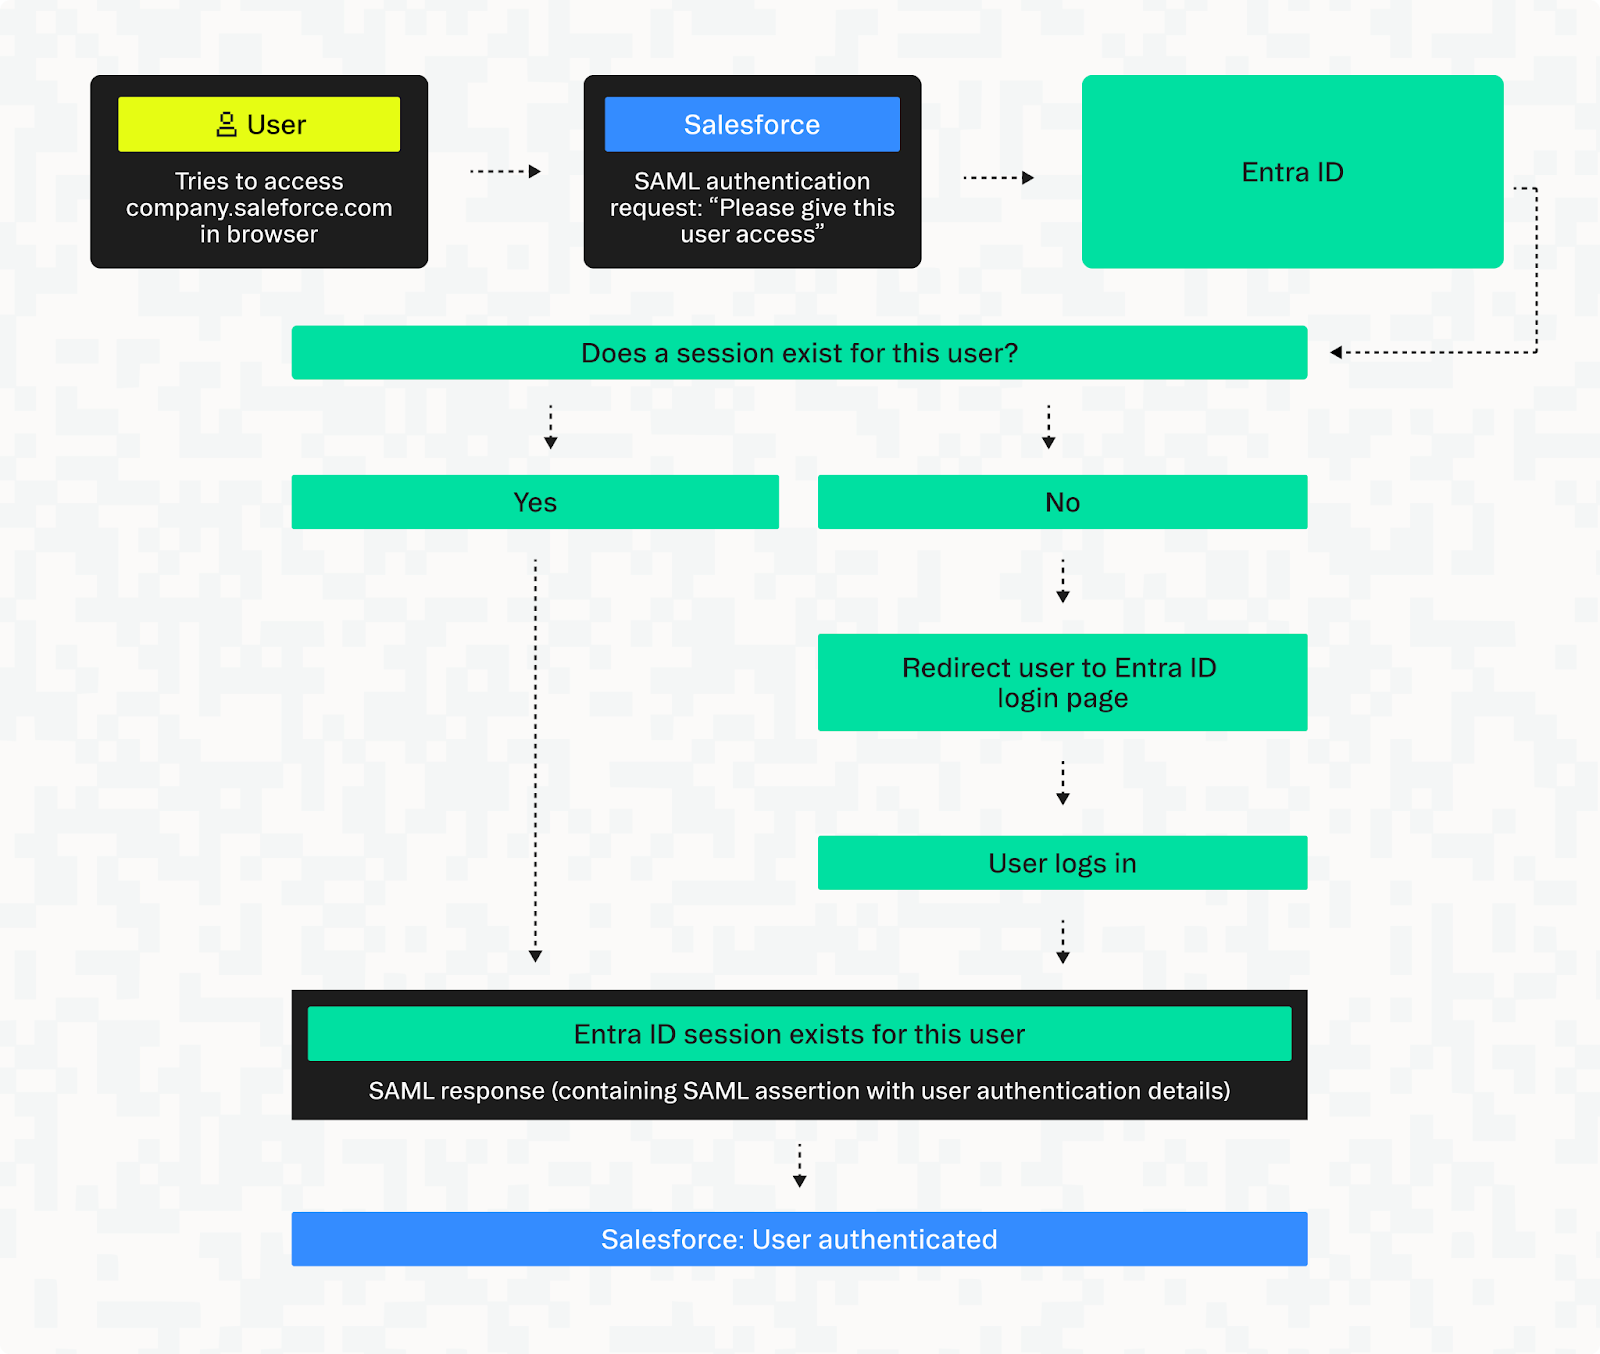
This setup allows the user to sign in once with their identity provider and gain access to multiple connected apps. In this example, the IdP is Entra ID, but other common enterprise providers include Okta, AD FS (Active Directory Federation Services, used for on-premises environments), and Ping Identity.
An IdP can be used to authenticate with many different service providers. To continue with the example above, once the user has logged into Entra ID, they will be able to access other systems that are linked to it (for example, Slack, GitHub or an on-premises application), not just Salesforce.
The benefits of this include fewer separate accounts and passwords for users to manage and better security for the user and the organization.
SAML anatomy: AuthnRequest, Response, and Assertion
SAML is used to transmit data about a user's authentication and authorization using a request and a response (including an assertion sent within the response).
SAML authentication request example (AuthnRequest)
When a Service Provider asks an Identity Provider to authenticate a user, it sends a SAML authentication request. This is sent in an XML element called <samlp:AuthnRequest>, which contains:
<saml:Issuer>: Identifies the Service Provider that is making the request.<samlp:NameIDPolicy>: Informs the Identity Provider what format the user identifier (ID, username, email address) should be in.<samlp:RequestedAuthnContext>: Explains what type of authentication to enforce (for example, a password, a TLS certificate, or multi-factor authentication).<ds:Signature>: The digital signature.
Below is an example of a SAML authentication request. Besides the elements mentioned above, some information is also encoded in XML attributes, including:
AssertionConsumerServiceURL: This defines the Service Provider endpoint where the SAML response should be sent to.
<samlp:AuthnRequest
  xmlns:samlp="urn:oasis:names:tc:SAML:2.0:protocol"
  ID="_request123456789"
  Version="2.0"
  IssueInstant="2025-03-19T10:32:44Z"
  ProtocolBinding="urn:oasis:names:tc:SAML:2.0:bindings:HTTP-POST"
  Destination="https://b2b-customer.identityprovider.com/app/123456/sso/saml"
AssertionConsumerServiceURL="https://serviceprovider.com/sso-callback/callback-id-123">

  // Issuer (who is making this request?)
  <saml:Issuer xmlns:saml="urn:oasis:names:tc:SAML:2.0:assertion">
    https://serviceprovider.com/
  </saml:Issuer>

  // What format the user identifier should be in
  <samlp:NameIDPolicy
    Format="urn:oasis:names:tc:SAML:1.1:nameid-format:emailAddress"
    AllowCreate="true" />

  // Requested authentication context (for example, MFA)
  <samlp:RequestedAuthnContext Comparison="exact">
    <saml:AuthnContextClassRef>
      urn:oasis:names:tc:SAML:2.0:ac:classes:MultiFactor
    </saml:AuthnContextClassRef>
  </samlp:RequestedAuthnContext>

  // Digital signature placeholder
  <ds:Signature xmlns:ds="http://www.w3.org/2000/09/xmldsig#">
    ...
  </ds:Signature>

</samlp:AuthnRequest>
SAML response example
A SAML response tells the Service Provider whether the authentication request was successful and passes on user details such as their username/email address and their roles and permissions. The response is sent to the URL specified in the AssertionConsumerServiceURL attribute of the SAML authentication request in a <samlp:Response> XML element. Like the authentication request, it contains <saml:Issuer> and <ds:Signature> elements.
Alongside these, it also contains:
<samlp:Status>: This explains whether the authentication request was successful.<saml:Assertion>: This is the security token containing the user's identity and other attributes like roles and permissions. A detailed description of this is provided below the SAML response.Destination: The URL that the response is being sent to. This is generally the same as the AssertionConsumerServiceURL from the request.InResponseTo: The ID of the SAML authentication request that this is in response to.
<?xml version="1.0" encoding="UTF-8"?>
<samlp:Response
    xmlns:samlp="urn:oasis:names:tc:SAML:2.0:protocol"
    xmlns:saml="urn:oasis:names:tc:SAML:2.0:assertion"
    xmlns:ds="http://www.w3.org/2000/09/xmldsig#"
    ID="_response123456789"
    Version="2.0"
    IssueInstant="2025-03-19T12:22:53Z"
Destination="https://serviceprovider.com/sso-callback/callback-id-123"
    InResponseTo="_request123456789">

    // Issuer (who is making this request?)
    <saml:Issuer>https://idp.example.com</saml:Issuer>

    // Digital signature
    <ds:Signature> ... </ds:Signature>

    // Status (was the request a success or failure?)
    <samlp:Status>
        <samlp:StatusCode Value="urn:oasis:names:tc:SAML:2.0:status:Success"/>
        // Optional: <samlp:StatusMessage>...</samlp:StatusMessage>
    </samlp:Status>

    // Assertion (security token)
    <saml:Assertion>...</saml:Assertion>

</samlp:Response>
SAML assertion example
The SAML assertion contains the following elements (in addition to <saml:Issuer> and <ds:Signature>):
Details | Example data | |
|---|---|---|
<saml:Subject> | ||
<saml:Subject> | Identifies who the user is. | user@example.com |
<saml:AuthnStatement> | ||
<saml:AuthnStatement> | Describes how and when the user authenticated. | Authenticated via the PasswordProtectedTransport method at 2025-03-19T12:00:00Z |
<saml:AttributeStatement> | ||
<saml:AttributeStatement> | Contains user attributes like roles or other information like their organizational department) so permissions can be granted. | Role=Administrator, Department=Engineering |
An example of how these elements fit together is below:
<saml:Assertion xmlns:saml="urn:oasis:names:tc:SAML:2.0:assertion"
                ID="_abc123456"
                IssueInstant="2025-03-19T12:34:56Z"
                Version="2.0">

    // Issuer: The IdP that issued this assertion
    <saml:Issuer>https://idp.example.com/saml</saml:Issuer>

    // Subject: Info about the authenticated user
    <saml:Subject>...</saml:Subject>

    // Conditions: Defines when and where this assertion is valid
    <saml:Conditions>...</saml:Conditions>

    // Authentication Statement: When and how the user authenticated
    <saml:AuthnStatement>...</saml:AuthnStatement>

    // Attribute Statement: Additional user details (Optional)
    <saml:AttributeStatement>...</saml:AttributeStatement>

</saml:Assertion>
The risks of DIY SAML authentication
Implementing SAML (or any form of authentication or authorization) yourself is complex, and mistakes could lead to significant cybersecurity vulnerabilities in your apps and infrastructure. Open-source authentication libraries such as passport-saml for Node.js or python3-saml for Python help avoid this problem by providing community-developed authentication and authorization solutions with contributions from security professionals. For SAML implementation in your projects, these help with:
- Handling XML parsing and validation: Working with XML (and particularly SAML assertions) can be complex and cause security vulnerabilities if you're inexperienced (or just aren't super careful!).
- Loading certificates: Your certificates need to be correctly loaded into your app.
- Handling SAML requests and responses: Including initiating authentication requests, decoding Base64-encoded XML, and parsing and validating assertions.
- Extracting user details: Such as email address, name, or roles from the SAML assertion and adding them to your app’s user model.
However, even when using a SAML library, there are still a number of challenges to handle.
- Manually integrating with your Identity Provider: This might include setting up and verifying Assertion Consumer Service URLs, entity IDs, and metadata configuration. Each different Identity Provider has slight differences, which may mean you end up spending ages on extensive testing and troubleshooting.
- Managing certificates: Your certificates need to be securely managed and regularly rotated before they expire.
- SSO session management: Correctly maintaining secure user sessions, and ensuring proper logout behavior can both be substantial challenges.
The effects of a security or privacy breach caused by poorly implemented authentication and authorization in front-end and back-end code could threaten your customers and your business. It is important to choose trusted, well vetted authentication libraries and to keep your systems fully patched and monitored against emerging threats.
Even if effectively implemented, this ongoing responsibility can lead to significant development, hosting, and maintenance overheads. This is leading to many businesses turning to authentication services like Stytch, who provide all of the infrastructure and back-end code supported by APIs and SDKs that can be added to any project.
SAML authentication code example
This code example demonstrates how to implement SAML authentication (with Okta as the IdP) for a Next.js application, using Node.js for the server and passport-saml to handle the SAML authentication. You can follow along with the tutorial and see the full code on our GitHub.
Adding a SAML auth server to your Next.js project
Start by creating a new Next.js project, by running the following:
npx create-next-app@latest nextjs-saml-okta
Next, from inside the new nextjs-saml-okta project directory, install all the necessary dependencies by running:
npm install express passport passport-saml express-session dotenvThen, create a file called nodejs-auth-server.js in your src directory and add the code below. You'll be using the express framework as your web server, passport (and passport-saml) to authenticate with your IdP, and body-parser to parse the SAML XML.
const express = require("express");
const bodyParser = require("body-parser");
const passport = require("passport");
const SamlStrategy = require("passport-saml").Strategy;
const session = require("express-session");
require("dotenv").config({ path: ".env.local" });

// Define the SAML strategy for Passport
passport.use(
  new SamlStrategy(
    {
      // The values are read from environment variables
      entryPoint: process.env.OKTA_ENTRY_POINT,
      issuer: process.env.OKTA_ISSUER,
      callbackUrl: process.env.SAML_CALLBACK_URL,
      cert: process.env.OKTA_CERT?.replace(/\\n/g, "\n"),
    },
    (profile, done) => {
      console.log("SAML login success:", profile);
      return done(null, profile);
    }
  )
);

// Passport uses serialization to persist the user across a session
passport.serializeUser((user, done) => done(null, user));
passport.deserializeUser((user, done) => done(null, user));

// Creates an Express web server
const app = express();

// Parses URL-encoded data from POST requests (used for the SAML responses)
app.use(bodyParser.urlencoded({ extended: false }));

// This persists login state across requests
app.use(
  session({ secret: "supersecret", resave: false, saveUninitialized: true })
);

// Initializes Passport.js
app.use(passport.initialize());
app.use(passport.session());

// Home page displays different information depending on whether user is authenticated
app.get("/", (req, res) => {
  if (req.isAuthenticated()) {
    res.send(`
      <h1> You are logged in as ${req.user.nameID}</h1>
      <p><a href="/profile">View Profile</a></p>
      <p><a href="/logout">Log out</a></p>
    `);
  } else {
    res.send(`
      <h1>Welcome</h1>
      <p><a href="/login">Login with SAML</a></p>
    `);
  }
});

// Start SAML login flow with IdP
app.get("/login", passport.authenticate("saml"));

// Callback URL (after successful SAML login)
app.post(
  "/login/callback",
  passport.authenticate("saml", { failureRedirect: "/" }),
  (req, res) => {
    res.redirect("/"); // If successfully authenticated, redirect to home page
  }
);

app.get("/logout", (req, res) => {
  // Logs out of session and redirects to home page
  req.logout(() => res.redirect("/"));
});

// Returns profile info about the user (only if authenticated)
app.get("/profile", (req, res) => {
  if (!req.isAuthenticated()) {
    return res.status(401).json({ error: "Unauthorized" });
  }
  res.json(req.user);
});

// Starts the server
app.listen(4000, () =>
  console.log("Auth server running on http://localhost:4000")
);
The code starts by defining a SAML strategy for Passport, using the passport-saml library, which helps Passport handle SAML authentication. A SAML strategy tells Passport how to handle SAML authentication, and it includes configuring it with the URL of the identity provider's entry point and the callback URL for your application, as well as the certificate for the identity provider. These values can be read from your .env.local file — More detail will be given on this later in the tutorial.
There are also a couple of lines for serializing and deserializing the user, as this is how Passport keeps users logged in across a session.
Next, an Express web server is created with express(), and some session handling code is added.
The key routes needed to make SAML authentication work are then defined:
/is the homepage, which checks whether the user is authenticated and shows either protected content or a login link./logintriggers the SAML login auth flow by redirecting to the IdP. This calls passport.authenticate("saml"), which handles building the SAML authentication request and redirects to the IdP./login/callbackis the Assertion Consumer Service (ACS) endpoint that the IdP calls after it has successfully authenticated a user. Passport then parses the SAML response, checks if it's valid, and redirects the user to the homepage./logoutends the user's session./profileis a protected route that returns information about the logged in user. It's used as an example of how content is protected from unauthenticated users.
Configuring Okta as your IdP
For this example to function, you'll need to add your Next.js app as a SAML app integration in your Okta admin panel. Do this by going to Applications > Create App Integration > SAML 2.0.
Next, you need to configure Okta. This involves telling it the URL of your app that should be called upon successful authentication, giving it a unique identifier for your app, and telling it some information about how users should be uniquely identified (in this example, by email address).
In the Configure SAML tab in Okta, enter the following information:
- Single sign-on URL: http://localhost:4000/login/callback
- Audience URI (SP Entity ID): nextjs-saml-app
- Name ID format: EmailAddress
- Application username: Email
To be able to test the SAML authentication, you'll need to add yourself as a user. In the Assignments tab for your app in Okta, go to Assign > Assign to People, then find yourself and click Assign > Save and go back > Done.
Adding Okta and SAML configuration to your environment variables
In .env.local, add the following:
OKTA_ENTRY_POINT=<OKTA_ENTRY_POINT>
OKTA_ISSUER=nextjs-saml-app
OKTA_CERT=<OKTA_CERT>
SAML_CALLBACK_URL=http://localhost:4000/login/callback
You'll need to replace <OKTA_ENTRY_POINT> and <OKTA_CERT> with the correct values, which you can find in the Okta admin panel.
Linking up your front end code with your SAML authentication
Back in your nextjs-saml-okta project folder, replace the contents of the entire src/app/page.js file with this code, which checks if the user is logged in by calling the /profile endpoint of your auth server.
If the user is logged in, it will display a link to log out; and if they're not logged in, it shows a link to log in. Each of these links are linked to the /login and /logout endpoints of the example Node.js authentication server.
"use client";

import { useEffect, useState } from "react";

export default function Home() {
  const [user, setUser] = useState(null);

  useEffect(() => {
    // Calls the Node.js /profile endpoint (to check if the user is logged in)
    fetch("http://localhost:4000/profile", {
      credentials: "include", // Sends session cookie ID to IdP so it can work out if they're logged in
    })
      .then((res) => (res.ok ? res.json() : null)) // If session exists, parse the JSON profile data and display it
      .then((data) => setUser(data))
      .catch(() => setUser(null)); // If session doesn't exist, assume unauthenticated
  }, []);

  return (
    <main style={{ padding: "2rem", fontFamily: "sans-serif" }}>
      <h1>Welcome to the Next.js SAML App</h1>
      // If user is logged in, show their name and a logout link
      {user ? (
        <>
          <p>
            You are logged in as <strong>{user.nameID}</strong>
          </p>
          <a href="http://localhost:4000/logout">Logout</a>
        </>
      ) : (
        // If user is not logged in, show a login button
        <>
          <p>You're not logged in.</p>
          <a
            href="http://localhost:4000/login"
            style={{
              display: "inline-block",
              padding: "0.6rem 1.2rem",
              backgroundColor: "#0070f3",
              color: "#fff",
              borderRadius: "4px",
              textDecoration: "none",
              fontWeight: "bold",
              marginTop: "1rem",
            }}
          >
            Login with SAML
          </a>
        </>
      )}
    </main>
  );
}
Running your code
To run your code, you need to start two services using the following commands:
- The Next.js app:
npm run dev - The Node.js authentication server:
node src/nodejs-auth-server.js
Getting your SAML code production-ready: next steps
Certificate rotation
On top of giving your application the certificate for your IdP, it's also best practice to generate your own service provider certificates for signing SAML authentication requests and for decrypting assertions.
This can be a major source of friction in keeping SSO implementations up and running. Generating your own certificate and private key for your Service Provider is simple enough, but rotating certificates before they expire and making sure that they're kept in sync with Okta can be a frustrating experience.
Handling single logout
The logout function in the above example only logs the user out of one specific app, but in enterprises, single logout (SLO) is often required. SLO means the user is logged out of the identity provider and any other connected service providers.
Implementing SLO can be complicated and usually involves endpoints for both SP-initiated logouts and IdP-initiated logouts, as well as sending and validating SAML LogoutRequest and LogoutResponse messages. SAML libraries like passport-saml and python3-saml do support this, but it takes time and isn't simple to configure.
Fetching your SAML metadata instead of generating it from manually configured values
Identity providers such as Okta expose a metadata URL so you can fetch the full metadata from there. This is more comprehensive and less error prone than manually configuring values in your .env files and having your metadata be generated from those.
Fetching metadata from your IdP will give you the full metadata, including sections such as <saml:AttributeStatement> which contains user attribute mappings (for example, first name, email or groups). These mappings will only be included in the metadata XML if you've first configured them in your identity provider's settings.
Managing multiple tenants and SSO connections
Managing multiple organizations can make SSO significantly more complex to implement and maintain. For example, if building a multi-tenant SaaS app with Next.js and Node.js, you need to dynamically configure a separate SAML strategy for each organization, manage certificates and metadata for each organization, and debug issues for each specific IdP.
If you're working with large enterprise clients, some of these (for example, conglomerates) may also require multiple SSO connections for their organization, so your code needs to be flexible enough to handle these use cases.
Signing and encrypting SAML requests and responses
For production apps, it's best practice to digitally sign all requests sent between the service provider and the identity provider. Currently the identity provider requests are being signed but you should also add a signature to requests from the service provider. To do this, you'll need to generate a private key and public certificate, add the private key to your SAML strategy and upload the public certificate to Okta.
You should also encrypt any assertions, which you can do in your identity provider settings. This will also require a public certificate, but you can reuse the same one that you're using to sign your requests.
Why DIY and risk security headaches? Use Stytch instead
Using an authentication service provider like Stytch abstracts away the most complex work involved in using SAML in your projects. Check out our full Stytch SAML authentication example and tutorial that creates a full application (using Python, Flask and Vite) to integrate SAML with Okta as the IdP.
Using Stytch authentication is as easy as adding our SDKs to your projects, including Python, JavaScript, Go, and Java. You can then use our quickstart guides to get up and running fast — take a look at our Next.js quickstart and Node.js quickstart guides to see how much less code is required to add auth to your project. You can then use the Stytch SDKs to implement a SAML authentication flow to your apps.
Stytch helps to simplify your SAML SSO setup with a number of features, including built-in certificate management and rotation, session handling, support for single logout (SLO) across multiple providers and dynamic metadata fetching from identity providers. All this makes your SAML SSO integration much faster, easier to maintain, and more secure. Stytch is also compliant with global privacy frameworks and certifications, and is developed and hardened by security experts.
Some of the Stytch features that help simplify your SAML SSO setup include:
- Multi-language support: SDKs for Node.js, Python, Go, Java etc.
- Certificate management: Automatically rotates certificates.
- Session handling: Manages sessions across all your apps
- Single logout support: Handles logging users out from all apps after they've logged out from one.
- Dynamic metadata fetching: Automatically imports metadata from your identity provider
- Security and compliance: SOC 2 and ISO 27001 certifications.
Sign up to Stytch to start building with a secure authentication platform that makes your code simpler and safer.
Authentication & Authorization
Fraud & Risk Prevention
© 2025 Stytch. All rights reserved.