Back to blog
SCIM API explained: how it works and how to integrate with identity providers
Auth & identity
Aug 14, 2025
Author: Stytch Team
"Do you support SCIM?"
If you're building a SaaS app for enterprises, you've probably already been asked this many times — either by your customers or as part of a security review checklist. What this really means is "Does your app expose a SCIM API?"
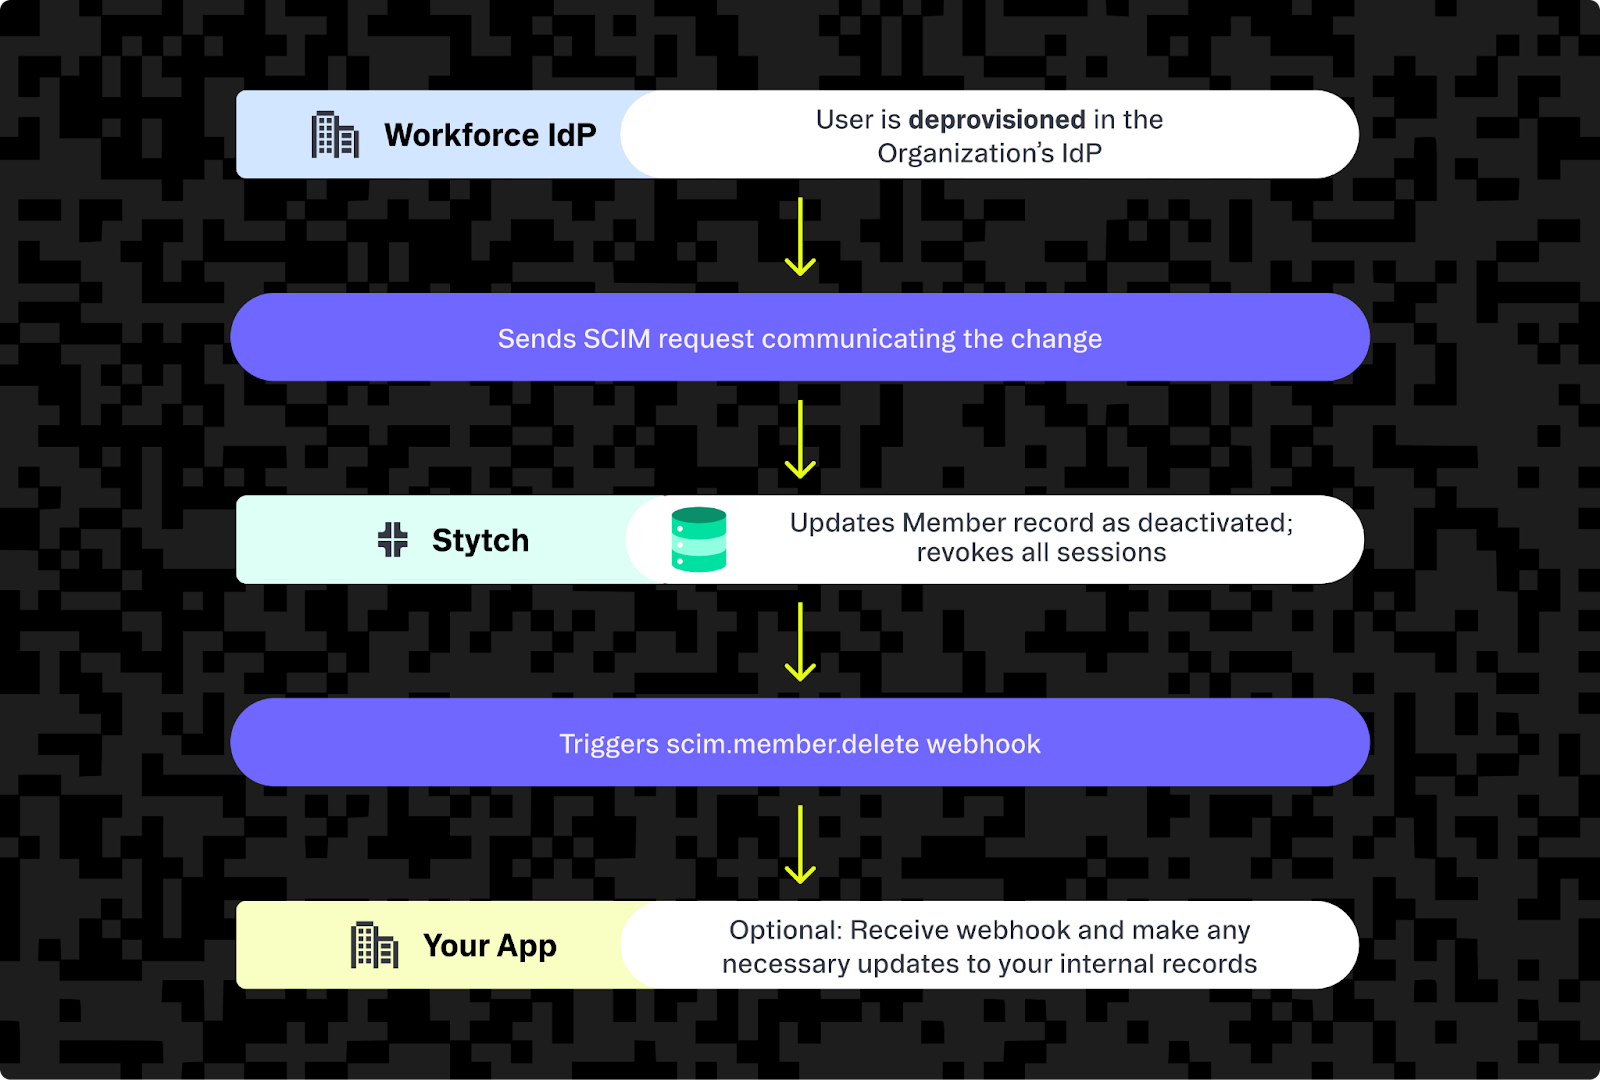
A SCIM API is a REST API with standardized endpoints that allow automated user provisioning with identity providers like Okta or Microsoft Entra ID. This enables them to create or update users and groups as well as instantly deactivate or remove them. Because all SCIM-compliant apps have the same standardized endpoints, any changes (for example, an employee getting promoted) can be easily cascaded across hundreds of connected apps at once.
If your app isn't SCIM-compatible yet, read on. We explain:
- What a SCIM API is and how it works under the hood
- How to implement a SCIM API in your SaaS app
- Common implementation pitfalls and security best practices
- If you’d rather not build and maintain your own SCIM layer, Stytch’s SCIM connector translates IdP calls into retry-safe webhooks and handles all the underlying provider quirks for you
What is a SCIM API and how does it work?
A SCIM REST API is used for automatic user provisioning and deprovisioning. It follows the SCIM protocol, which means it must have certain endpoints (like /Users and /Groups) that accept data in JSON format that matches SCIM schemas.
Nowadays, most enterprise applications support SCIM (System for Cross-domain Identity Management), and you should too if you want enterprises to use your application. A SCIM API makes it easy for organizations' identity providers to sync user access permissions with these applications without the need for custom logic.
With most apps following the SCIM standard, an identity provider (known as a SCIM client in this context) can call the same endpoint for each SCIM API of each connected app (or SCIM service provider), sending it the exact same JSON structured data. This makes it easy to update all apps at once.
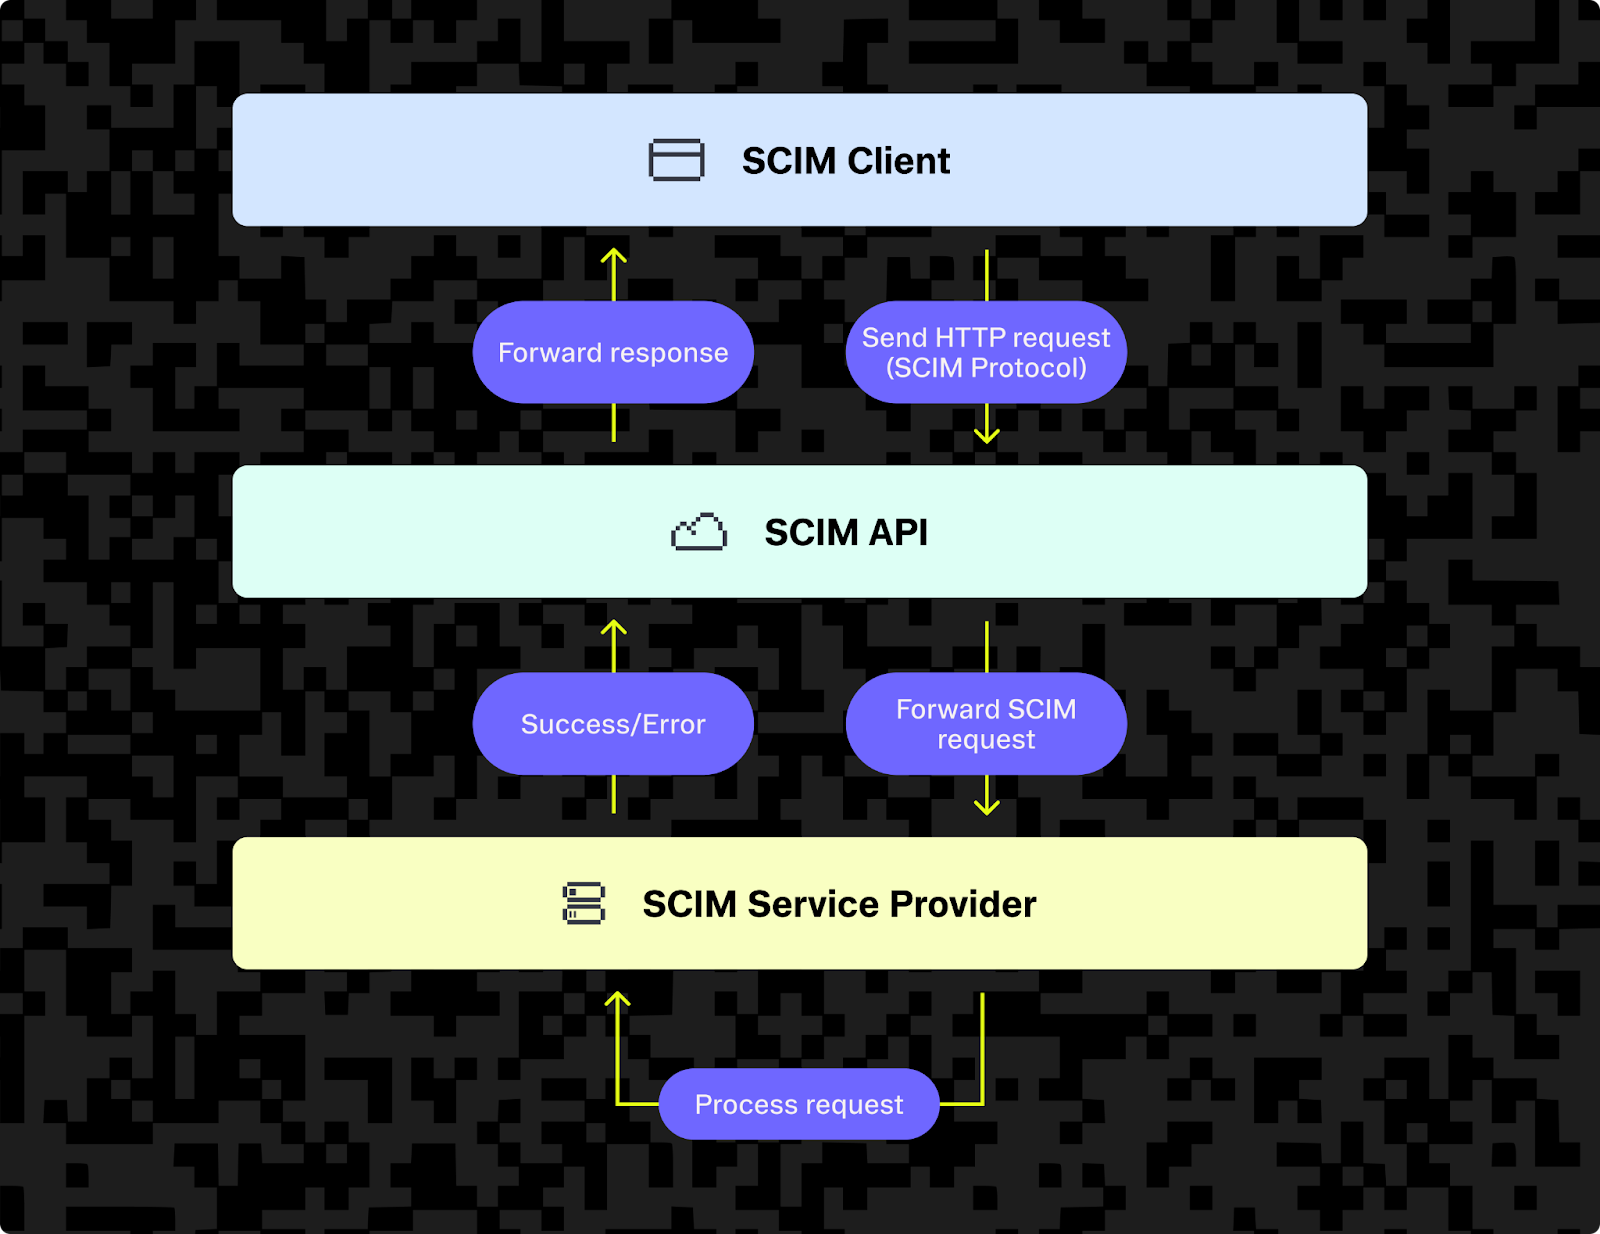
You can either implement a SCIM API yourself in your own application code, or you can rely on a third-party provider to forward requests to your application for you. The diagram below shows the flow of one SCIM request from the SCIM client (identity provider) to the SCIM API to your app (SCIM service provider) and back again, but it's worth remembering that the same request might get sent out to hundreds of other applications at the same time.
The data that the SCIM client sends to each endpoint must conform to the schema for the resource you're trying to operate on. The two core SCIM resources are User and Group, each of which has some required and optional fields of different data types. For example, User has userName as a required field and emails and title as optional ones.
SCIM API endpoints in detail
Below are all the endpoints you must implement as a bare minimum in order to accurately say you support SCIM. These are mostly endpoints for doing CRUD operations on SCIM's two core resources: User and Group. However, there are three extra endpoints at the bottom of the table that are more metadata-related, providing additional information to developers about how to use your SCIM API.
Method | Description | |
|---|---|---|
/Users | ||
/Users | GET | Lists users |
/Users | ||
/Users | POST | Creates a new user |
/Users/{id} | ||
/Users/{id} | GET | Finds a user by their ID |
/Users/{id} | ||
/Users/{id} | PUT | Replaces an entire user |
/Users/{id} | ||
/Users/{id} | PATCH | Partially updates a user |
/Users/{id} | ||
/Users/{id} | DELETE | Deletes (or soft-deletes) a user (depending on how you implement it) |
/Groups | ||
/Groups | GET | Lists groups |
/Groups | ||
/Groups | POST | Creates a new group |
/Groups/{id} | ||
/Groups/{id} | GET | Finds a group by its ID |
/Groups/{id} | ||
/Groups/{id} | PUT | Replaces an entire group |
/Groups/{id} | ||
/Groups/{id} | PATCH | Partially updates a group |
/Groups/{id} | ||
/Groups/{id} | DELETE | Deletes (or soft-deletes) a group (depending on how you implement it) |
/ServiceProviderConfig | ||
/ServiceProviderConfig | GET | Returns info about what features are supported, what authentication methods are used, etc. |
/ResourceTypes | ||
/ResourceTypes | GET | Lists all the resource types this SCIM API uses (This could be just |
/Schemas | ||
/Schemas | GET | Lists the full schema for each resource |
Many enterprises find that the User resource is too limited for them, as it doesn't include certain fields like department, manager, or costCenter. If this is likely to be the case for your users, you can use the Enterprise User schema extension. As this is an extension and not its own resource type, there are no extra endpoints to implement; however, you will need to define the schema extension in your code.
It's also possible to define your own custom schemas. For example, you might want to track information about your users’ devices or locations. If you want to do that, create the schema and create endpoints that follow the same structure as the /User and /Group endpoints above. You'll also need to ensure that the /ResourceTypes and /Schemas endpoints return this new information.
SCIM user and group schemas explained
SCIM schemas define the structure of each resource type, and every object sent to or returned from each API endpoint must conform with this structure. Let's take a look at a sample User resource returned when querying GET https://api.dundermifflin.com/v2/Users/user-002.
{
  "schemas": [
    "urn:ietf:params:scim:schemas:core:2.0:User",
    "urn:ietf:params:scim:schemas:extension:enterprise:2.0:User"
  ],
  "id": "user-002",
  "userName": "dschrute",
  "name": {
    "givenName": "Dwight",
    "familyName": "Schrute"
  },
  "emails": [
    {
      "value": "dwight.schrute@dundermifflin.com",
      "type": "work",
      "primary": true
    }
  ],
  "active": true,
  "urn:ietf:params:scim:schemas:extension:enterprise:2.0:User": {
    "employeeNumber": "172",
    "department": "Sales",
    "manager": {
      "value": "user-001",
      "displayName": "Michael Scott"
    }
  },
  "groups": [
    {
      "value": "group-001",
      "$ref": "https://api.dundermifflin.com/v2/Groups/group-001",
      "display": "Sales Department"
    }
  ],
  "meta": {
    "resourceType": "User",
    "created": "2001-01-01T09:00:00Z",
    "lastModified": "2007-04-26T13:45:00Z"
  }
}
First, the object states the schemas in use, which in this case are User and the enterprise:User extension. The userName is Dwight's SCIM username, which is often used as a unique ID in identity providers. The emails field is an array, allowing for multiple emails, including work and home. The department, manager, and employeeNumber are enterprise:User fields that are sometimes required by downstream apps for reporting and filtering purposes, but they are not used for provisioning groups. Instead, the groups array shows which groups the user belongs to.
Now let's have a look at some sample Group resources. A common reason to group employees is by department, as below. Remember that even though you can have a department field when using the enterprise:User extension, the department field can't be used for provisioning, so you will still need to add a group if you want to manage access by department.
{
  "schemas": [
    "urn:ietf:params:scim:schemas:core:2.0:Group"
  ],
  "id": "group-001",
  "displayName": "Sales Department",
  "members": [
    {
      "value": "user-002",
      "$ref": "https://api.example.com/scim/v2/Users/user-002",
      "display": "Dwight Schrute"
    },
    {
      "value": "user-006",
      "$ref": "https://api.example.com/scim/v2/Users/user-006",
      "display": "Jim Halpert"
    }
  ],
  "meta": {
    "resourceType": "Group",
    "created": "2005-03-24T09:00:00Z",
    "lastModified": "2010-02-11T10:00:00Z"
  }
}
You can also use groups to manage access to cross-department resources. For example, the Party Planning Committee, which may require access to shared calendars, folders, or tools.
{
  "schemas": [
    "urn:ietf:params:scim:schemas:core:2.0:Group"
  ],
  "id": "group-005",
  "displayName": "Party Planning Committee",
  "members": [
    {
      "value": "user-003",
      "$ref": "https://api.example.com/scim/v2/Users/user-003",
      "display": "Angela Martin"
    },
    {
      "value": "user-004",
      "$ref": "https://api.example.com/scim/v2/Users/user-004",
      "display": "Phyllis Vance"
    },
    {
      "value": "user-005",
      "$ref": "https://api.example.com/scim/v2/Users/user-005",
      "display": "Pam Beesly"
    }
  ],
  "meta": {
    "resourceType": "Group",
    "created": "2005-03-24T09:00:00Z",
    "lastModified": "2007-05-17T16:00:00Z"
  }
}
How to implement a SCIM API in your SaaS app
If you want to sell to enterprise clients, they will expect (and most likely require) your app to be SCIM-compliant. To become SCIM-compliant for enterprises, you'll need to support the following in your SCIM API as a bare minimum:
- Expose core SCIM endpoints: Implement the required
/Usersand/Groupsendpoints for provisioning and group management. Also implement the recommended discovery endpoints—/ServiceProviderConfig,/ResourceTypes, and/Schemas—for maximum IdP compatibility. Add any custom endpoints only if your use case requires them. - Support the necessary resource types: This includes the two core resource types:
UsersandGroups(required) as well as theenterprise:Userextension if your customers need attributes like department or manager (recommended). - Follow the SCIM schema for each resource: Support all required attributes defined in RFC 7643, and optional attributes if they’re relevant to your use case or required by the IdPs you’re integrating with..
- Return SCIM JSON: All responses from SCIM endpoints should use the HTTP header
Content-Type:application/scim+jsonin all responses.(and it’s also good practice to setAccept: application/scim+jsonin requests). - Handle errors robustly: Make sure you return the correct HTTP status codes and SCIM-compliant error responses, as outlined in RFC-7644, including proper
scimTypevalues in error payloads when applicable.
Beyond getting the basics up and running, you should follow these best practices, especially if you're trying to sell to enterprises.
SCIM best practices
- Idempotency: Make your API idempotent (especially for
PUT,PATCH, and DELETE methods). This allows identity providers to retry a request that timed out or failed without any unexpected side effects. - Test with different identity providers: Test your SCIM API with as many identity providers as possible. Each one has subtle differences, and you need to make sure you're compatible with all the major providers.
- Good docs: Write clear, comprehensive documentation on your SCIM implementation so your customers can work with it.
- Schema versioning: To avoid breaking changes, add a version number to your schema and reference a specific version in the resource. For example, version 1.1 of your User schema could have this ID:
"id": "urn:ietf:params:scim:schemas:core:2.0:User:1.1"which you can then reference in different user resources. - Avoid changing standard SCIM core URNs. If you need versioning, use vendor-specific extension URNs (e.g.,
urn:yourco:params:scim:schemas:extension:user:1.1) and/or rely on ETags/meta.version for resource concurrency - Use a SCIM library: This will save you time that you'd otherwise spend working around SCIM edge cases and make your implementation more likely to work with major providers like Okta and Microsoft Entra ID. However, not all SCIM libraries are created equal. Some only handle low-level logic like parsing requests or validation.The two most comprehensive ones that are production-ready for enterprises are Apache SCIMple for Java and go-scim for Go developers.
- Support soft deletion: If an identity provider (or other SCIM client) calls one of your endpoints with a
DELETErequest and then realizes they made a mistake, you need to ensure they can revert it. You can do this by implementing yourDELETEendpoint in such a way that it marks a user or group as deleted rather than actually deleting them from the database.
SCIM security best practices
- HTTPS: Use this everywhere with TLS 1.2+.
- Bearer tokens/OAuth: Insisting on bearer tokens is a bare minimum practice, but supporting OAuth 2.0 is now standard practice.
- Rotate tokens regularly.
- Mutual TLS: Many financial and healthcare institutions require this, so it's worth supporting.
- Validate all input in case it has missing fields or wrong data types.
- Add rate limits to your endpoints to protect your SCIM API from abuse or accidental request floods.
- Continuously monitor and patch your implementation for any issues and patch them before attackers are able to take advantage of them.
How to integrate your SCIM API with your identity provider
Once you've implemented your SCIM API, you may want to integrate it with an identity provider, either to test it or to enable automated user provisioning in production. In some cases, you might just be integrating a third-party SCIM API with your organization's identity provider. Either way, the setup is the same.
Each identity provider has its own instructions for setting up SCIM, so the most important thing is to find the right guide for your identity provider.
SCIM integration guides
Here are links to the official integration guides from some of the most common identity providers:
Most of the guides follow similar principles, so we will work through one particular example: Okta.
Integrating SCIM with Okta
To keep things simple for this tutorial, we’ll use basic auth; but for a production application, you should use OAuth. The tutorial makes use of a SCIM stub written in Java (a mock SCIM application with some SCIM endpoints that returns some fake data), and you can use this stub to test a complete SCIM integration with Okta.
1. Add your app as a SCIM service provider in Okta
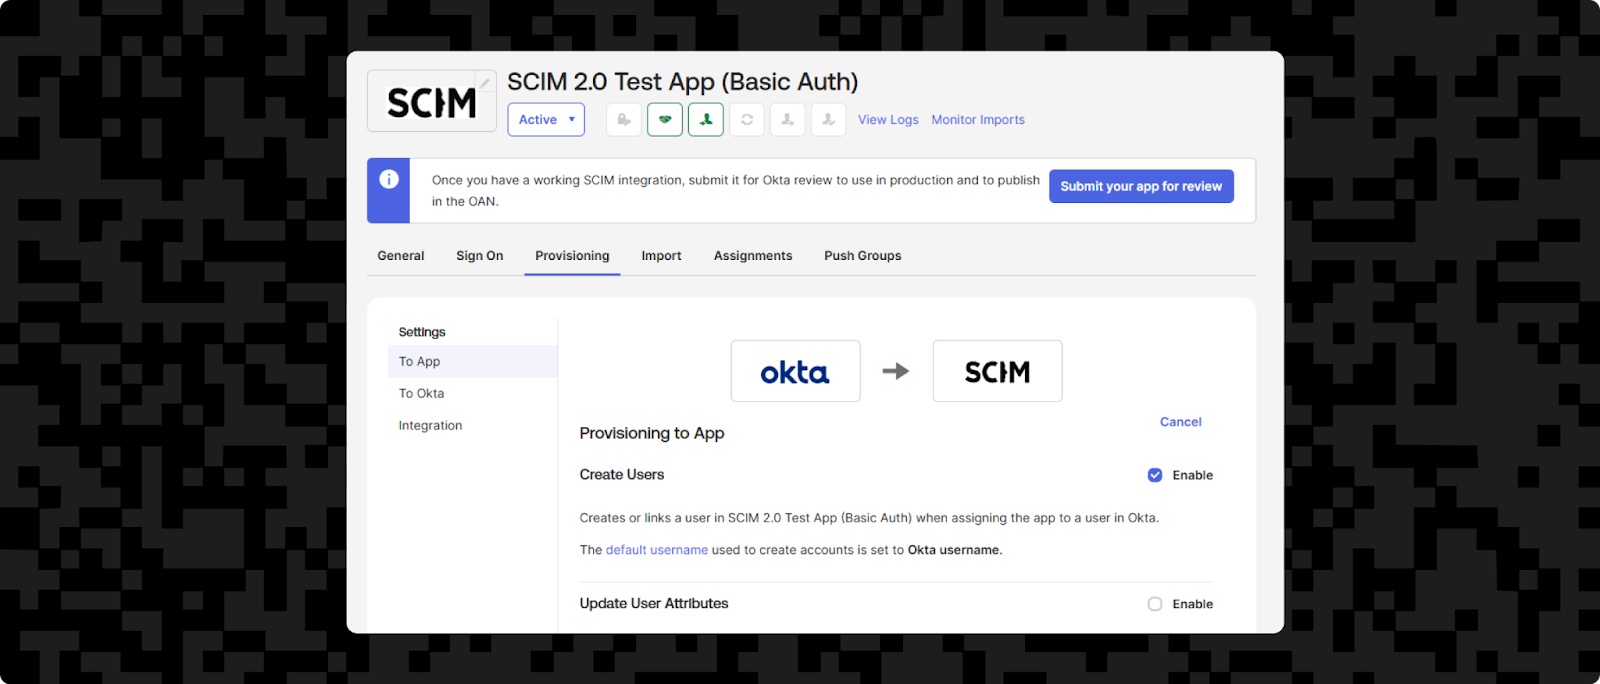
For this, you'll need to log into the Admin Console in an Okta account. From there, go to Applications > Applications > Browse App Catalog. To add your app as a SCIM integration, type "SCIM" into the search box and select SCIM 2.0 Test App (Basic Auth). Next, click the Add integration button.
In the General Settings tab, you can give your app a name in the Application label field. You can leave the Application Visibility field unchecked and the Browser plugin auto-submit field checked, then click
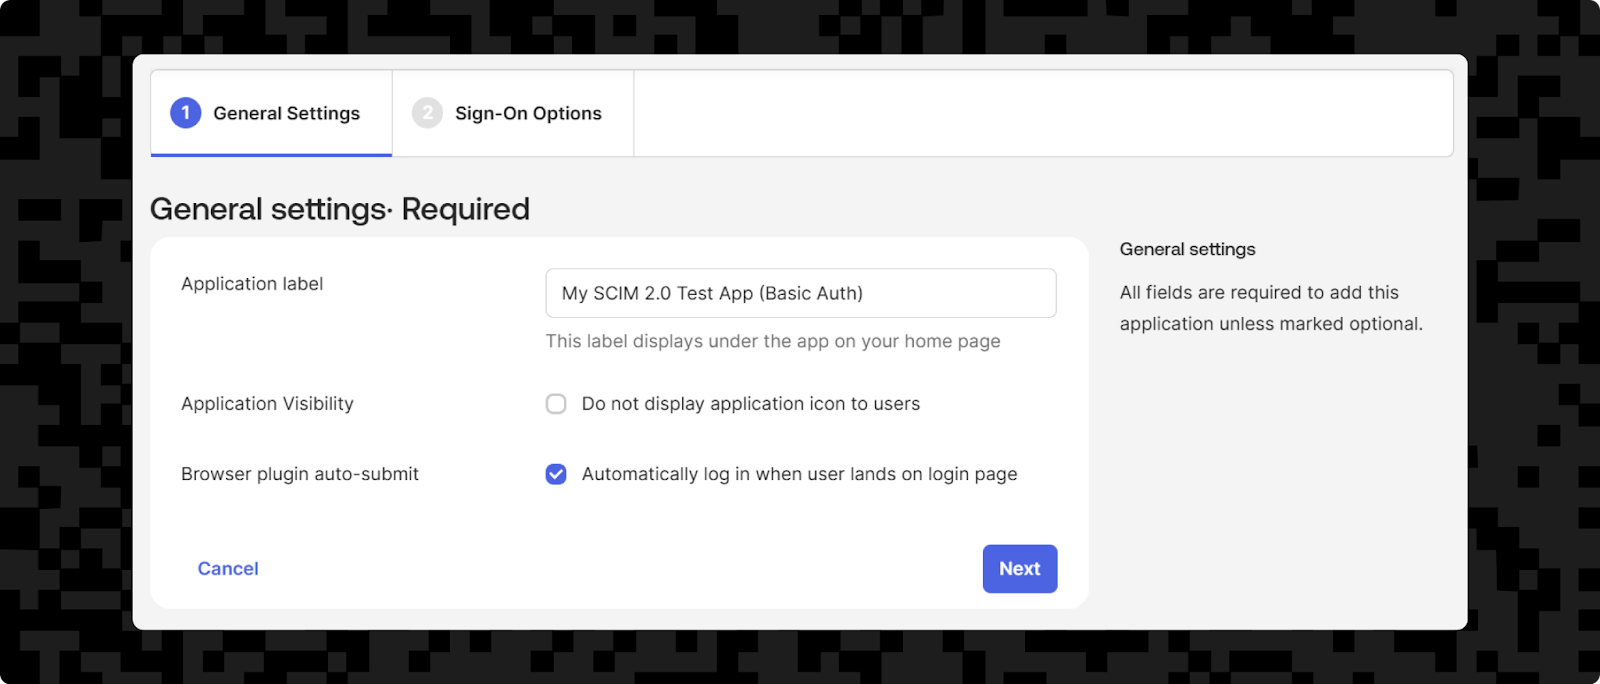
This will take you to the Sign-On Options tab, which is where you would configure SAML or whichever single sign-on option you're using. However, this tutorial focuses on SCIM only, so you can leave all the default options selected and just click the Done button here.
2. Make your SCIM app accessible to Okta
You can run the SCIM stub code locally with mvn clean spring-boot:run. However, since the code isn’t on the internet, Okta can’t access it. This poses a problem when you want to test code that's not yet in production.
To solve this, you can use ngrok — an API gateway that makes local code available to the internet. You'll need to create an account, log in, and get an auth token, as well as install it on your local machine. Once ngrok is installed, you can configure it to use your auth token with ngrok config add-authtoken <paste-your-auth-token-here> and start a tunnel to port 8080 (the SCIM stub application's port) with ngrok http 8080. You'll get a public URL like this, which you'll need to use later:
Forwarding https://xxxxxxxxxxxx.ngrok-free.app → http://localhost:80803. Enable SCIM provisioning for your app in Okta
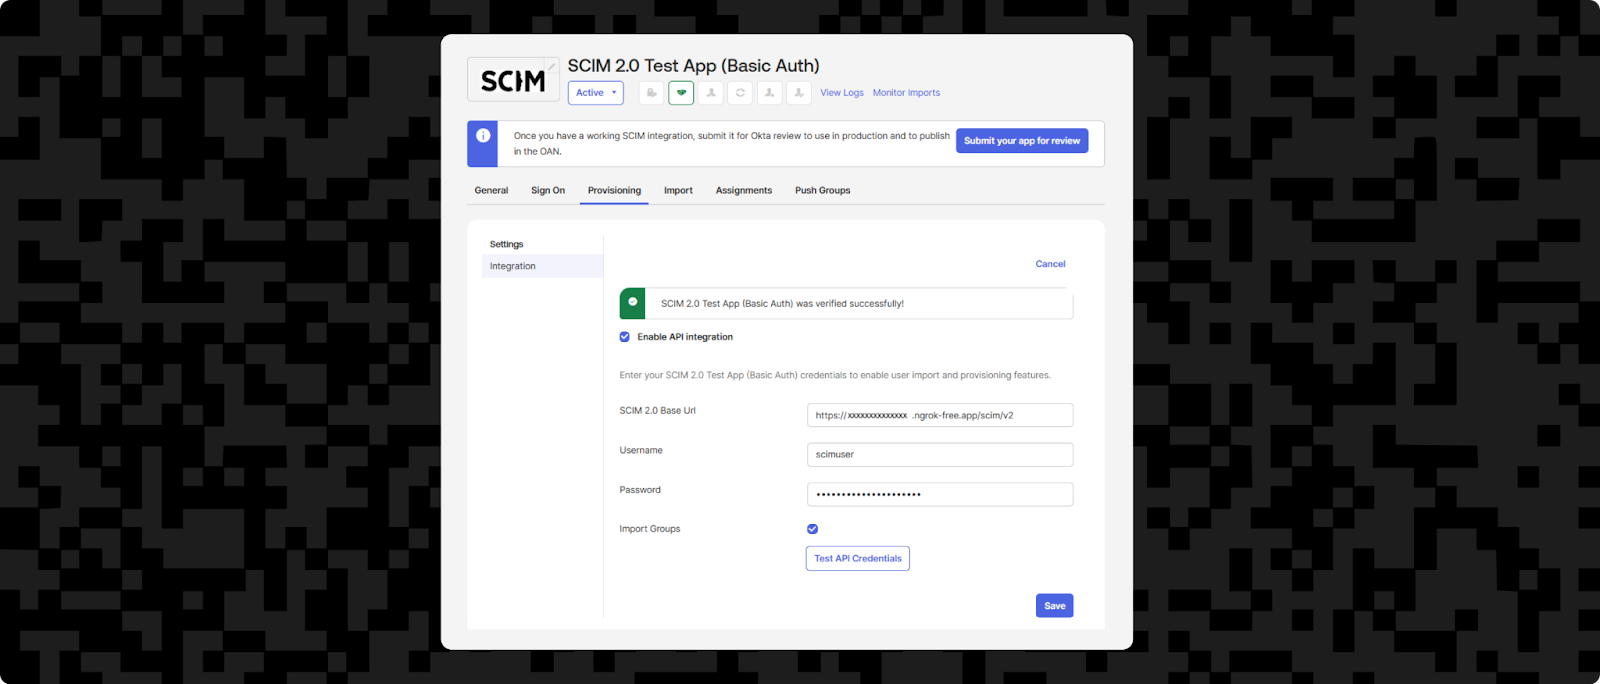
Click the Provisioning tab, then the Configure API Integration button. Then check the Enable API integration box. From here, you need to fill in the SCIM 2.0 Base URL, Username and Password fields.
The SCIM API Base URL should be your https://xxxxxxxxxxxx.ngrok-free.app URL from earlier with /scim/v2 appended to it. The username and password need to match the username and password set in the SCIM stub application. The ScimController expects to read the username and password from SCIM_USER and SCIM_PASSWORD environment variables, so you can use the .env.example template file to create a .env file with these variables.
Once you've filled in the fields, click Test API Credentials. You should get a success message at the top saying that your app was verified successfully. Once you have, you must click Save.
4. Test user provisioning
It's a good first step to manually test that your user provisioning endpoint is working before automating it for many production users in Okta. You can do this with a simple cURL request:
curl -X POST https://xxxxxxxxxxxx.ngrok-free.app/scim/v2/Users \
  -u $SCIM_USER:$SCIM_PASSWORD \
  -H "Content-Type: application/scim+json" \
  -H "Accept: application/scim+json" \
  -d '{
    "schemas": ["urn:ietf:params:scim:schemas:core:2.0:User"],
    "userName": "test@stytch.com",
    "name": {
      "givenName": "Test",
      "familyName": "User"
    },
    "emails": [
      {
        "value": "test@stytch.com",
        "primary": true
      }
    ],
    "password": "test123",
    "active": true
  }'
Note: The password attribute is part of the SCIM User schema, but many IdPs disable password writes over SCIM. Expect provider-specific behavior.
You should now see an output like this in your terminal (wherever you're running your app with mvn spring-boot:run):
{schemas=[urn:ietf:params:scim:schemas:core:2.0:User], userName=test@stytch.com, name={givenName=Test, familyName=User}, emails=[{value=test@stytch.com, primary=true}], password=test123, active=true}Now you're ready to automate this process in Okta. Go to the Provisioning tab, click Edit next to the Provisioning to App section, and click Enable next to Create Users, then Save.
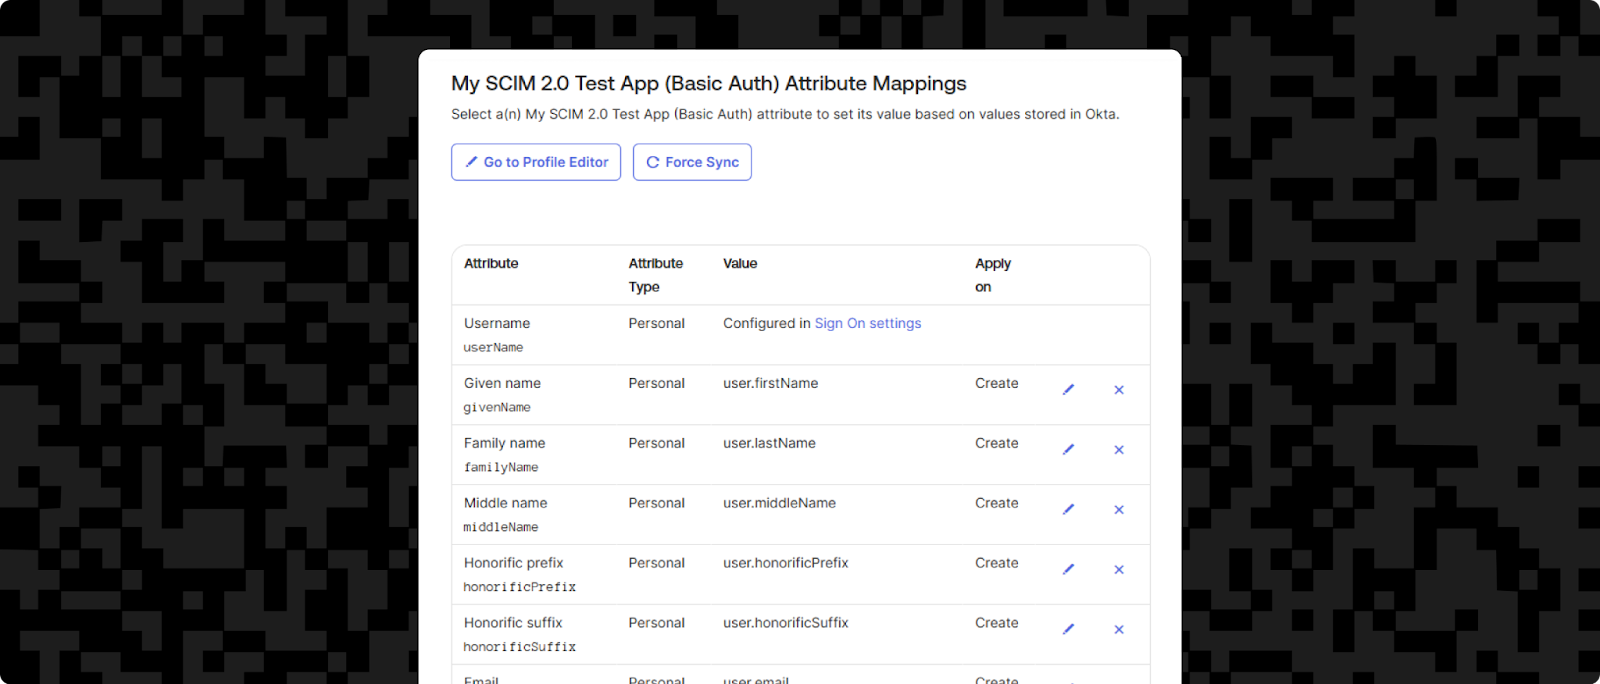
While we're on the Provisioning tab, it's worth scrolling down to take a look at the Attribute Mappings section. This is a section that maps Okta fields to their equivalent SCIM fields. Providing you're doing a standard SCIM implementation, these should work out of the box — but if you're changing anything or creating custom endpoints, you may need to make changes.
Now you're ready to provision a user to your app using Okta. Go to the Assignments tab and choose Assign > Assign to People. You can choose yourself as the user to provision by clicking Assign next to your account. This allows you to edit your own fields before you assign, but since you don't need to change anything here, you can just scroll to the bottom and click Save and Go Back. This starts the process of provisioning you as a user to the SCIM stub app. Your application output should now show:
{schemas=[urn:ietf:params:scim:schemas:core:2.0:User], userName=janedoe@stytch.com, name={givenName=Jane, familyName=Doe}, emails=[{primary=true, value=janedoe@stytch.com, type=work}], displayName=Jane Doe, locale=en-US, externalId=xxxxxxxxxxxxxxxxxxxx, groups=[], password=xxxxxxxx, active=true}5. Next steps
You'll need to also test user deprovisioning and updates, as well as group provisioning, deprovisioning, and updates. To do this, you'll need to enable these options in the Provisioning tab.
You also need to implement a proper SCIM API, ensuring good security and that all endpoints do what they need to. You can achieve this using a SCIM library, using your own expertise, or by using a third-party SCIM provider.
Common SCIM implementation pitfalls
- Attribute mapping mismatches: Each identity provider has slight differences in how they name their fields, meaning attribute mappings need to be different for each identity provider. If you're doing anything non-standard, such as creating your own custom endpoints, you'll need to ensure that the mappings work for each possible identity provider that your customers might use.
- PATCH handling differences: Updating a user or group in SCIM usually involves doing a PATCH so you can just update one field at a time. However, each identity provider handles this slightly differently. They all send valid SCIM JSON data, but there is often a variation in the structure. This can lead to a lot of time wasted parsing all the slightly different PATCH requests from different identity providers, or debugging issues around that.
- Case insensitivity of
userName: TheuserNamefield is case insensitive, according to the SCIM specification. This can cause problems, likejdoeandJDOEbeing seen as two different users in an identity provider but as the same user in the SCIM service provider, which can lead to broken syncs.
Building SCIM in-house vs using Stytch
When implementing a SCIM API that needs to work with many different identity providers, you'll need to ask yourself whether to build or buy: you can either build a custom SCIM connector in-house or leverage an out-of-the-box SCIM connector like Stytch.
Building your own SCIM API sounds simple at first, but it soon becomes frustrating when you find yourself dealing with the quirks of each different identity provider. You’ll need to figure out how different identity providers (like Okta, OneLogin, Entra ID, JumpCloud, and Google Workspace) each map resource attributes and integrate with the SCIM protocol differently. Be prepared to spend ages learning about their inconsistent CRUD behaviors and PATCH handling, as well as their case sensitivity problems and retry failures. Unless you have the resources of Google or Microsoft, it's just not worth the time and distraction from your core product.
Stytch does all the SCIM heavy lifting for you. It converts SCIM requests for any identity provider into retry-safe webhooks and deals with any mismatches between identity providers (and it supports all the major identity providers). It also gives you a self-service admin panel to configure the basics, making it easy to get started.
By leveraging Stytch's SCIM base connector URL, enterprise applications can effortlessly configure their IdP and connected service providers to send and receive SCIM updates without the need for an in-house SCIM implementation.
Stytch has enterprise-grade security and compliance with audit logging and multitenancy included as standard.
Another compelling reason to use a SCIM provider like Stytch is that we support other open industry protocols such as SAML, OIDC, and OAuth. With Stytch, these protocols (as well as SCIM) can be implemented in a matter of days, as opposed to the months or even years it would take for an in-house implementation.
Authentication & Authorization
Fraud & Risk Prevention
© 2020-2026 Stytch. All rights reserved.