Back to blog
MCP authentication and authorization implementation guide
Auth & identity
Jul 21, 2025
Author: Stytch Team

Model Context Protocol (MCP) is an open standard that bridges large language models (LLMs) to external tools, APIs, and services. It connects AI agents to third-party services in a structured way, opening up powerful possibilities for AI assistants to perform permitted actions on your behalf.
These AI-to-service connections must not compromise authentication, access permissions, or data privacy. OAuth 2.1 has emerged as the foundation for MCP authentication, enabling users to log in and explicitly authorize an agent, all through familiar web OAuth flows and consent screens. Yet, implementing secure authentication to these standards can be complex, requiring careful attention to OAuth 2.1 specifications, token management, and user consent flows.
This guide explains how to implement proven web security standards for delegated access using MCP. It covers the core MCP roles and flow, how OAuth fits in (including all the required endpoints and specifications like PKCE and dynamic client registration), and practical steps to build or integrate an authorization server for MCP.
Table of Contents
- MCP basics explained
- The role of OAuth in MCP security
- Key OAuth components in MCP
- Example: How an end-to-end OAuth flow works with MCP
- MCP and OAuth implementation
- How to build an OAuth 2.1 MCP authentication flow
- MCP deployment considerations (cloud functions vs. traditional)
- User consent and front-end integration
- Staying aligned with the MCP specification
- MCP auth doesn't have to be as complex as it sounds
MCP basics explained
MCP defines a standard interface for an AI agent to communicate with external services in a controlled way. There are three core components in this ecosystem:
- The MCP client lives inside the AI agent and is responsible for calling out to tools or services via the MCP protocol, making JSON-RPC or HTTP requests.
- The MCP server translates standardized MCP requests into API calls or operations on the third-party service. It advertises what actions are available and executes them. It also handles authentication and authorization of the MCP client. When interacting with a third-party service, it may perform an additional level of authentication to ensure secure, scoped access..
- The third-party service is the underlying service or API that actually fulfills the request. This could be a cloud service like GitHub, Notion, Google Calendar, or your own application.
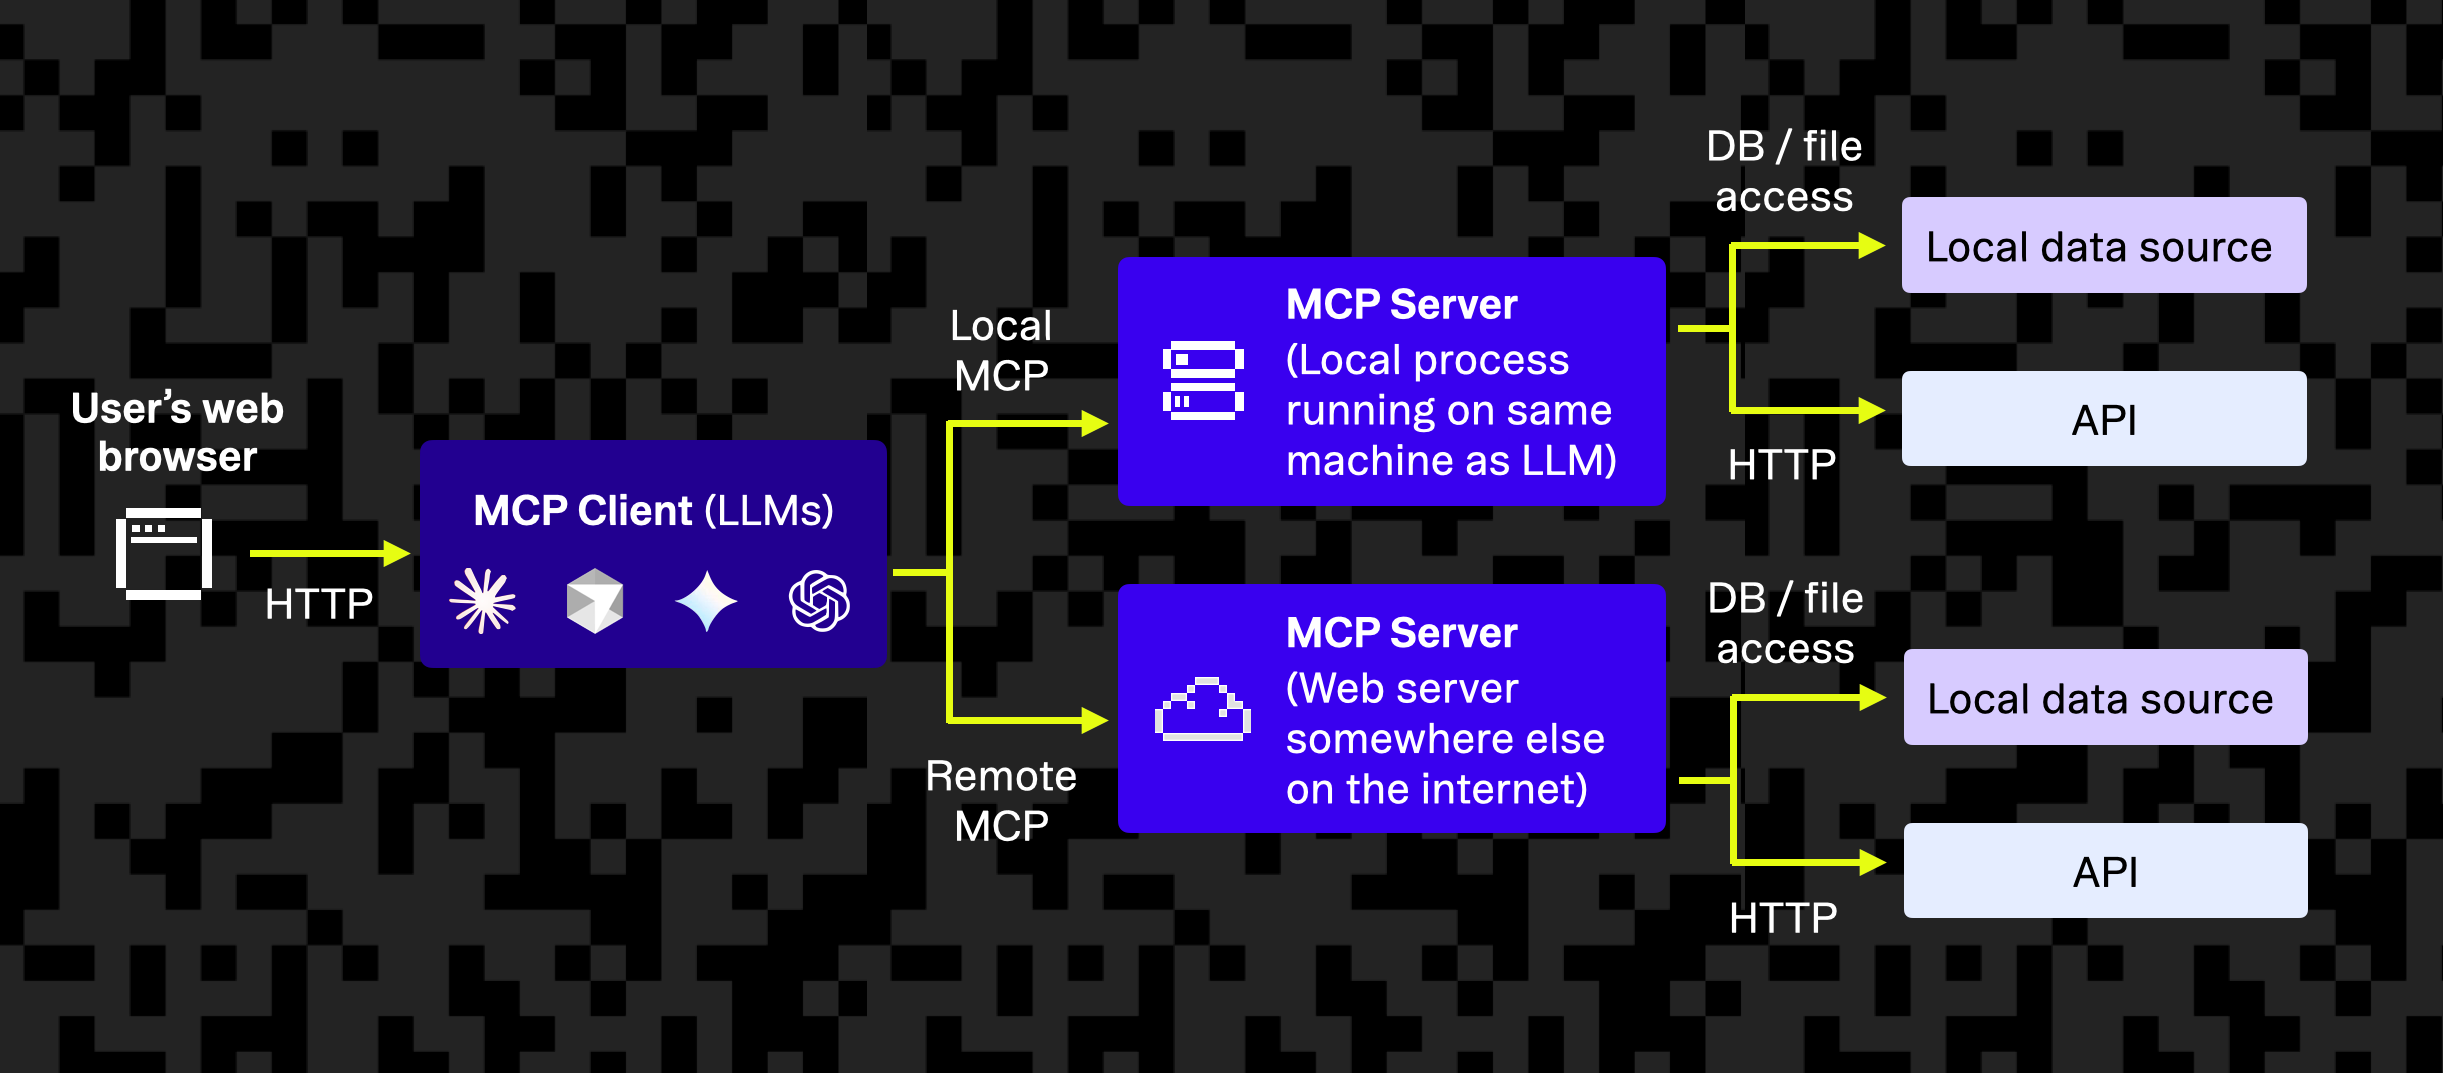
Think of MCP as a standardized form of RPC for LLMs. For example, the MCP server for a to-do list app might advertise a tool named createTask to which an LLM can send a structured request, which, in turn, calls the Create Task API in the app. MCP adds a consistent structure around these interactions, including how the LLM discovers available tools and how results are returned in a machine-readable format.
The role of OAuth in MCP security
The MCP specification now formally incorporates familiar OAuth flows (with some modern extensions) for user authentication and consent. Users can grant an AI agent limited access to their data, explicitly authorizing it to act within a specific scope, all without sharing their password or handing out unlimited credentials.
When an agent tries to use an MCP tool that requires a user’s account, the MCP server requires the agent to obtain an access token on behalf of that user. The user logs in and approves specific permissions for the AI, and then the AI receives a token that it includes in subsequent calls. The MCP server checks this token on each request to ensure it’s valid and permitted.
This way, the user remains in control. Tokens are revocable and have a limited lifetime. The access token links the authorization to the user’s identity, unlike API keys, which don’t preserve the user’s identity.
Key OAuth components in MCP
OAuth has been updated to work with MCP implementations through key components that enable secure discovery, dynamic registration, and user consent.
Authorization server metadata (RFC 8414/OpenID)
Authorization servers publish .well-known/oauth-authorization-server or .well-known/openid-configuration documents to inform clients how to interact. These documents typically include:
- OAuth endpoints (
authorization_endpoint,token_endpoint,registration_endpoint,jwks_uri) - Supported OAuth features (
response_types_supported,grant_types_supported,scopes_supported,code_challenge_methods_supported) - Token endpoint authentication methods (not required for public clients)
This metadata allows clients to dynamically self-configure without hardcoding values.
Dynamic Client Registration (RFC 7591)
Dynamic Client Registration (DCR) allows MCP clients to onboard automatically. With DCR, the MCP client registers by sending basic details (application name, redirect URIs) to a specified registration_endpoint. The server returns a client_id and, optionally, a client_secret. This is implemented by either enabling DCR in your external IdP (such as Stytch) or implementing your own /register endpoint.
Proof Key for Code Exchange (PKCE, RFC 7636)
PKCE is mandatory in OAuth 2.1 and required by MCP. PKCE enhances security for public clients with the following:
- Code verifier and challenge: The client creates a random verifier and sends a derived challenge during authorization.
- Token exchange: The original verifier is required, ensuring intercepted authorization codes can’t be misused.
Scopes and consent
Scopes specify what a token allows. Define scopes based on your MCP server functionality, enforce scope checks within your MCP server, and always design scopes with least privilege. Make sure you clearly show scopes during user consent for transparency.
Resource indicators and protected resource metadata (RFC 8707 & 9728)
MCP uses resource indicators to scope tokens securely. Clients must include the MCP server’s address in the resource parameter during authorization requests. The resulting token includes this value as the audience claim, ensuring it's valid only for that specific server and preventing misuse across services.
Building on this, protected resource metadata allows clients to discover how to authenticate with a given MCP server. Each server exposes a .well-known/oauth-protected-resource endpoint that returns its resource identifier, supported token methods, trusted authorization servers, and optionally a JWKS URL for validating tokens locally.
Together, resource indicators and metadata form the foundation for secure, discoverable authentication in MCP.
Token format and verification between an MCP server and the underlying service
MCP supports two main token formats:
- JSON web tokens (JWT): Tokens are signed with claims (
sub,iss,aud,scope,exp). This allows for fast local validation without database calls by the MCP server These claims allow the MCP server to validate tokens issued to MCP clients locally, using public keys, without making a database call.. - Opaque tokens: These are random token strings stored in a database. The MCP server must verify each token through a database lookup, which can introduce latency. This simplifies token revocation.
Each of these is appropriate for different levels of complexity or scaling requirements.
Example: how an end-to-end OAuth flow works with MCP
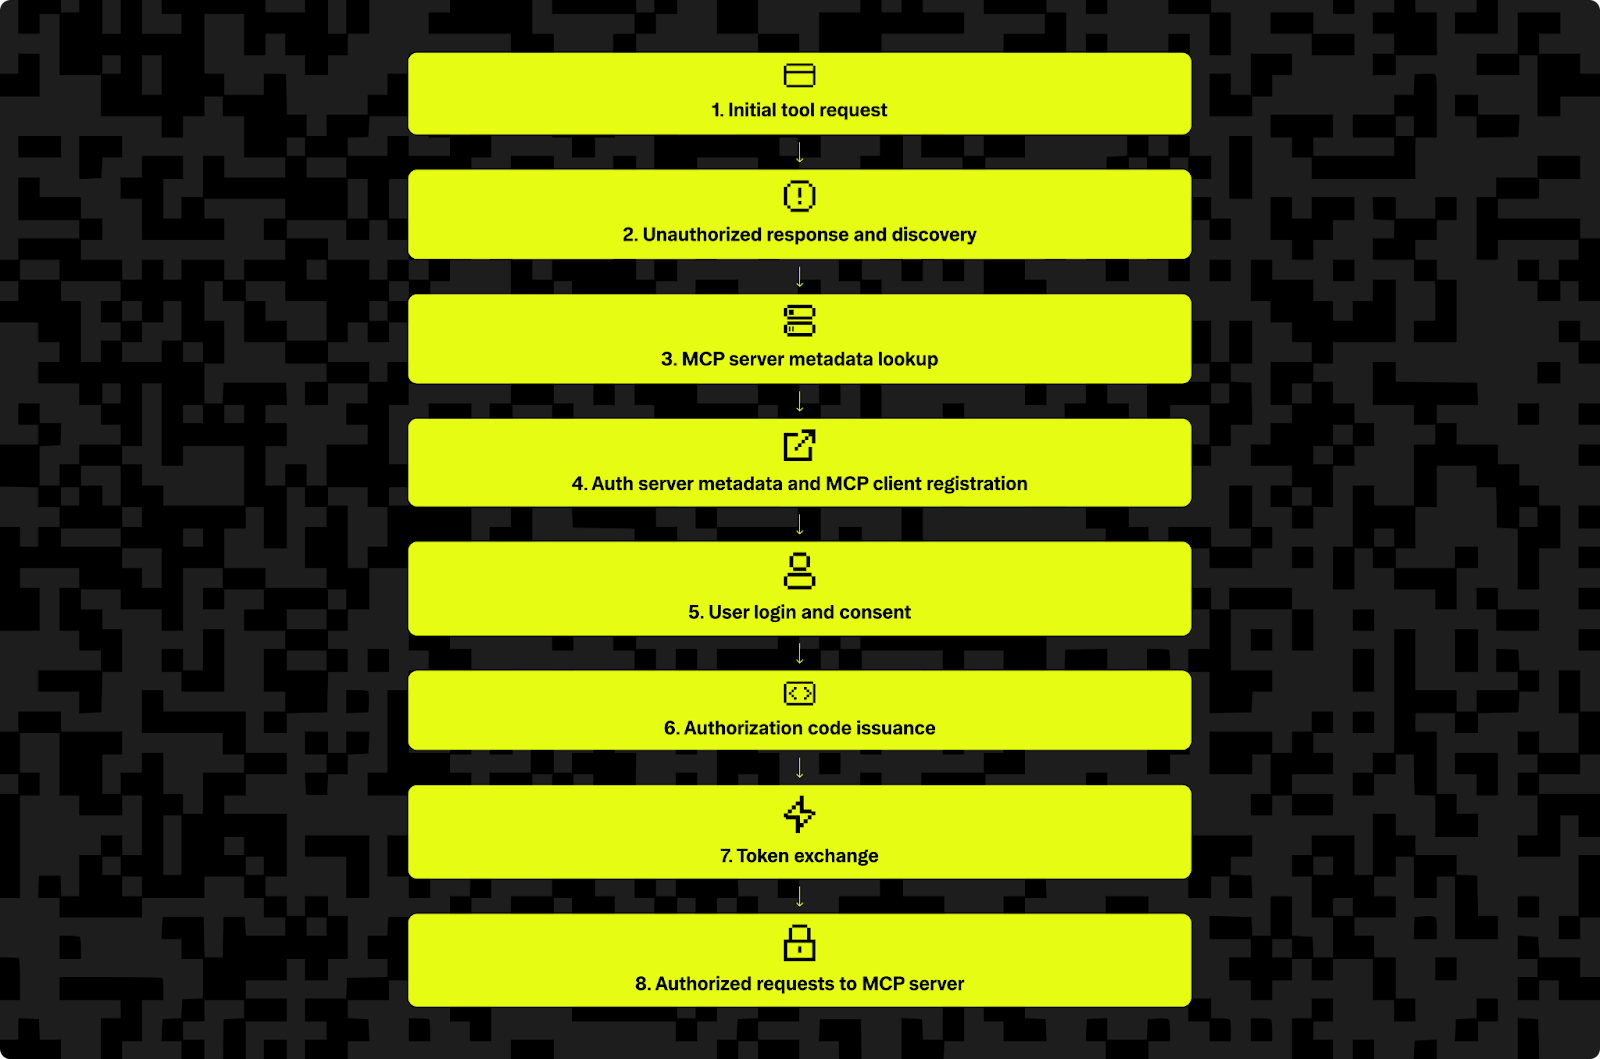
The following example end-to-end authentication flow shows how an AI agent accesses a protected MCP server. This sequence aligns with the OAuth 2.1 authorization code grant (with PKCE) adapted for MCP security.
1. Initial tool request
When prompted, the LLM (acting as the MCP client) attempts to call a tool on the MCP server without credentials, sending a POST request to an endpoint such as https://api.example.com/mcp.
2. Unauthorized response and discovery
Because no access token was included in the request, the MCP server rejects the request with a 401 Unauthorized response. This response includes a hint for the client on how to get authorized: a WWW-Authenticate header that contains a URL to its protected resource metadata document.
The header might point to https://api.example.com/.well-known/oauth-protected-resource. This tells the client that it needs to authenticate and where it can find information about what authorization server to use.
3. MCP server metadata lookup
The AI client retrieves the metadata from /.well-known/oauth-protected-resource. This JSON document tells the client things like the resource’s identifier (URI), the authorization server(s) it trusts, and how tokens should be presented (for example, as Bearer tokens in headers).
4. Auth server metadata and MCP client registration
Given the auth server URL, the client next fetches the authorization server metadata JSON from /.well-known/oauth-authorization-server. This includes information that tells the client which URLs to send users for login and exchange codes for tokens, as well as information like supported scopes and grant types and whether DCR is supported.
If DCR is supported, the AI client can self-register by POSTing its client_name, redirect_uris, and optionally a logo_uri for branding the OAuth login flow. It receives a client_id in response. In most MCP contexts, the client is public — no client_secret is used, and PKCE is required instead.
If registration is not supported, the AI client must receive a client_id through an out-of-band mechanism, usually by having a developer or an administrator manually pre-register the AI with the identity provider.
5. User login and consent
With its configuration in place, the AI now initiates the OAuth flow by directing the user to the authorization_endpoint.
The user is then prompted to log in and grant consent. The consent screen lists the requesting app’s name and requested scopes, and if the user approves, the flow continues.
6. Authorization code issuance
When the user approves, the authorization server redirects the user’s browser to the provided redirect_uri, including a temporary authorization code and the original state.
The MCP client typically has a local web server listening at that redirect to receive the code securely. This single-use code is short-lived and represents the user’s granted authorization but is not yet the token to access resources.
The actual implementation for this step can vary. For example, the authorization code may be obtained through different routes (such as using an intermediate callback after user login), with the server then issuing the code to the client. However, the result should always be the same, with the client being issued an authorization code.
7. Token exchange
The AI client now sends a back-channel request to the token endpoint to exchange the authorization code for tokens. This is a server-to-server call that does not involve the user’s browser.
The token endpoint validates the code and verifies that the code_verifier matches the earlier challenge. This confirms that the same client that initiated the flow is redeeming the code. If all checks pass, the server issues an access token. A refresh token is often included as well, particularly if the client requests one by including the offline_access scope or if long-term access is expected. The presence of refresh_token in grant_types_supported in the metadata indicates that the server supports this capability.
8. Authorized requests to MCP server
The AI agent can now make authorized calls to the MCP server. It includes the Bearer access token in the Authorization header of HTTP requests.
If valid, the request is allowed to proceed, and the MCP server performs the tool action. From here on, the LLM can interact with the MCP server repeatedly — until the token expires or is revoked — without prompting the user again each time.
MCP server acts on third-party service
When fulfilling a tool request, the MCP server may need to call an underlying third-party API. Token passthrough, where the MCP server would use the same access token or an associated credential to call the third-party service on behalf of the user, is explicitly not allowed.
Instead, the MCP server maps the authenticated MCP client request to a separate, upstream token that it uses to call the third-party API. This architectural choice is intentional: the MCP server acts in two distinct roles, as a Resource Server to the LLM client and as a Client (or Relying Party) to the third-party service. Because the scopes, semantics, or trust boundaries may differ between those layers, the MCP server is responsible for performing this translation in line with the user’s consent.
The MCP specification deliberately treats interactions with third-party APIs as out of scope. It only defines the protocol between the MCP client and the MCP server. As a result, it’s up to the implementer to ensure that any calls to upstream APIs are properly authorized and aligned with the user’s original consent.
This flow closely mirrors what happens when you “Sign in with [Service Name]” to connect web apps, only here, the “app” is an AI agent. The MCP specification has made this concrete by mandating OAuth 2.1 usage and even defining how the 401 responses and discovery documents should work.
Following this flow, we get a system where:
- Only authenticated users can initiate tool usage: The AI can’t act for an anonymous or unauthorized user.
- Fine-grained consent is captured: The user sees exactly what permissions are being granted and can approve, cancel, or later revoke access.
- The AI’s access is auditable: The issued token can be tied to specific permissions and is logged by the auth server.
- The MCP server stays secure: Every request is validated, and tokens expire automatically. If an IdP is used, the MCP server doesn’t have to manage passwords or user credentials directly.
MCP and OAuth implementation
When implementing MCP authentication, you essentially have to build or integrate an OAuth 2.1 authorization server and tie it to your MCP server. There are two high-level options for this:
Option 1: Embedded authorization server
In this model, your MCP server includes its own auth system that handles login, user sessions, consent UI, token issuance, and verification. It acts as both the authorization server (IdP) for managing user identities and issuing access tokens and the resource server for validating tokens and serving protected MCP tools.
Pros
With an embedded authorization server, you have complete control over the user experience and authentication logic. The setup is fully self-contained, meaning there are no external dependencies required for handling login or token issuance. This also allows the MCP server to authenticate with multiple upstream OAuth providers and broker tokens with each.
Cons
This approach requires significant implementation effort. You need to build and maintain every part of the OAuth flow, including login interfaces, consent screens, secure credential storage, and token management. It also increases your exposure to potential security and compliance risks since you’re responsible for the entire authentication system.
This model is best suited for teams building standalone MCP services who want full control over the stack and can handle the high operational burden.
Option 2: External authorization server
Here, your MCP server delegates OAuth to a trusted external provider, such as an enterprise identity provider like Stytch. The authorization server handles authentication, user management, consent, and token issuance, while your MCP server focuses only on validating tokens, enforcing scopes, and mapping users to internal data/actions.
Pros
Using an external authorization server significantly reduces the engineering effort required to implement secure OAuth flows. It allows you to leverage mature, battle-tested authentication infrastructure, making it easier to stay compliant with OAuth 2.1 and the latest MCP specifications.
Additionally, it enables centralized management of connected applications through tools like Stytch’s Connected Apps.
Cons
The main tradeoff to this approach is that it introduces an external dependency into your architecture. You’ll also have less direct control over the authentication user experience, although many providers offer options for customization.
This is the preferred choice for most modern deployments, particularly when integrating with existing auth infrastructure or third-party providers that already support features like dynamic client registration, PKCE, and robust token management.
How to build an OAuth 2.1 MCP authentication flow
The following steps explain how to implement OAuth authentication and authorization for MCP security.
Building MCP discovery endpoints
To support MCP authentication, your server needs to expose two standardized discovery endpoints that allow clients to understand how to authenticate and interact with your service. These endpoints return static JSON metadata and are fundamental to initiating the OAuth 2.1 flow.
Step 1: Discover the protected resource metadata (GET /.well-known/oauth-protected-resource)
When an MCP client attempts to call a tool without a valid access token, the MCP server should respond with a 401 Unauthorized status and include a WWW-Authenticate header that points to the resource metadata.
HTTP/1.1 401 Unauthorized
WWW-Authenticate: Bearer realm="MCP Server", resource_metadata_uri="https://api.toolbox.dev/.well-known/oauth-protected-resource"
This response signals to the client that it must initiate authorization and provides the location of the protected resource metadata (PRM) document.
The client then makes a GET request to the resource_metadata_uri to fetch the PRM. This document tells the client how to authenticate with the MCP server. A typical response might look like this:
{
  "resource": "https://api.example.com/mcp",
  "authorization_servers": ["https://auth.example.com"],
  "bearer_methods_supported": ["header"]
}Note: Unlike authorization server metadata, the protected resource metadata does not typically include a
jwks_uri. JWT validation is handled by the authorization server, whose metadata includes the appropriatejwks_urifield.
If your MCP server includes an embedded authentication server, it should still expose the authorization_servers field as a list of issuer URLs — not as embedded metadata. The client will retrieve full configuration from each authorization server’s own .well-known/oauth-authorization-server endpoint.
For example:
"authorization_servers": ["https://api.toolbox.dev"]The issuer listed here must match the issuer field in the authorization server’s metadata and must serve that metadata at the expected .well-known path.
Step 2: GET /.well-known/oauth-authorization-server
This endpoint provides authorization server metadata, allowing clients to discover how to interact with your OAuth implementation.
If you’re using an external IdP, this metadata will be hosted by that provider. If you’re running your own authentication server, you’ll need to implement this endpoint yourself. The response should look like this, customized based on your implementation:
{
  "issuer": "https://auth.toolbox.dev",
  "authorization_endpoint": "https://auth.toolbox.dev/authorize",
  "token_endpoint": "https://auth.toolbox.dev/token",
  "registration_endpoint": "https://auth.toolbox.dev/register",
  "jwks_uri": "https://auth.toolbox.dev/.well-known/jwks.json",
  "scopes_supported": ["calendar.read", "calendar.write"],
  "response_types_supported": ["code"],
  "grant_types_supported": ["authorization_code", "refresh_token"],
  "code_challenge_methods_supported": ["S256"],
  "token_endpoint_auth_methods_supported": ["none"]
}
If you don't support DCR, omit the registration_endpoint. If you don't support refresh tokens, omit the refresh_token from the grant_types_supported array.
Discovery endpoints implementation tips:
- Both endpoints must be public, as they’re accessed before the client has any credentials.
- These JSON files can be static or generated at startup, so make sure they are up to date and reflect your current capabilities.
- Tools like Postman, curl, or custom test clients can help validate that metadata is reachable and correctly formatted.
Discovery endpoints are lightweight to implement but essential for interoperability: Without these, clients can’t begin the OAuth handshake.
Implementing user authentication and consent
The /authorize endpoint is the gateway for user login and consent in the OAuth flow. This is where the user interacts with your system to approve the AI agent’s access request. Depending on your setup, this step may be handled by your MCP server (embedded authentication) or entirely delegated to an external provider like Stytch.
If you’re using an external IdP, the client will redirect the user directly to the provider’s authorization page, and your MCP server doesn’t need to implement /authorize.
If you’re managing the embedded authentication flow yourself (or using a hybrid setup), you’ll need to build and maintain your own /authorize endpoint.
Step 1: Authenticate the user
When the user is directed to the /authorize endpoint, the first step is to check whether they’re already logged in. If not, you need to present a login screen.
This login can take different forms depending on setup. For example, it could be a simple email/password form or a federated login like “Sign in with [Service Name].” Most teams use third-party authentication systems to handle this step securely and avoid managing passwords or MFA flows directly.
In some cases, especially when your MCP server is wrapping a third-party API like Google Calendar, “logging in” the user means initiating an OAuth flow with the third-party provider (e.g., Google). In this case, your MCP server functions as an OAuth client to the external API. After the user completes that nested OAuth flow and grants consent, the MCP server receives an access token that it can store and later use when calling the upstream API during tool execution.
Step 2: Request consent for scopes
Once the user is authenticated, show a consent screen that clearly lists the scopes being requested (for example, “Access your calendar” or “Create new tasks”).
The user must be given the option to approve or deny the request. If they deny it, redirect them back to the client with an appropriate error. If they approve, continue the flow.
Some flows (especially first-party ones) combine login and consent, but it’s good practice to display scopes explicitly. If you’re using an external provider, they’ll often handle this for you automatically, including persisting user consent on subsequent visits.
If you’re implementing this yourself, the UI can be as simple as a templated page that reads the requested scopes from the query string and presents an “Allow” button. It’s also a good idea to log the consent details (who approved what and when) so that you can revoke access or audit later if needed.
Step 3: Handle OAuth parameters and validate the request
The client will include several query parameters when initiating the /authorize request. Your server needs to validate them carefully before continuing. Key parameters include:
client_id: must match a registered clientredirect_uri: should exactly match a URI the client registeredscope: a space-separated list of requested permissionsstate: a random string sent by the client to mitigate CSRFcode_challengeandcode_challenge_method: required for PKCEresource: indicates which API or resource the token is for
If anything looks off, like a mismatched redirect URI or missing code challenge, your app logic should stop the flow and return an error.
Security note: If the
redirect_uripoints to alocalhostdomain or loopback address (e.g., for a desktop agent), you should always require explicit user consent, even if access has been previously granted. This prevents malicious applications running on the same machine from silently reusing old grants without user awareness.
Step 4: Issue the authorization code
If all parameters are valid and the user has logged in and given consent, you can generate an authorization code.
In most implementations, the code is a short-lived opaque string that should be stored server-side along with key context, including the user_id, client_id, scopes granted, PKCE code challenge, expiration time, and resource identifier.
Once stored, redirect the user to the client’s redirect_uri with both the code and original state, for example, https://client.example.com/callback?code=abc123&state=xyz789.
When that’s complete, the client will take the authorization code and continue with the /token exchange to get an access token. If you’ve validated everything carefully and tracked consent, your OAuth flow will be both secure and user-friendly.
User authentication and consent implementation tips
In serverless environments, if your MCP server runs in a stateless cloud function, store codes in a shared data store like Redis or Firestore. Alternatively, encode the context into the code itself (for example, as a signed JWT) if necessary.
If something goes wrong — whether the client is invalid, the user cancels, or parameters don’t validate — you should redirect back to the client with an appropriate error in the query string.
Authorization Code exchange
After the user approves access via the /authorize endpoint, the AI client, not the user’s web browser, makes a POST request to /token to exchange the authorization code for real tokens. This step happens server-to-server and commonly uses form-encoded data or JSON.
Here’s an example of what the request might look like:
POST /token
Content-Type: application/x-www-form-urlencoded

grant_type=authorization_code
&code=SplxlOExampleCode
&redirect_uri=http%3A%2F%2Flocalhost%3A8043%2Fcallback
&client_id=LLM123
&code_verifier=the_original_random_string
If you’re using an external authorization server, this request goes directly to the provider. Your MCP server doesn’t handle /token at all and only validates tokens later. But if you’re embedding the auth server within your MCP service, you’ll need to implement this route yourself.
Step 1: Validate the client
The /token endpoint must validate the client, and while most MCP clients are public and don’t use a client_secret, you should still check that the client_id is known. You can also require the redirect_uri to match the one used during the /authorize step as an additional safety check.
Next, it needs to verify the authorization code by looking it up in your database and ensuring it hasn’t expired or already been used. Confirm it was issued to the same client and (if applicable) that the redirect URI matches. You’ll also need to validate the PKCE code verifier by hashing the code_verifier and comparing it with the stored code_challenge. If any of these checks fail, return an appropriate error response (usually invalid_grant).
Step 2: Issue tokens
If everything checks out, the endpoint can issue tokens. You can return either a signed JWT or an opaque token. For JWTs, all the relevant claims (like user_id, scopes, and expiration) are embedded in the token and verified using a public key. For opaque tokens, you generate a random string and store its metadata in a database. In either case, you should also consider issuing a refresh token if you want the client to be able to renew access without user interaction.
Here’s an example of a typical success response from the /token endpoint:
{
  "access_token": "abc123",
  "token_type": "Bearer",
  "expires_in": 3600,
  "refresh_token": "def456",
  "scope": "tasks.read tasks.write"
}
You should return only the scopes that were actually granted. If you’re not issuing a refresh_token, you can omit that field.
Step 3: Error handling
If something goes wrong, like a bad code, an invalid client_id, or a PKCE failure, return a JSON error following the OAuth specification. Use HTTP status codes like 400 for invalid input or 401 if the client is unauthenticated:
{
  "error": "invalid_grant",
  "error_description": "Authorization code is invalid or expired"
}
Supporting refresh tokens
If you’ve enabled refresh tokens, your /token endpoint will also need to support the refresh_token grant type. The client will send a request that includes the original refresh token and the client_id. You’ll validate the refresh token, then issue a new access token and possibly a new refresh token if you’re rotating them.
This is especially useful for long-running AI agents that may need to act on a user’s behalf hours or days after the initial authentication. Without refresh, you’d need to prompt the user to log in again once the access token expires.
Protect MCP requests (token verification and scopes)
Once the OAuth flow is complete, your MCP server will begin receiving authenticated requests from AI clients. Each request will include an Authorization: Bearer <token> header. You need to validate that token and ensure the client is allowed to perform the requested action.
Step 1: Extract and validate the token
On each request to your MCP endpoints, check for the Authorization header. If it’s missing or malformed, respond with a 401 Unauthorized and include a WWW-Authenticate header that points to your .well-known/oauth-protected-resource endpoint. This signals to the AI client that it needs to initiate the auth flow.
If a token is present, verify it. The process depends on the type of token:
- For JWTs: Validate the signature using your public keys and check standard claims. Ensure that the issuer matches your auth server, the audience or resource matches your service, and the token hasn’t expired. Reject the request with HTTP
401or403responses if any of these checks fail. - For opaque tokens: Look up the token in your database or cache. Confirm it exists, hasn’t expired, and is associated with the correct user and client. You may have stored this during the /token issuance step.
Some providers also support token introspection endpoints (RFC 7662), but in most MCP setups, local verification or database lookups are sufficient.
If the token is invalid or expired, return a 401 response with WWW-Authenticate: Bearer error="invalid_token" and a short description.
Step 2: Attach authentication context
Once a token is verified, extract the relevant data — typically the user_id, client_id, and granted scopes — and attach it to the request context. This makes it accessible to downstream logic that enforces authorization and performs the requested action.
Step 3: Authorize the operation
Now map the incoming MCP request to the required scope in the underlying service (a third-party API or your own app or database). For example, a tool that writes data might require data.write, while a read-only action might require data.read. Compare the scopes granted in the token against what the request requires.
If the scopes are insufficient, respond with a 403 Forbidden and, optionally, include a WWW-Authenticate header describing the required scope. (insufficient_scope is the standard error value.) You can also respond using an MCP-specific error format if your server communicates over JSON-RPC.
The granularity of your scopes is up to you. Some implementations start with a single catch-all scope like app.access, while others define fine-grained scopes per tool or method. Start simple and expand as needed.
Step 4: Execute the tool logic
If the token is valid and the requested action is allowed, proceed to handle the request. At this point, you’ll usually need the user’s identity from the token to interact with the underlying service.
For example, if you’re calling an internal database, the token’s sub or user_id claim can be used to filter the user’s records. If the MCP server needs to call an external API (like Google Calendar), it should use a separately stored access token that it obtained by performing its own OAuth flow with that third-party service on behalf of the user. The access token received from the AI agent should never be forwarded to downstream APIs. Instead, the MCP server acts as an intermediary, translating the authorized request into a secure upstream call using its own credentials.
Step 5: Logging and observability
Log when tokens are used, especially if they fail verification or are rejected for insufficient scope. Including user_id, client_id, and the requested action in logs can be helpful for auditing and debugging. You may also track suspicious patterns like token usage from unexpected locations.
Example: Middleware for token verification
Here’s a simplified pseudocode example of middleware to authenticate a token:
async function authenticateToken(req, res, next) {
  const authHeader = req.headers['authorization'] || '';
  const token = authHeader.replace(/^Bearer\s+/, '');

  if (!token) {
    res.set('WWW-Authenticate', 'Bearer realm="MCP", resource_metadata_uri="https://api.example.com/.well-known/oauth-protected-resource"');
    return res.status(401).json({ error: 'missing_token' });
  }

  let tokenData;

  if (isJWT(token)) {
    try {
      tokenData = verifyJwt(token, PUBLIC_KEYS);
      if (tokenData.aud !== "https://api.example.com/mcp") {
        throw new Error('Invalid audience');
      }
    } catch (err) {
      return res.status(401).json({ error: 'invalid_token' });
    }
  } else {
    tokenData = await db.getTokenRecord(token);
    if (!tokenData || tokenData.expires_at < Date.now()) {
      return res.status(401).json({ error: 'invalid_token' });
    }
  }

  req.auth = {
    user_id: tokenData.sub || tokenData.user_id,
    client_id: tokenData.client_id,
    scopes: Array.isArray(tokenData.scope)
      ? tokenData.scope
      : (tokenData.scope || '').split(' ')
  };

  next();
}
And later when handling a tool request, avoid manually checking whether a specific scope like 'tasks.write' is present. This can lead to brittle logic that fails to account for broader permissions (e.g., 'tasks.admin') might also permit writes).
Instead, delegate this decision to your authentication middleware or utility function, which can validate the user's permissions in the context of the requested resource. For example:
// Inside your middleware or route handler
await stytch_session.authenticateJwt({
  session_jwt: token,
  authorization_check: {
    organization_id: tokenData.member_session.organization_id,
    resource_id,
    action
  }
})
In this example, the authorization_check enforces whether the authenticated user is permitted to perform the requested action on the specified resource, not just whether the app was granted access during the OAuth flow.
If the JWT does not authorize the request, authenticateJwt will raise an error and block the call. This pattern helps avoid common mistakes like hardcoded scope checks and keeps your authorization logic centralized and extensible.
At this point, your request is both authenticated and authorized. Your MCP server is now acting as a proper OAuth 2.1 Resource Server, validating each tool invocation with the appropriate user and resource context in mind.
MCP deployment considerations (cloud functions vs. traditional)
MCP servers can run in a variety of environments, but cloud functions and serverless platforms are especially well suited. They offer autoscaling, HTTPS by default, and low idle cost — ideal for event-driven workloads like AI-triggered tool calls.
Cloud functions / serverless
Popular platforms for hosting MCP servers include Cloudflare Workers, AWS Lambda, Netlify Functions, and Vercel Functions.
Consider the following when choosing a platform:
- Streaming support: MCP supports both legacy HTTP + SSE and newer chunked streaming via HTTP. Some platforms, like Cloudflare Workers, support streaming responses well. Others, like AWS Lambda, may require special configuration to support SSE. Check that your platform can hold open connections if you plan to support streaming MCP calls.
- Statelessness: Cloud functions are ephemeral, so any session data (such as authorization codes, tokens, and consent records) must be stored externally in a database like Redis, Firestore, or Postgres. If
/authorizeruns on one instance and/tokenon another, a shared database ensures continuity. - Cold starts: Serverless platforms may introduce latency during the first invocation. Consider strategies like keeping functions warm or using fast-start runtimes (for example, Workers on V8 isolates).
- Secrets and configuration: Store API keys and client secrets in secure platform-native secrets managers or environment variables and never hardcode them.
- Latency: To reduce round-trip time, deploy close to users or the AI system calling your MCP server. Edge platforms like Cloudflare are ideal for this.
Traditional servers (VMs/containers)
Running an MCP server on a long-lived container or VM gives you more control and can simplify debugging and local caching.
- You can use in-memory storage for tokens and codes — but only if you’re running a single instance or using sticky sessions. For high-availability deployments, a shared store is still necessary.
- HTTPS is mandatory as OAuth requires it. Even if running locally during development, always test over HTTPS for parity with production.
- Load-balanced deployments should serve consistent, well-known discovery documents and share state across instances.
Persistent servers can be easier to monitor and debug but may cost more at idle and require more operations work for scaling.
External authorization server integration
Using an external OAuth provider can offload the most complex and sensitive parts of the authentication flow. In this model, your MCP server acts purely as a resource server, delegating login, consent, and token issuance to a separate authorization server.
This pattern greatly simplifies deployment. The external service handles:
- User login and consent UI
- Token issuance and refresh
- Dynamic client registration
- Publishing JWKS for token validation
Your job becomes verifying incoming JWTs and enforcing scopes, typically using the provider’s public keys or SDK. Many services also track granted scopes per user and client, so consent prompts aren’t shown unnecessarily.
Deployment tips
Here are a few tips to secure the deployment of MCP servers to production while providing a consistent end-user experience:
- Token storage: If using opaque tokens or refresh tokens, persist them securely with TTLs.
- Consent persistence: Whether implemented internally or delegated, store user consent per client to avoid prompting on every authorization.
- JWKS caching: If verifying JWTs, cache public keys locally and refresh periodically using the key ID.
- Rate limiting: Protect
/tokenand login routes from abuse. Throttle failed auth attempts and code redemption failures. - Security hygiene: Use secure cookies, enforce TLS, and avoid logging sensitive data.
Deploying your MCP server as a stateless function with external auth is often the easiest and most secure path, provided you’re equipped with a reliable storage layer and a good observability setup.
User consent and front-end integration
When designing your user authentication and authorization experience, keep it fast, friendly, and transparent. Users shouldn’t need to wonder what’s happening or who they’re giving access to. Well-executed front-end flows increase trust in your AI integration and reduce support load from confused users.
For full-featured deployment, consider an identity provider that handles login, consent UI, client management, and revocation UX. This lets your team focus on building your MCP logic, not OAuth screens.
When does consent happen?
From the user’s perspective, this usually starts when an AI interface prompts them with something like:
“To allow [Agent Name] to access your account, click here to log in and authorize.”
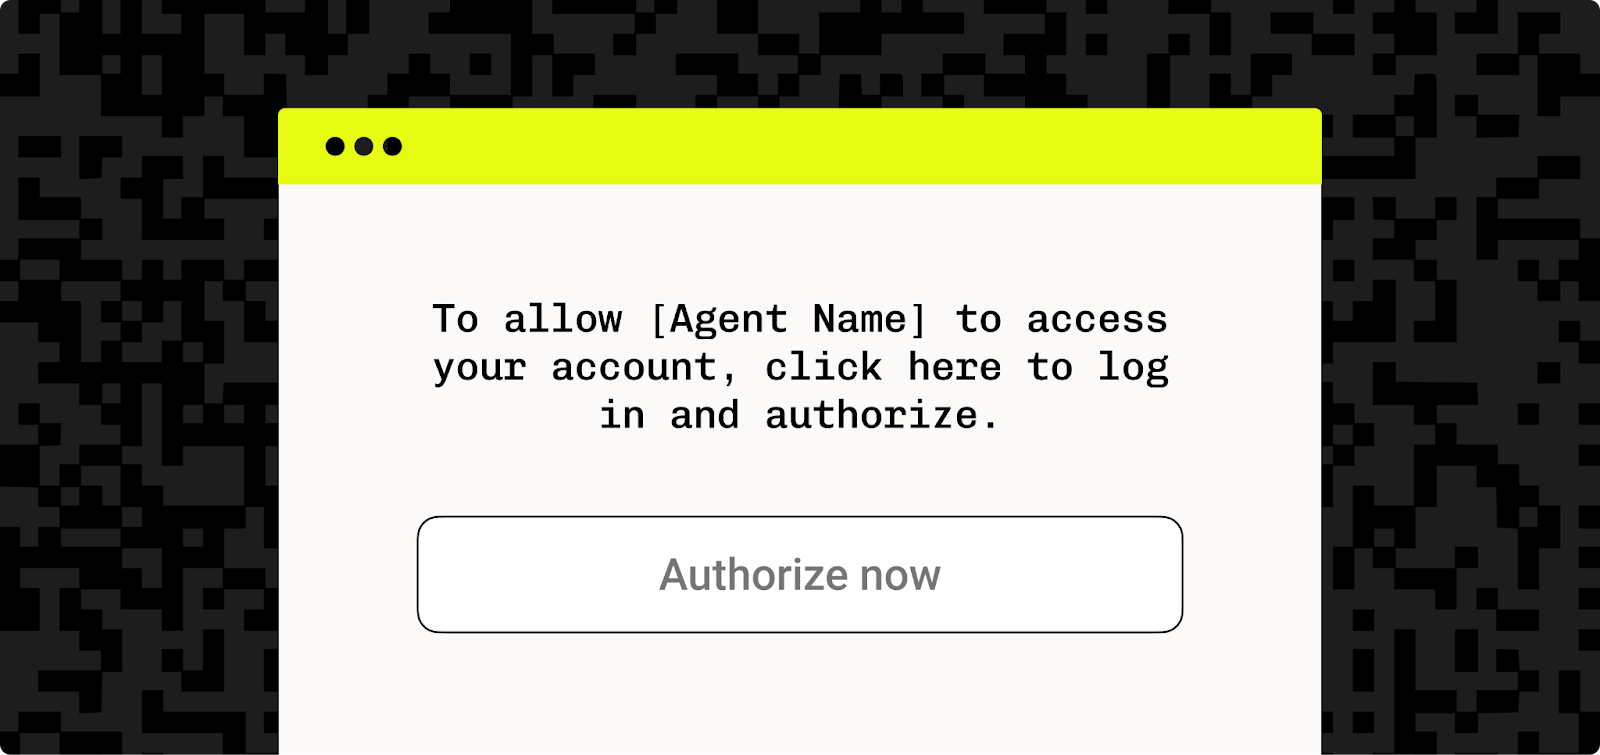
Clicking the link opens a browser or in-app window pointing to your /authorize endpoint (or your external IdP’s authorization URL). This kicks off the OAuth flow.
Step 1: Design a good login page
Your login page may be a user’s first interaction with your service, so it’s worth investing the time to get it right. If you control the login screen, ensure the page is:
- Mobile-optimized and fast-loading: Many users will hit this flow from a mobile device or a webview inside an AI interface.
- Clearly branded: Users should instantly recognize they’re authenticating with your service. Use your logo, colors, and visual design to reinforce this.
- Simple and focused: Avoid extraneous UI or content, and show only what’s necessary (a login form and maybe a short explanation of what’s happening).
If you’re using an external IdP, you’ll likely redirect to their hosted login page, which may include theming options to match your brand.
Step 2: Clearly identify the AI agent
Modern OAuth flows increasingly treat AI agents as distinct clients. Your consent screen should display the name and identity of the requesting AI application, not just a generic “This app is requesting access” message. This helps users understand exactly who they’re granting access to and make informed decisions.
Step 3: Build the consent UI
The consent page should:
- List each requested scope in plain language. For example, “Read your to-do list” or “Write new calendar events.”
- Show an “Allow” and “Deny” button — don’t make consent ambiguous.
- Include the agent’s identity so that the user knows who they’re authorizing.
- Optionally include contextual info like when this access will expire or if it will be remembered for future sessions.
If the user clicks “Deny,” your server should redirect back to the AI client’s redirect_uri with an access denied error. If not feasible, a fallback message like “You can close this window — the AI was not granted access” works too.
If your users have multiple accounts, consider allowing them to switch before continuing, similar to how Google lets you pick an account. This ensures users don’t mistakenly grant access from the wrong profile.
Step 4: Implement front-end authentication logic (for embedded flows)
If you implement your own login directly in your front end (rather than redirecting to a provider-hosted UI), the flow might look like this:
- The user visits
/authorize. - You check if the user is logged in, and if not, show a login UI.
- If the user is logged in, skip straight to consent.
- After login, store the user session in a cookie or token.
- Show the consent screen with requested scopes and agent info.
- On approval, issue an authorization code and redirect to the AI client.
If you’re using an authentication SDK, the front end can handle login directly and then call a back-end /callback route with a verified identity token. Many identity providers offer production-ready front-end components that simplify login, session handling, and consent flows. You can explore these in interactive component playgrounds that also link to the relevant SDKs. These components are easy to embed into your authorization pages and help ensure your flows remain secure, consistent, and user-friendly out of the box.
Step 5: Ensure session and state security
When building your /authorize route:
- Always validate the state parameter on the redirect back to prevent CSRF and redirection attacks.
- Use
SameSiteandSecurecookies for any login sessions. - If you present a login form directly, apply CSRF protection.
- Never trust redirect URIs blindly, and validate that they match the one registered for the client.
Step 6: Add consent persistence
OAuth allows you to “remember” consent for a client once granted. Implement this by storing consent grants in your database:
{
  "user_id": "abc123",
  "client_id": "llm-456",
  "scopes": ["tasks.read", "tasks.write"],
  "granted_at": "2025-06-30T10:12:00Z"
}
This avoids prompting the user every time the AI wants to act. It improves the user experience and reduces friction, especially in long-running sessions. External providers like Stytch manage this automatically and give end users a dashboard to revoke access. If you’re self-hosting, you should offer a way for users to view and revoke connected agents in your app’s account settings.
Step 7: Handle errors and edge cases
Gracefully handle errors and edge cases in your front end by:
- Displaying a generic error and letting the user retry if login fails.
- Redirecting with an access denied error if the user denies access.
- Showing a message like “Something went wrong. Please try connecting again later,” if something fails mid-flow (for example, the token endpoint is down).
Staying aligned with the MCP specification
MCP continues to evolve rapidly, particularly in areas related to authentication and authorization. As of the June 18, 2025, specification update, the protocol has solidified its foundation around OAuth 2.1 and introduced new security requirements that all implementers should be aware of. While many changes are additive and backward-compatible, keeping your MCP server up to date with the latest version is essential for maintaining interoperability and security.
MCP servers are now official OAuth 2.0 Resource Servers
One of the most significant formalizations in the June 2025 specification is the classification of MCP servers as OAuth 2.0 Resource Servers. This means your server is now explicitly expected to:
- Serve a .
well-known/oauth-protected-resourcedocument. - Validate access tokens as described in the OAuth 2.0 spec.
- Require the resource parameter in token requests (per RFC 8707).
If your implementation predates this requirement, you’ll need to update your resource metadata and ensure tokens are scoped correctly to your server’s unique identifier. This change closes a potential security gap around token replay and resource ambiguity.
Resource indicators are now mandatory
The resource parameter is no longer optional. Clients are expected to send it in both the authorization and token request phases. Your authorization server must:
- Validate that the requested resource matches your API or service.
- Include an audience claim in issued tokens that binds the token to your resource.
- Reject tokens with missing or mismatched audiences.
This strengthens access boundaries and prevents misuse of tokens across services.
JSON-RPC batching removed
JSON-RPC batching is no longer part of the MCP specification. If your server previously accepted batched JSON-RPC calls, you should remove that support. This simplifies request parsing and improves clarity around error handling and authorization granularity.
Structured outputs and elicitation support
The latest MCP version introduces structured tool outputs and elicitation, features that improve model-server interaction:
- Structured outputs allow your server to return typed JSON responses, including arrays and objects with schema, rather than just plain strings.
- Elicitation enables your server to request additional context from the model or user mid-interaction (for example, asking for a missing parameter).
These features don’t change the auth flow, but they do interact with permission boundaries. For example, if an elicitation prompt reveals sensitive data, your server should ensure the requesting client has the appropriate scopes before responding.
MCP-Protocol-Version header
To ensure version compatibility, MCP clients must now send the MCP-Protocol-Version header after initial negotiation. Your server should check this on incoming requests and reject or downgrade gracefully if the version is unsupported. This prevents protocol mismatches across tool interactions.
Embedded vs. external authorization remains flexible
The MCP specification continues to allow both embedded and external authorization server models, so you’re free to:
- Embed the authentication logic that handles login, consent, and token issuance; allowing your MCP server to act as both the Resource Server and Identity Provider.
- Delegate to an external IdP, such as your company’s existing OAuth stack or a third party like Stytch.
Both approaches are valid, and the specification remains intentionally neutral. However, if you’re embedding, recognize that you’re assuming the responsibilities of an OAuth provider, including compliance with PKCE, refresh flows, DCR, and token validation best practices.
Watch for future guidance here, as reference implementations are likely to emerge.
Community-driven evolution
Because MCP is still a young and fast-moving protocol, changes often begin as discussions or PRs in the community:
- Follow the official MCP GitHub repository for proposed changes, reference implementations, and clarifications.
- Monitor developer blogs and changelogs from ecosystem contributors. Stytch often updates Connected Apps and related SDKs to align with the latest MCP features.
- Participate in forums or mailing lists where edge cases and specification clarifications are actively debated.
Being involved helps you catch breaking changes early and avoid surprises when a required parameter becomes mandatory in the next release.
Real-world compatibility testing
Spec alignment doesn’t just mean reading the RFCs: It means testing your implementation with the actual clients and LLMs expected to interact with your tools. That could be Claude, ChatGPT (if plugin/MCP support emerges), or open-source agent frameworks.
These clients may interpret parts of the specification slightly differently, so consider encoding quirks, headers, and error codes. Tools like the MCP Inspector can simulate real agent traffic and validate your server’s compliance with token formats, headers, redirect flows, and error behavior.
Staying current with the specification and testing against real-world clients is the best way to ensure a smooth experience for your users and secure access for AI agents.
MCP auth doesn't have to be as complex as it sounds
OAuth 2.1 is a well-established and secure standard that is suitable for connecting AI agents with user data and third-party services using MCP.
However, it is still a complex system to implement: It requires the development, testing, and hardening of discovery endpoints, supporting PKCE, enforcing scopes, and issuing valid access tokens. Ongoing maintenance, patching, and security monitoring are also required to ensure your MCP server is a safe and compliant bridge between AI and your application.
You must also build interfaces that engender trust and control with users. Provide full transparency and include granular controls that give users the ability to grant access as they see fit.
Identity providers like Stytch offload much of this work for you. They provide compliant, tested authentication and authorization infrastructure and front-end interfaces that are constantly updated to meet evolving specifications, developed by security experts.
Authentication & Authorization
Fraud & Risk Prevention
Resources
Community
© 2020-2026 Stytch. All rights reserved.