Back to blog
Building an MCP server with OAuth and Cloudflare Workers
Auth & identity
Apr 19, 2025
Author: Edwin Lim
This article will guide you through how to secure a Model Context Protocol (MCP) server with OAuth for authentication. MCP builds on the robust and widely adopted OAuth standard, allowing users to log in, review requested permissions, and explicitly authorize agents to act on their behalf.
We’ll explore a full-stack app with a REST API and an MCP server that uses OAuth for authentication and dynamic client registration to connect to an MCP client—all powering a simple todo list application that’s accessible to both users and AI agents.
Want to explore the codebase first? You can check out the full repo on GitHub.
MCP authentication overview

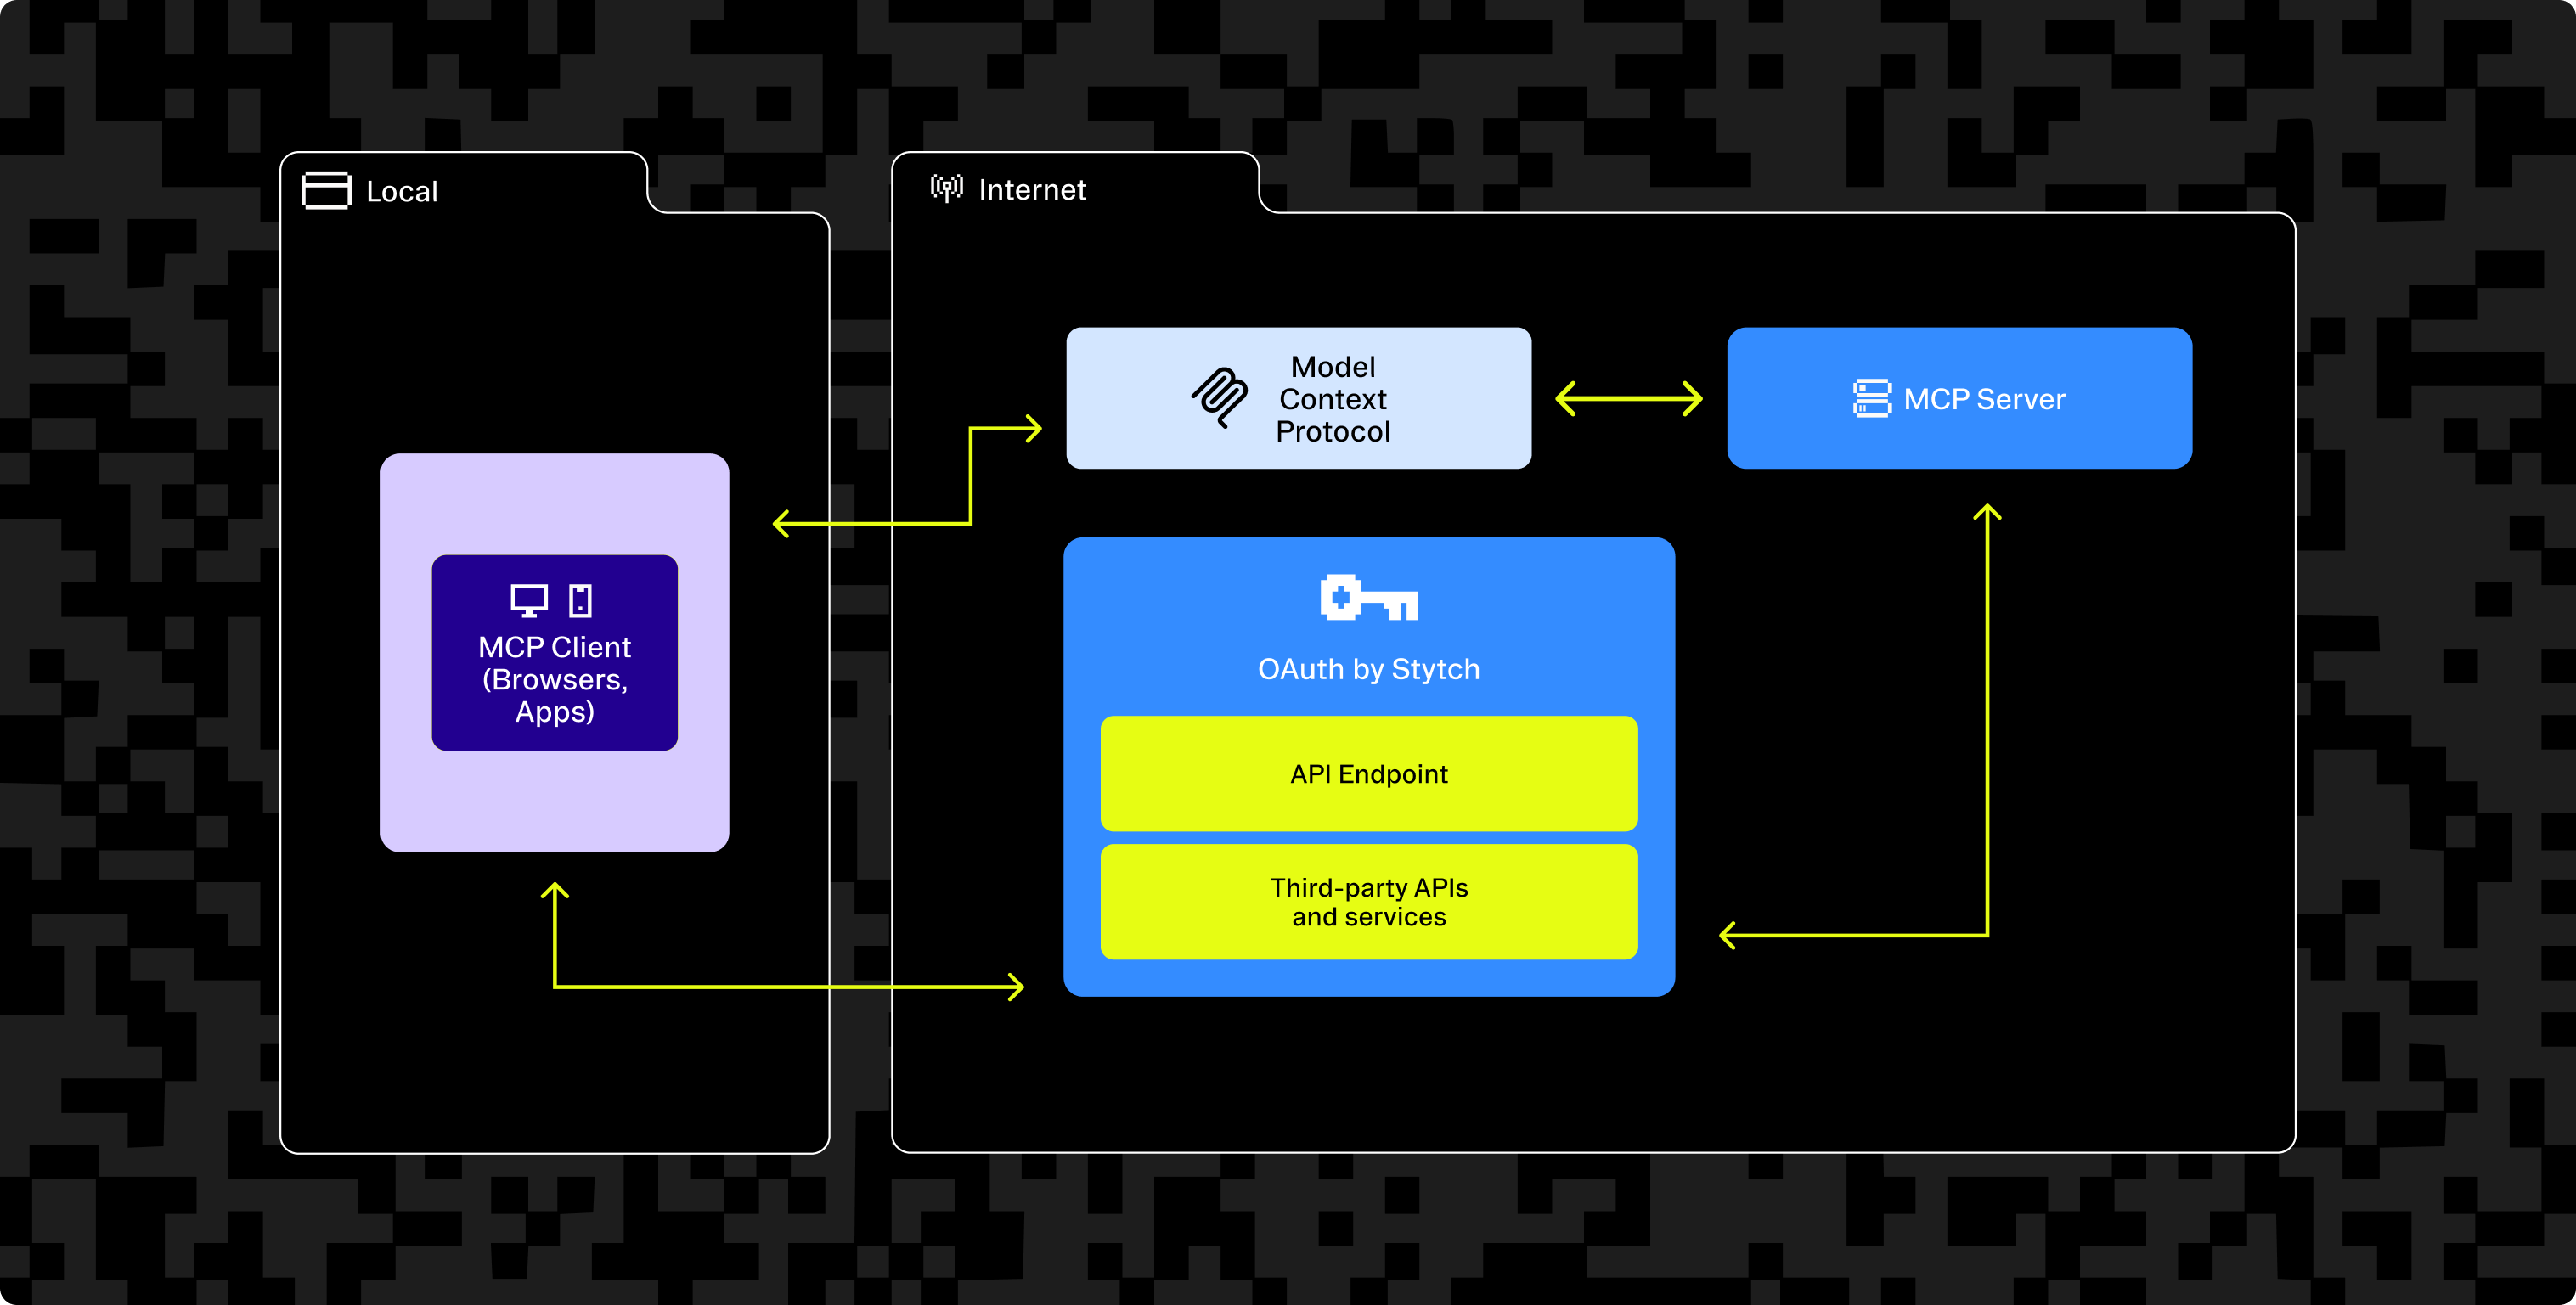
In an MCP setup, AI agents and assistants (MCP clients) need access to the MCP server and the downstream 3rd party service. OAuth is what makes this work: users authenticate with an authorization server which issues tokens (JWTs) that your MCP clients and servers can use to handle the auth flow.
Specifically, the authorization server is what enables a secure, user-consented OAuth flow in MCP. It’s responsible for:
- Acting as an Identity Provider
- Issuing signed access tokens with embedded claims
- Supporting OAuth 2.1 flows (like Authorization Code with PKCE)
- Displaying consent screens to users
- Dynamically registering MCP clients
- Managing token lifetimes, refresh logic, and revocation
- And more
For this example app, we’ll delegate authentication to Stytch as the authorization server to manage registered MCP clients and power the OAuth flows with the Connected Apps feature.
Application architecture
The full-stack application architecture consists of three main components:
- Frontend: A single-page React app that serves as the todo list interface. It uses Stytch’s JavaScript SDK to render the login form and OAuth redirects.
- Backend: A serverless backend that is organized into two layers:
- REST API: Built with the Hono framework to handle standard CRUD operations for todo items.
- MCP server: Handles requests from MCP clients and interacts with the todo API, using Cloudflare KV for storage and Durable Objects for persisting data.
- OAuth authorization server: The MCP server delegates authentication to Stytch, an auth provider. Stytch acts as an external identity provider, powering the OAuth flow—handling login, consent, client registration, and token issuance with the Connected Apps feature.
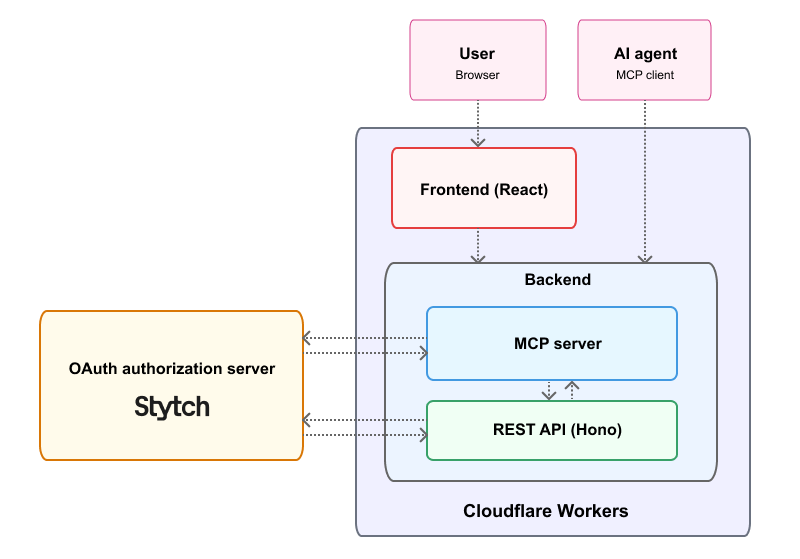
Both the frontend and backend components of this application can be deployed together to Cloudflare Workers as a remote MCP server.
Before you start
If you want to run the example app on your machine, you’ll need:
- Node.js installed
- A free Stytch account
Setting up your Stytch account
First, create and configure your Stytch account:
- Sign up at Stytch and select Consumer Authentication when prompted
- In the Stytch dashboard, navigate to Frontend SDKs and enable the frontend SDK
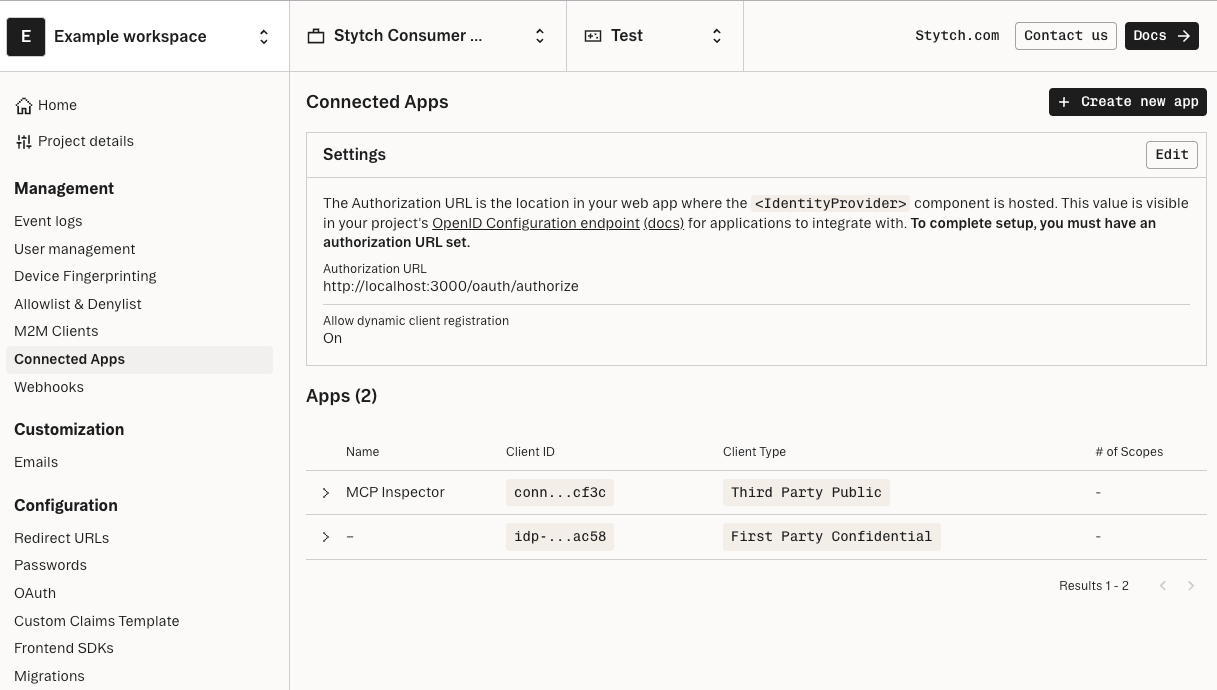
- Navigate to Connected Apps and enable Dynamic Client Registration
- Go to Project Settings to retrieve your Project ID and Public Token
Installation
Let's create the project structure:
# Clone the repository
git clone https://github.com/stytchauth/mcp-stytch-consumer-todo-list.git
cd mcp-stytch-consumer-todo-list

# Install dependencies
npm install

# Create environment files
cp .env.template .env.local
cp .dev.vars.template .dev.vars
Update your .env.local file with:
VITE_STYTCH_PUBLIC_TOKEN=your-public-token-from-stytchUpdate your .dev.vars file with:
STYTCH_PROJECT_ID=your-project-id-from-stytchStart the local development server:
npm run devYour application will be running at http://localhost:3000.
Testing with the MCP Inspector
To test your MCP server, use the MCP Inspector as an MCP client:
npx @modelcontextprotocol/inspector@latestThis will start an interactive session where you can connect to your MCP server at http://localhost:3000/sse.
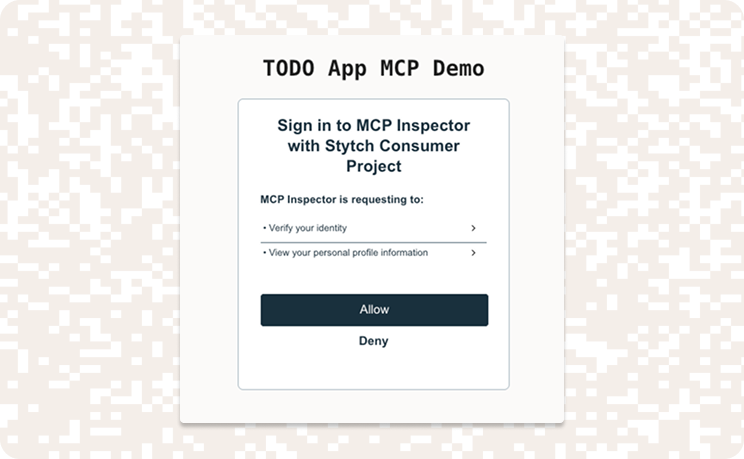
To run through the full end-to-end flow:
- Click Connect to initiate the connection to your MCP server
- Authenticate using an email one-time passcode
- When prompted, review and Allow the OAuth consent screen
Open the Tools tab and create a todo list item.
Understanding the project structure
The project is organized into a modular structure that separates the auth layer as middleware that can be reused by both the API and MCP server. Let's examine the key directories and files:
mcp-stytch-consumer-todo-list/
├── api/
│   ├── lib/
│   │   └── auth.ts           # Stytch authentication middleware and utilities
│   ├── index.ts              # Stytch OAuth discovery and register endpoints
│   ├── TodoAPI.ts            # REST API implementation
│   ├── TodoMCP.ts            # MCP server implementation
│   └── TodoService.ts        # Core business logic and data access
│
├── src/                      # Frontend React application
│   ├── App.tsx               # Main React component
│   ├── Auth.tsx              # Authentication Stytch UI components
│   ├── index.css             # Global styles
│   ├── main.tsx              # React entry point
│   ├── Setup.tsx             # Application setup and error handling
│   └── Todos.tsx             # Todo UI components
│
├── types.d.ts                # Shared type definitions
├── wrangler.jsonc            # Cloudflare Worker configuration
└── package.json              # Project dependencies and scripts
The API routes
In api/index.ts, we define the core application routes. Each route is responsible for a distinct part of the app: the REST API, OAuth discovery, and the MCP server.
export default new Hono<{ Bindings: Env }>()
    .use(cors())

    // Mount the TODO API underneath us
    .route('/api', TodoAPI)

    // Serve the OAuth Authorization Server response for Dynamic Client Registration
    .get('/.well-known/oauth-authorization-server', async (c) => {
        const url = new URL(c.req.url);
        return c.json({
            issuer: c.env.STYTCH_PROJECT_ID,
            // Link to the OAuth Authorization screen implemented within the React UI
            authorization_endpoint: `${url.origin}/oauth/authorize`,
            token_endpoint: getStytchOAuthEndpointUrl(c.env, 'oauth2/token'),
            registration_endpoint: getStytchOAuthEndpointUrl(c.env, 'oauth2/register'),
            scopes_supported: ['openid', 'profile', 'email', 'offline_access'],
            response_types_supported: ['code'],
            response_modes_supported: ['query'],
            grant_types_supported: ['authorization_code', 'refresh_token'],
            token_endpoint_auth_methods_supported: ['none'],
            code_challenge_methods_supported: ['S256'],
        })
    })

    // Let the MCP Server have a go at handling the request
    .use('/sse/*', stytchBearerTokenAuthMiddleware)
    .route('/sse', new Hono().mount('/', TodoMCP.mount('/sse').fetch))

    // Finally - serve static assets from Vite
    .mount('/', (req, env) => env.ASSETS.fetch(req))
Key routing logic:
/api: Hosts the todo REST API. This route is protected bystytchSessionAuthMiddlewareinsideTodoAPI.tsto ensure only authenticated users can access it./.well-known/oauth-authorization-server: Serves OAuth 2.0 server metadata for AI agents and other OAuth clients. This is essential for enabling Dynamic Client Registration (DCR) and initiating Authorization Code flows./sse: Reserved for MCP client connections. We first applystytchBearerTokenAuthMiddlewareto enforce that all agent requests include a valid OAuth Bearer token. We then mount theTodoMCPDurable Object, which implements the MCP protocol and routes agent tool calls to the correct backend logic./: Serves the React frontend app.
Todo API with Hono
The Todo API at api/TodoAPI.ts is a small RESTful interface for managing the todo list, primarily used by the React frontend. It uses Hono, a minimalist web framework, to define routes.
Key routes and behavior in TodoAPI.ts:
GET /todos– Fetch the current list of todos for the user.POST /todos– Create a new todo item.POST /todos/:id/complete– Mark a specific todo as completed.DELETE /todos/:id– Delete a specific todo.
Each route is protected by authentication middleware and then invokes the business logic via the Todo service. For example, the GET and POST routes look like:
// api/TodoAPI.ts
.get('/todos', stytchSessionAuthMiddleware, async (c) => {
    const todos = await todoService(c.env, c.var.userID).get();
    return c.json({ todos });
})
.post('/todos', stytchSessionAuthMiddleware, async (c) => {
    const newTodo = await c.req.json<{ todoText: string }>();
    const todos = await todoService(c.env, c.var.userID).add(newTodo.todoText);
    return c.json({ todos });
})
As shown above, we attach stytchSessionAuthMiddleware to ensure only authenticated users can hit these endpoints (more on this middleware soon).
The Todo service api/TodoService.ts encapsulates all the logic for managing todos in storage. Both the REST API and the MCP server use TodoService under the hood, ensuring consistent behavior. For example, the add method loads existing todos then pushes a new item and saves back to KV:
// TodoService.ts
add = async (todoText: string): Promise<Todo[]> => {
    const todos = await this.get();
    const newTodo: Todo = {
        id: Date.now().toString(),
        text: todoText,
        completed: false
    };
    todos.push(newTodo);
    return this.#set(todos);
}
MCP server
The MCP server api/TodoMCP.ts extends our app’s functionality to MCP clients with @modelcontextprotocol/sdk. MCP defines how an AI agent can discover a server’s capabilities and invoke “tools” or access “resources” on that server, which in this case is managing todos.
Inside TodoMCP.ts, we define the MCP interface in terms of:
- Resources – We expose the collection of todos as a resource called "Todos". This allows the agent to list all todo items and retrieve details of a specific item by URI.
- Tools – Discrete actions the agent can perform, analogous to API endpoints. We define three tools using
server.tool():createTodo– Adds a new todo. Expects a todoText string as input.markTodoComplete– Marks a todo as complete. Expects a todoID string.deleteTodo– Deletes a todo by ID.
export class TodoMCP extends McpAgent<Env, unknown, AuthenticationContext> {
  ...
  get todoService() {
      return todoService(this.env, this.props.claims.sub)
  }

  get server() {
      const server = new McpServer({ name: 'TODO Service', version: '1.0.0' });

      server.resource("Todos", new ResourceTemplate("todoapp://todos/{id}", {
              list: async () => {
                  const todos = await this.todoService.get();
                  return {
                      resources: todos.map(todo => ({
                          name: todo.text,
                          uri: `todoapp://todos/${todo.id}`
                      }))
                  };
              }
          }),
          async (uri, {id}) => {
              const todos = await this.todoService.get();
              const todo = todos.find(todo => todo.id === id);
              return {
                  contents: [
                      {
                          uri: uri.href,
                          text: todo
                              ? `text: ${todo.text} completed: ${todo.completed}`
                              : 'NOT FOUND',
                      },
                  ],
              };
          }
      );

      server.tool('createTodo', 'Add a new TODO task', { todoText: z.string() },
          async ({ todoText }) => {
              const todos = await this.todoService.add(todoText);
              return this.formatResponse('TODO added successfully', todos);
          }
      );
      server.tool('markTodoComplete', 'Mark a TODO as complete', { todoID: z.string() },
          async ({ todoID }) => {
              const todos = await this.todoService.markCompleted(todoID);
              return this.formatResponse('TODO completed successfully', todos);
          }
      );
      server.tool('deleteTodo', 'Mark a TODO as deleted', { todoID: z.string() },
          async ({ todoID }) => {
              const todos = await this.todoService.delete(todoID);
              return this.formatResponse('TODO deleted successfully', todos);
          }
      );

      return server;
  }
  ...
}
In the above code from, we see the resource named “Todos” being defined with a URI pattern todoapp://todos/{id} and two handlers: a list handler to enumerate all todo resources, and a resource handler to get a specific todo. This means an agent can ask “what resources do you have?” and discover each todo as a resource with a unique URI.
Then we define three tools: createTodo, markTodoComplete, and deleteTodo. Each tool includes a human-readable description (so agents can understand its purpose), an input schema (for validation), and an async handler that delegates to the TodoService. This tool-based interface lets the agent know exactly which actions it can perform on the user’s todos and how to structure those requests.
The call to this.todoService is important: it’s initialized using the authenticated user’s ID, derived from this.props.claims.sub. That claim comes from the verified Stytch OAuth JWT, and is also used to namespace keys in Cloudflare KV (e.g., user:abc123:todos) ensuring that data is scoped to the user who granted consent.
Auth middleware with Stytch
To ensure that only authorized users and agents can access the application, we define two Hono middleware functions in api/lib/auth.ts. Both rely on verifying JWTs issued by Stytch—one for browser-based sessions and one for OAuth-based agent access.
When a user logs in through the React app using Stytch, a session JWT is stored in a cookie called stytch_session_jwt. This token proves the user's identity in subsequent API requests.
The stytchSessionAuthMiddleware checks for this cookie and verifies the token:
// Middleware for session-based authentication (web UI)
export const stytchSessionAuthMiddleware = createMiddleware<...>(async (c, next) => {
    const sessionCookie = getCookie(c, 'stytch_session_jwt');
    try {
        const verifyResult = await validateStytchJWT(sessionCookie ?? '', c.env);
        c.set('userID', verifyResult.payload.sub!);
    } catch (error) {
        throw new HTTPException(401, { message: 'Unauthenticated' });
    }
    await next();
});
If the token is valid, we store the user’s ID (sub) in the request context so it can be accessed later by the API. If it's missing or invalid, the request is rejected with a 401. The validateStytchJWT function (defined below in the file) does the heavy lifting of JWT verification.
When an AI agent connects to the MCP server, it authenticates using a Bearer token in the Authorization header. This token is issued by Stytch’s Connected Apps flow, after the user consents.
The stytchBearerTokenAuthMiddleware verifies the token like so:
// Middleware for OAuth bearer token authentication (MCP server)
export const stytchBearerTokenAuthMiddleware = createMiddleware<...>(async (c, next) => {
    const authHeader = c.req.header('Authorization');
    if (!authHeader || !authHeader.startsWith('Bearer ')) {
        throw new HTTPException(401, { message: 'Missing or invalid access token' });
    }
    const accessToken = authHeader.substring(7);
    try {
        const verifyResult = await validateStytchJWT(accessToken, c.env);
        // Attach claims and token to context props for use in Durable Object
        c.executionCtx.props = {
            claims: verifyResult.payload,
            accessToken,
        };
    } catch (error) {
        throw new HTTPException(401, { message: 'Unauthenticated' });
    }
    await next();
});
The decoded claims (including the user ID) are stored in the Durable Object’s execution context. These claims are later accessed inside the MCP server as this.props.claims.
Both middleware functions rely on the shared validateStytchJWT function, which uses the jose library to validate JWTs using Stytch’s public keys:
// JWT validation logic
let jwks: ReturnType<typeof createRemoteJWKSet> | null = null;
async function validateStytchJWT(token: string, env: Env) {
    if (!jwks) {
        jwks = createRemoteJWKSet(new URL(getStytchOAuthEndpointUrl(env, '.well-known/jwks.json')));
    }
    return await jwtVerify(token, jwks, {
        audience: env.STYTCH_PROJECT_ID,
        issuer: [`stytch.com/${env.STYTCH_PROJECT_ID}`],
        typ: "JWT",
        algorithms: ['RS256'],
    });
}
This function ensures that:
- The token was issued by Stytch for the correct project
- The signature matches Stytch’s public key (fetched from their JWKS endpoint)
In api/index.ts, these middleware functions are applied to the appropriate routes:
// Protect REST API routes with session authentication
.route('/api', TodoAPI)

// Protect MCP server routes with bearer token authentication
.use('/sse/*', stytchBearerTokenAuthMiddleware)
.route('/sse', new Hono().mount('/', TodoMCP.mount('/sse').fetch))
This setup ensures that:
- All REST API requests come from authenticated users
- All MCP connections come from agents that have a valid access token (issued with the user’s consent)
OAuth flow in the codebase
Now that you’ve seen how the core backend components of the application are structured, let’s walk through how the OAuth flow is implemented with Stytch and MCP.
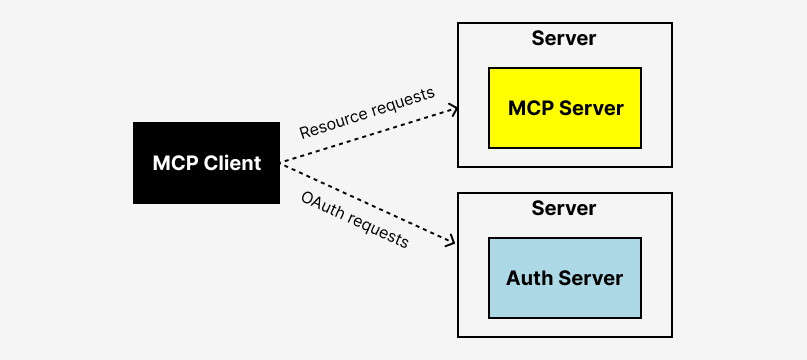
Here’s a high-level overview of how the MCP OAuth flow operates:
- Discovery: The MCP client fetches the OAuth metadata to locate Stytch authorization server endpoints
- Registration: MCP client dynamically registers itself with Stytch with Dynamic Client Registration
- Authorization: Stytch redirects the user to the authorization endpoint for consent
- Token exchange: After consent, the MCP client exchanges the authorization code for access and refresh tokens
- MCP connection: MCP client connects to the MCP server using the OAuth access token as authentication
1. OAuth Metadata discovery
In api/index.ts, the app serves a discovery document which returns metadata about the OAuth authorization server at /.well-known/oauth-authorization-server, which tells MCP clients where to:
- Redirect users for consent
/oauth/authorize - Exchange codes for tokens
{stytch-url}/oauth2/token - Register clients dynamically
{stytch-url}/oauth2/register
//api/index.ts
.get('/.well-known/oauth-authorization-server', async (c) => {
  const url = new URL(c.req.url);
  return c.json({
    issuer: c.env.STYTCH_PROJECT_ID,
    authorization_endpoint: `${url.origin}/oauth/authorize`,
    token_endpoint: getStytchOAuthEndpointUrl(c.env, 'oauth2/token'),
    registration_endpoint: getStytchOAuthEndpointUrl(c.env, 'oauth2/register'),
    scopes_supported: ['openid', 'profile', 'email', 'offline_access'],
    response_types_supported: ['code'],
    grant_types_supported: ['authorization_code', 'refresh_token'],
    token_endpoint_auth_methods_supported: ['none'],
    code_challenge_methods_supported: ['S256'],
  });
})
2. OAuth consent screen and authorization
On the frontend, in src/Auth.tsx, the /oauth/authorize route is handled by Stytch’s <IdentityProvider /> component, wrapped with a login check:
export const Authorize = withLoginRequired(function () {
  return <IdentityProvider/>
})
When an MCP client initiates the OAuth flow, it redirects the user to this route with standard query parameters (client_id, scope, redirect_uri, code_challenge, etc.). The <IdentityProvider /> component reads these values and renders a consent screen, allowing the user to approve the MCP client’s access.
Behind the scenes, the MCP client registers itself as an OAuth client with Stytch Connected Apps at the Dynamic Client Registration endpoint {stytch-url}/oauth2/register.
Once the user grants consent, Stytch redirects back to the MCP client with an authorization code. The MCP client captures this code and exchanges it for access tokens by making a request to the endpoint {stytch-url}/oauth2/token.
3. MCP authentication via bearer token
The MCP server enforces bearer token authentication via middleware. When an MCP client connects, it must present a valid OAuth token in the Authorization header:
export const stytchBearerTokenAuthMiddleware = createMiddleware(..., async (c, next) => {
  const accessToken = c.req.header('Authorization')?.substring(7);
  const verifyResult = await validateStytchJWT(accessToken, c.env);
  c.executionCtx.props = {
    claims: verifyResult.payload,
    accessToken,
  };
  await next();
});
These tokens are used by the MCP client to authenticate future requests to the MCP server, enabling secure, delegated access.
Summary of the MCP OAuth flow
Below is a quick reference to where each part of the flow is implemented in the codebase:
Code | Description | |
|---|---|---|
OAuth Metadata Discovery | ||
OAuth Metadata Discovery |
| Serves metadata about OAuth endpoints and Stytch authorization server |
User Consent (Frontend) | ||
User Consent (Frontend) |
| Renders Stytch’s login and OAuth consent screen |
OAuth endpoints and callbacks | ||
OAuth endpoints and callbacks |
| Stytch OAuth endpoints for DCR and token exchange |
Token Verification | ||
Token Verification |
| Validates agent tokens and authorizes MCP access |
OAuth for your MCP servers
In this walkthrough, you’ve seen how to secure a Model Context Protocol (MCP) server using OAuth 2.0—enabling AI agents to access user data in a structured, permissioned, and secure way.
While it’s possible to build this OAuth infrastructure from scratch, Stytch Connected Apps provides everything you need to make your MCP server OAuth-compliant out of the box.
With Connected Apps, you don’t need to reinvent the wheel when it comes to OAuth infrastructure. Stytch takes care of the heavy lifting so you can focus on building great agentic experiences.
Here’s some of what Stytch provides out of the box for MCP authentication:
- Core OAuth 2.1 specification
- Dynamic Client Registration
- Authorization Server Metadata
- Custom Scopes based on Resources/Actions granted as permissions to end users
- End user and IT Admin management of granted consent
Thinking about integrating MCP into your stack? Want to build secure agentic experiences without owning every piece of auth infrastructure?
Contact us for a demo or sign up and check out our MCP quickstart guide.
Auth for MCP servers
Use Stytch Connected Apps to build secure, scalable auth for AI agents

Authentication & Authorization
Fraud & Risk Prevention
© 2025 Stytch. All rights reserved.