Back to blog
Guide to authentication for the OpenAI Apps SDK
Auth & identity
Oct 8, 2025
Author: Stytch Team

The new OpenAI Apps SDK lets developers bring their products directly into ChatGPT with custom UI components, API access, and user context that can persist across chats. It’s built on Model Context Protocol (MCP), which defines how ChatGPT communicates with your app through tools, resources, and structured data.
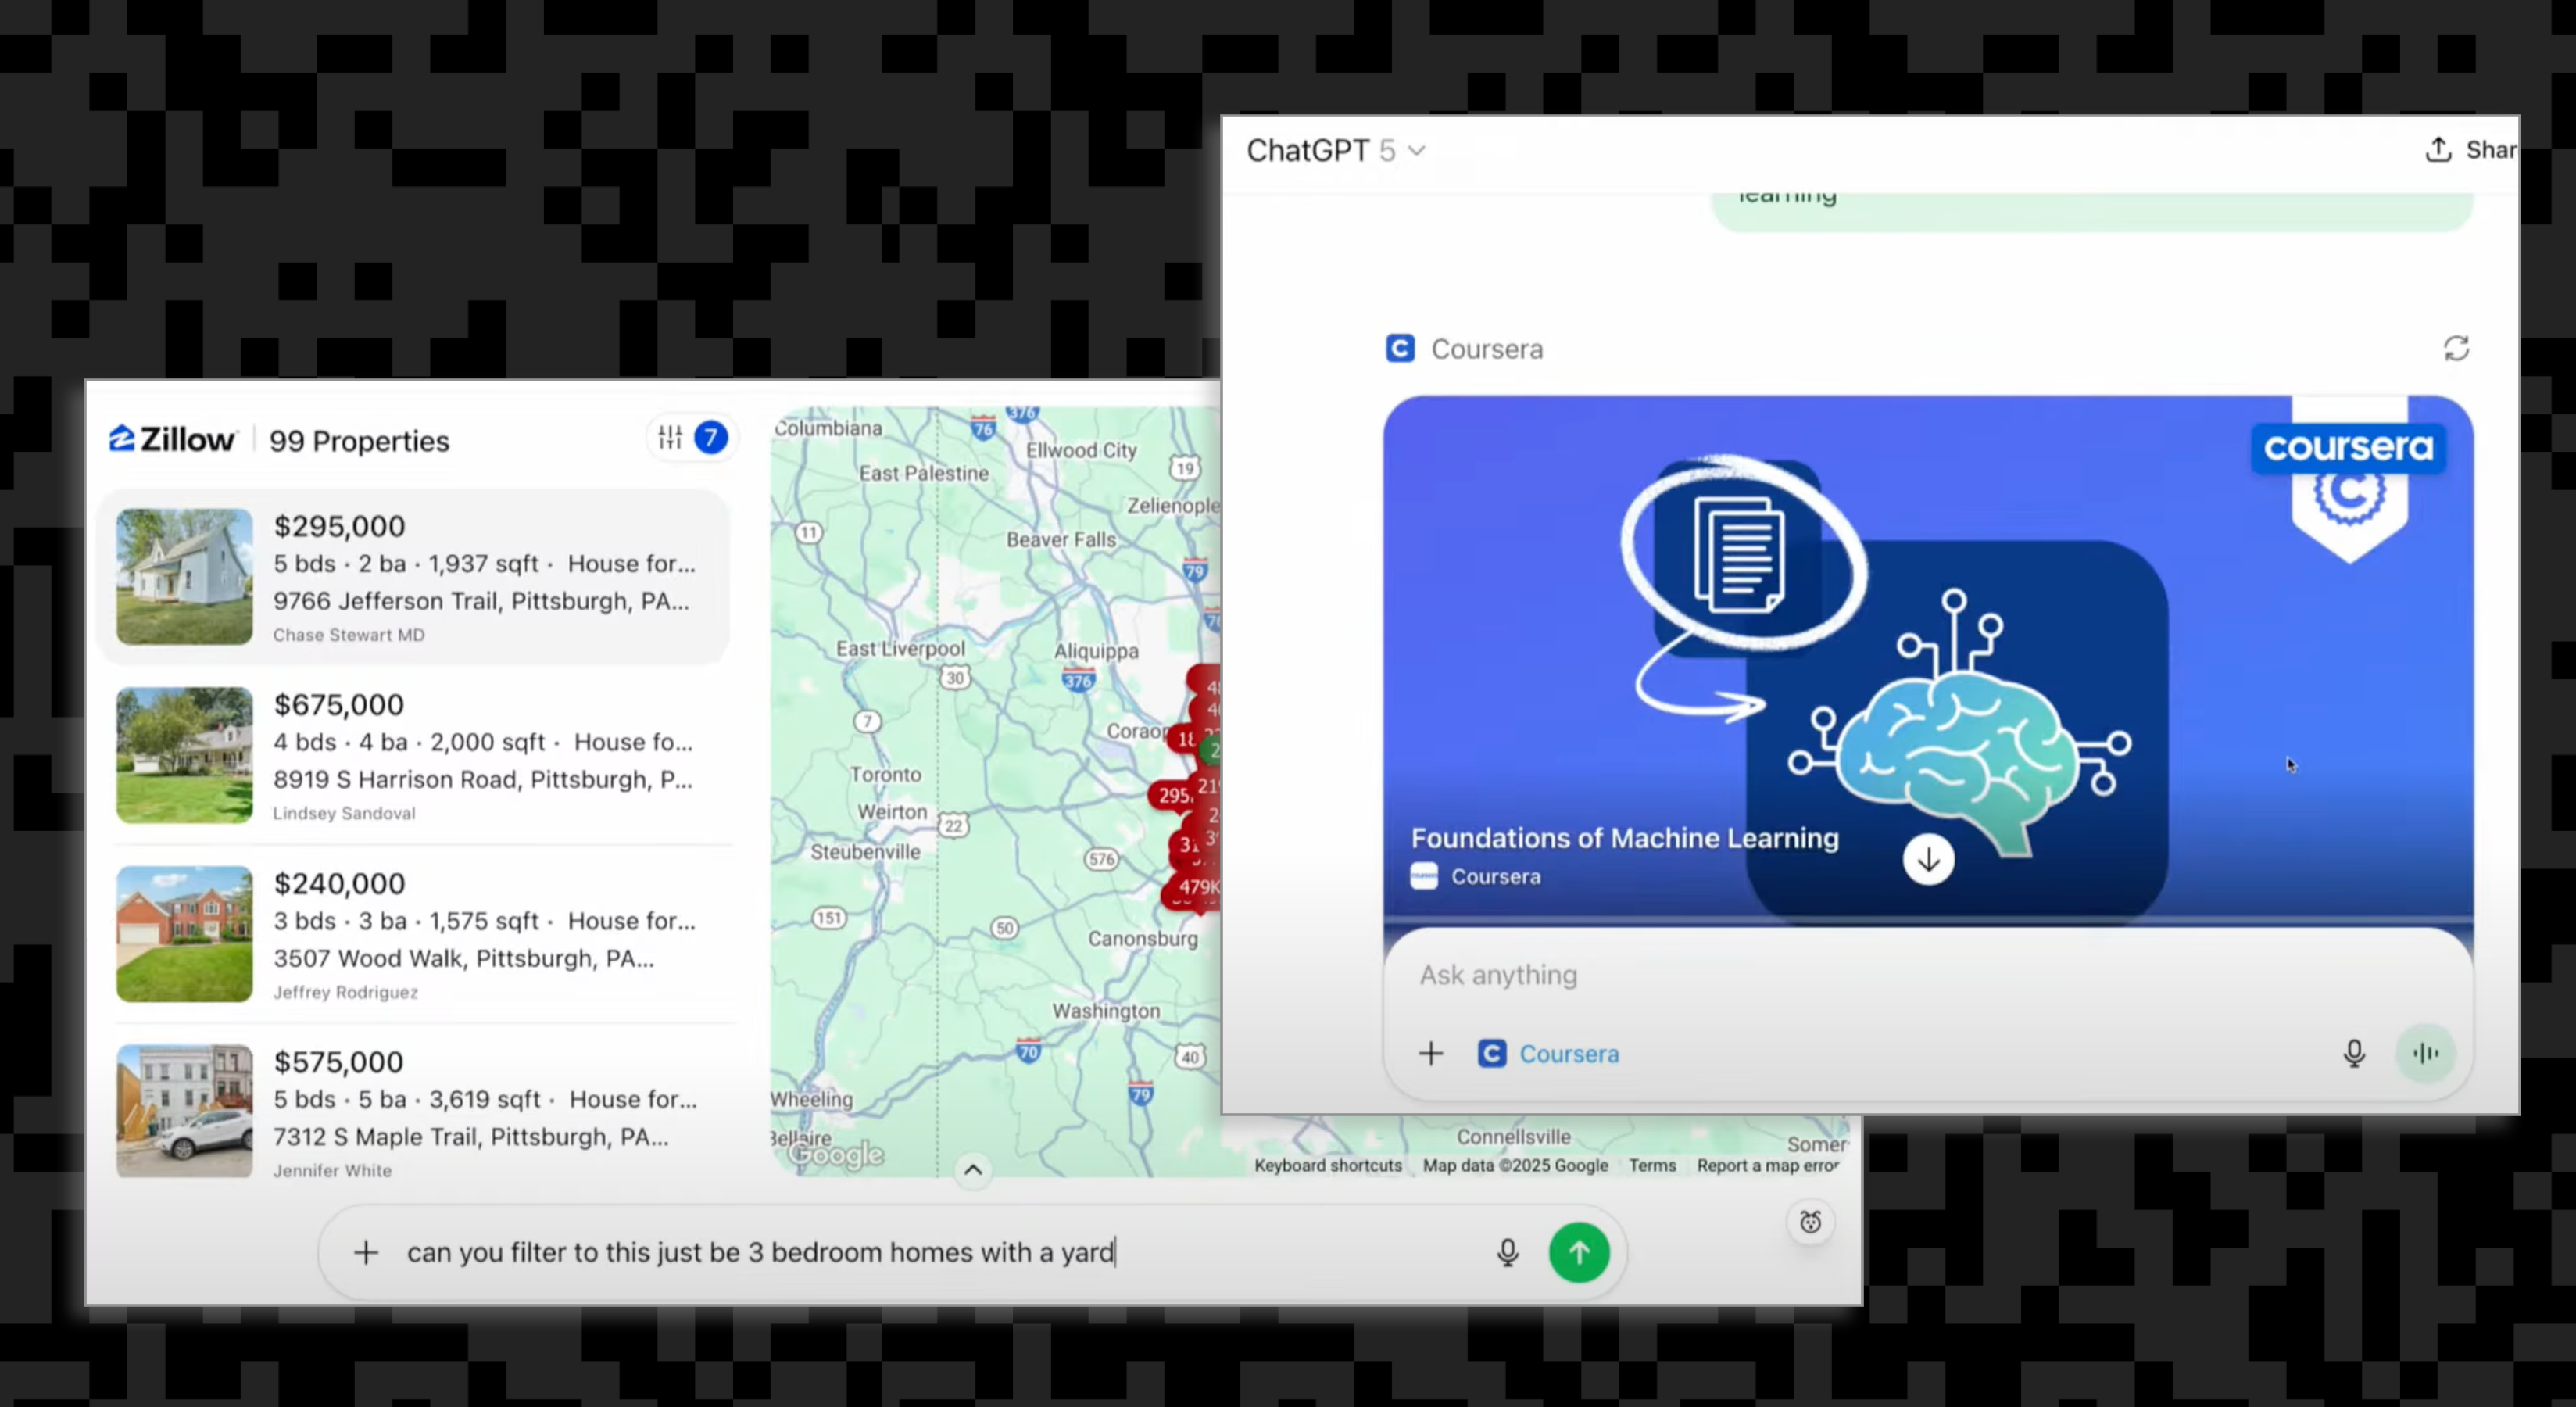
Two examples shown by OpenAI at their 2025 DevDay were Coursera and Zillow, complete with custom UI components and interactive data.
To make this all work safely, the Apps SDK makes use of familiar web standards like OAuth 2.1 and OIDC. ChatGPT acts as the OAuth public client on behalf of the user, while your backend serves as the protected resource, and an identity layer handles client registration, consent, and token management.
The basic mental model for auth looks something like this:
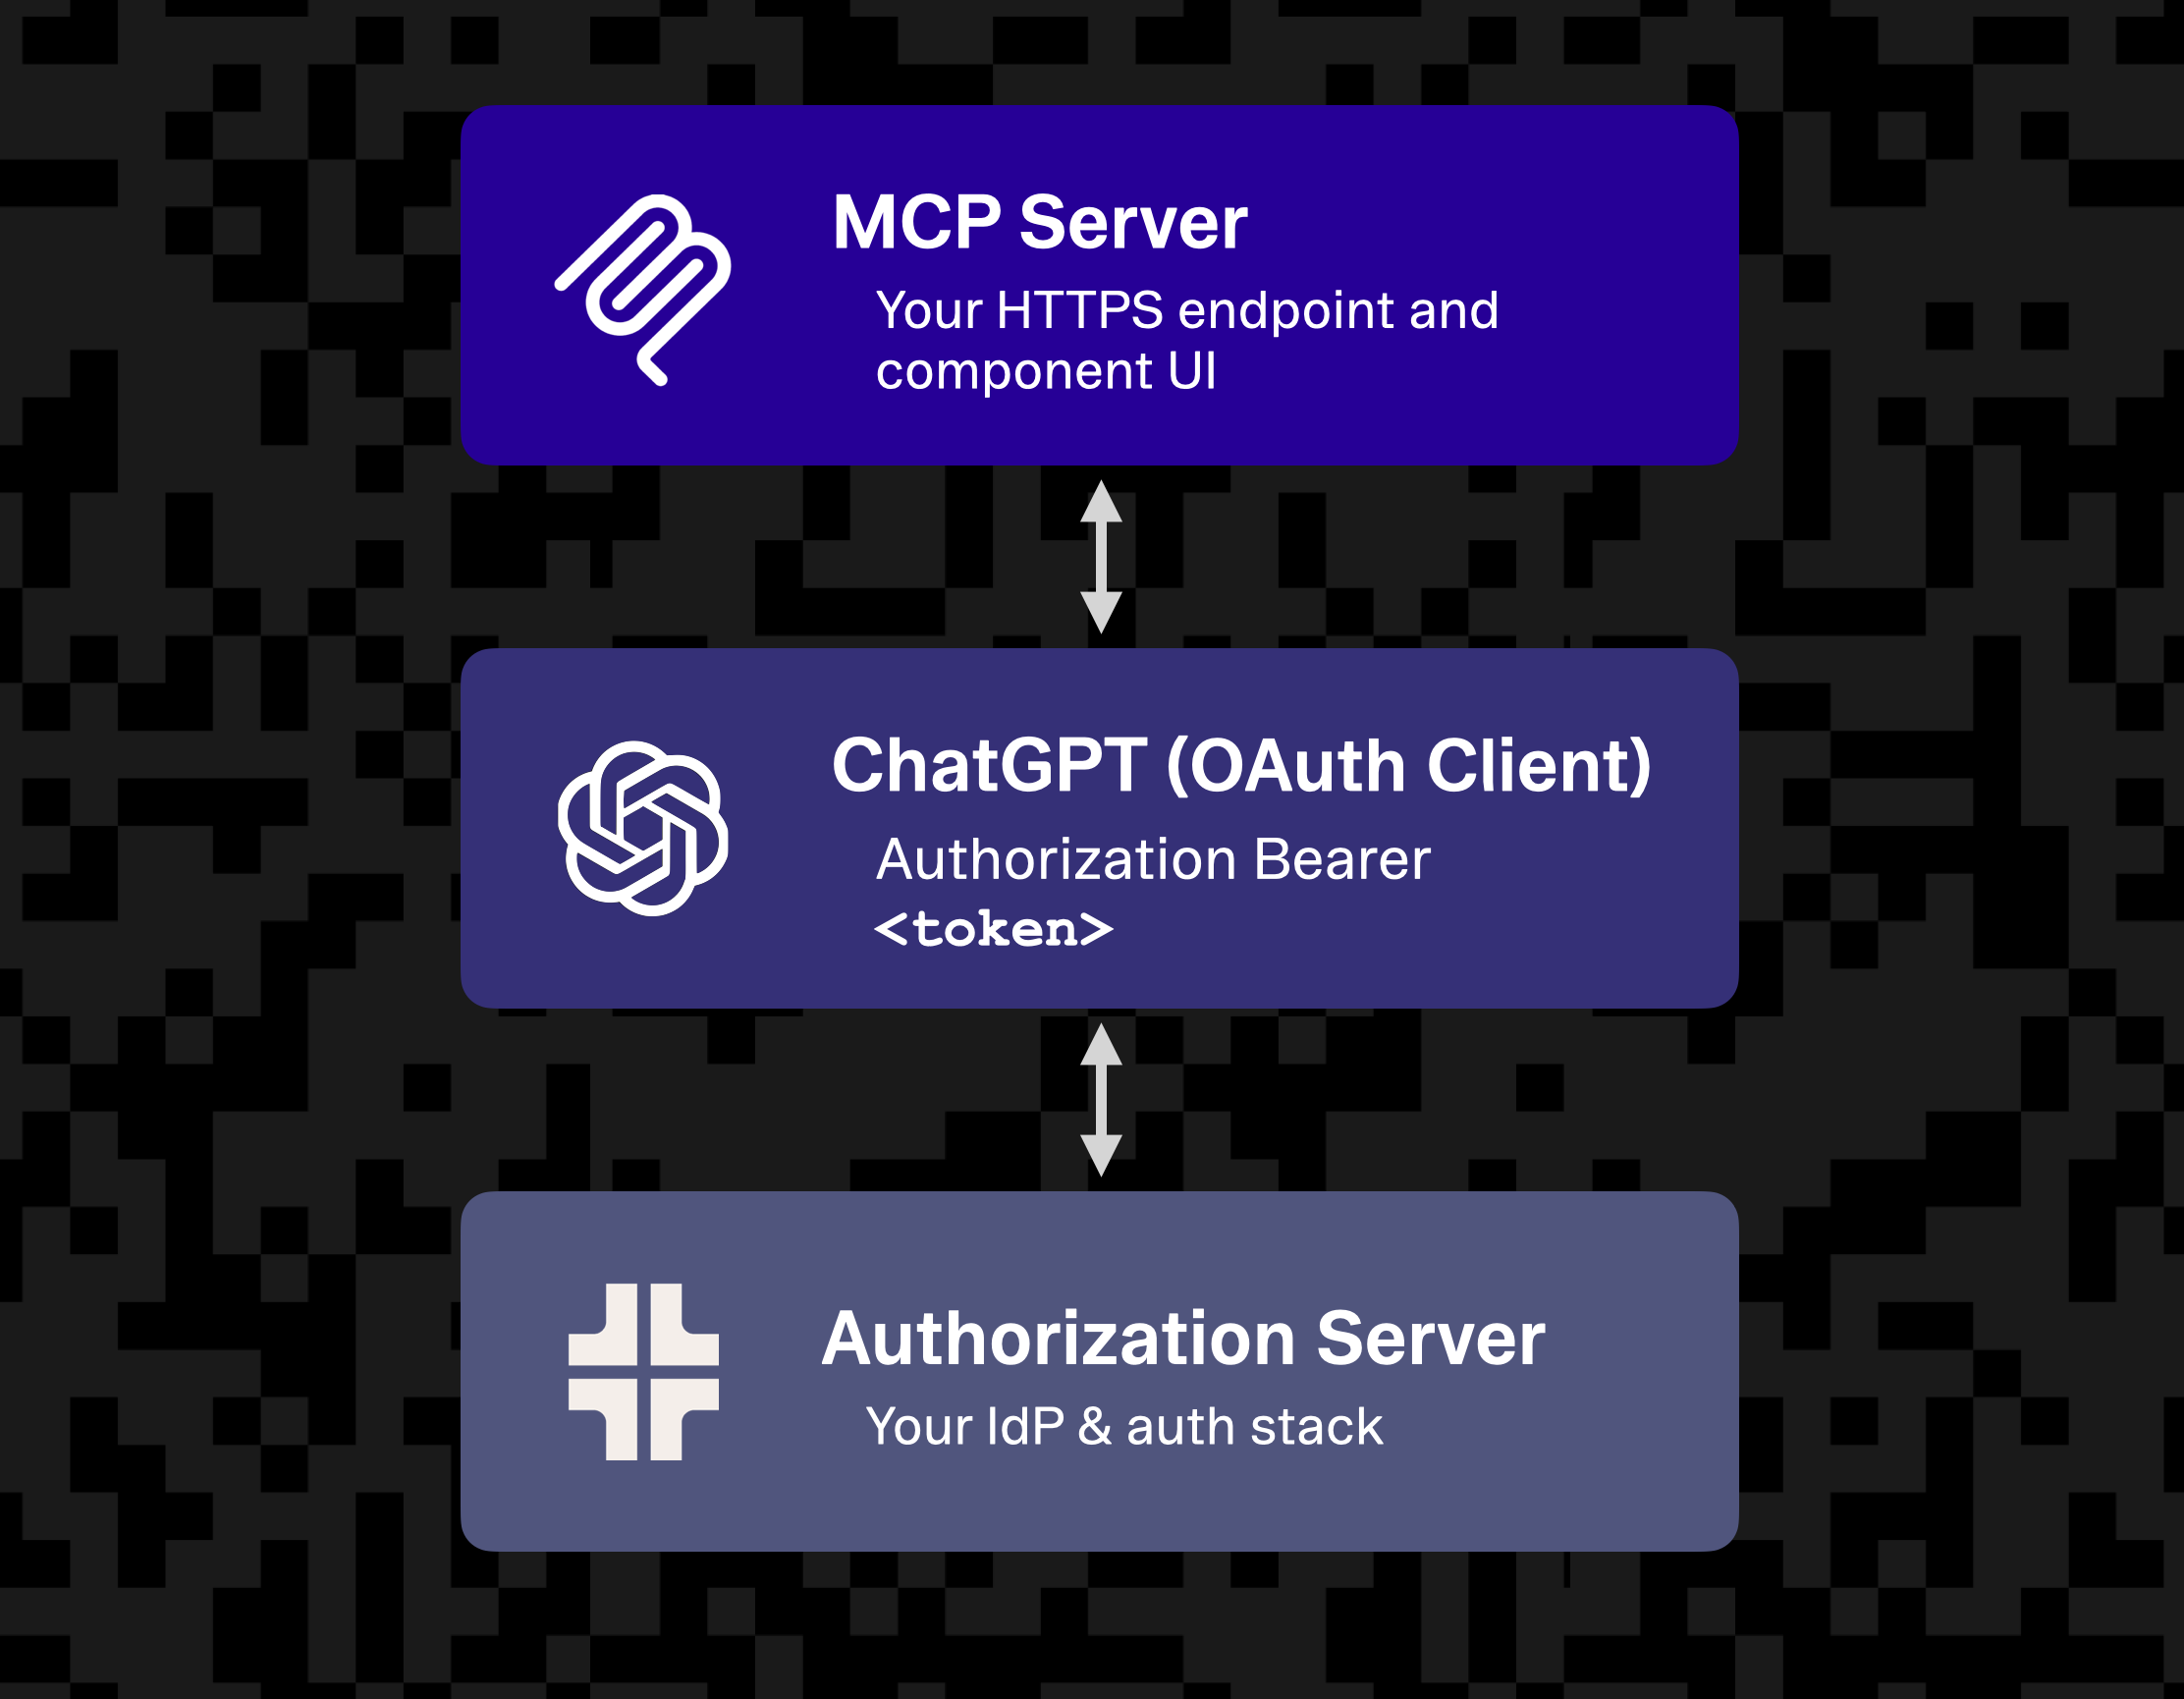
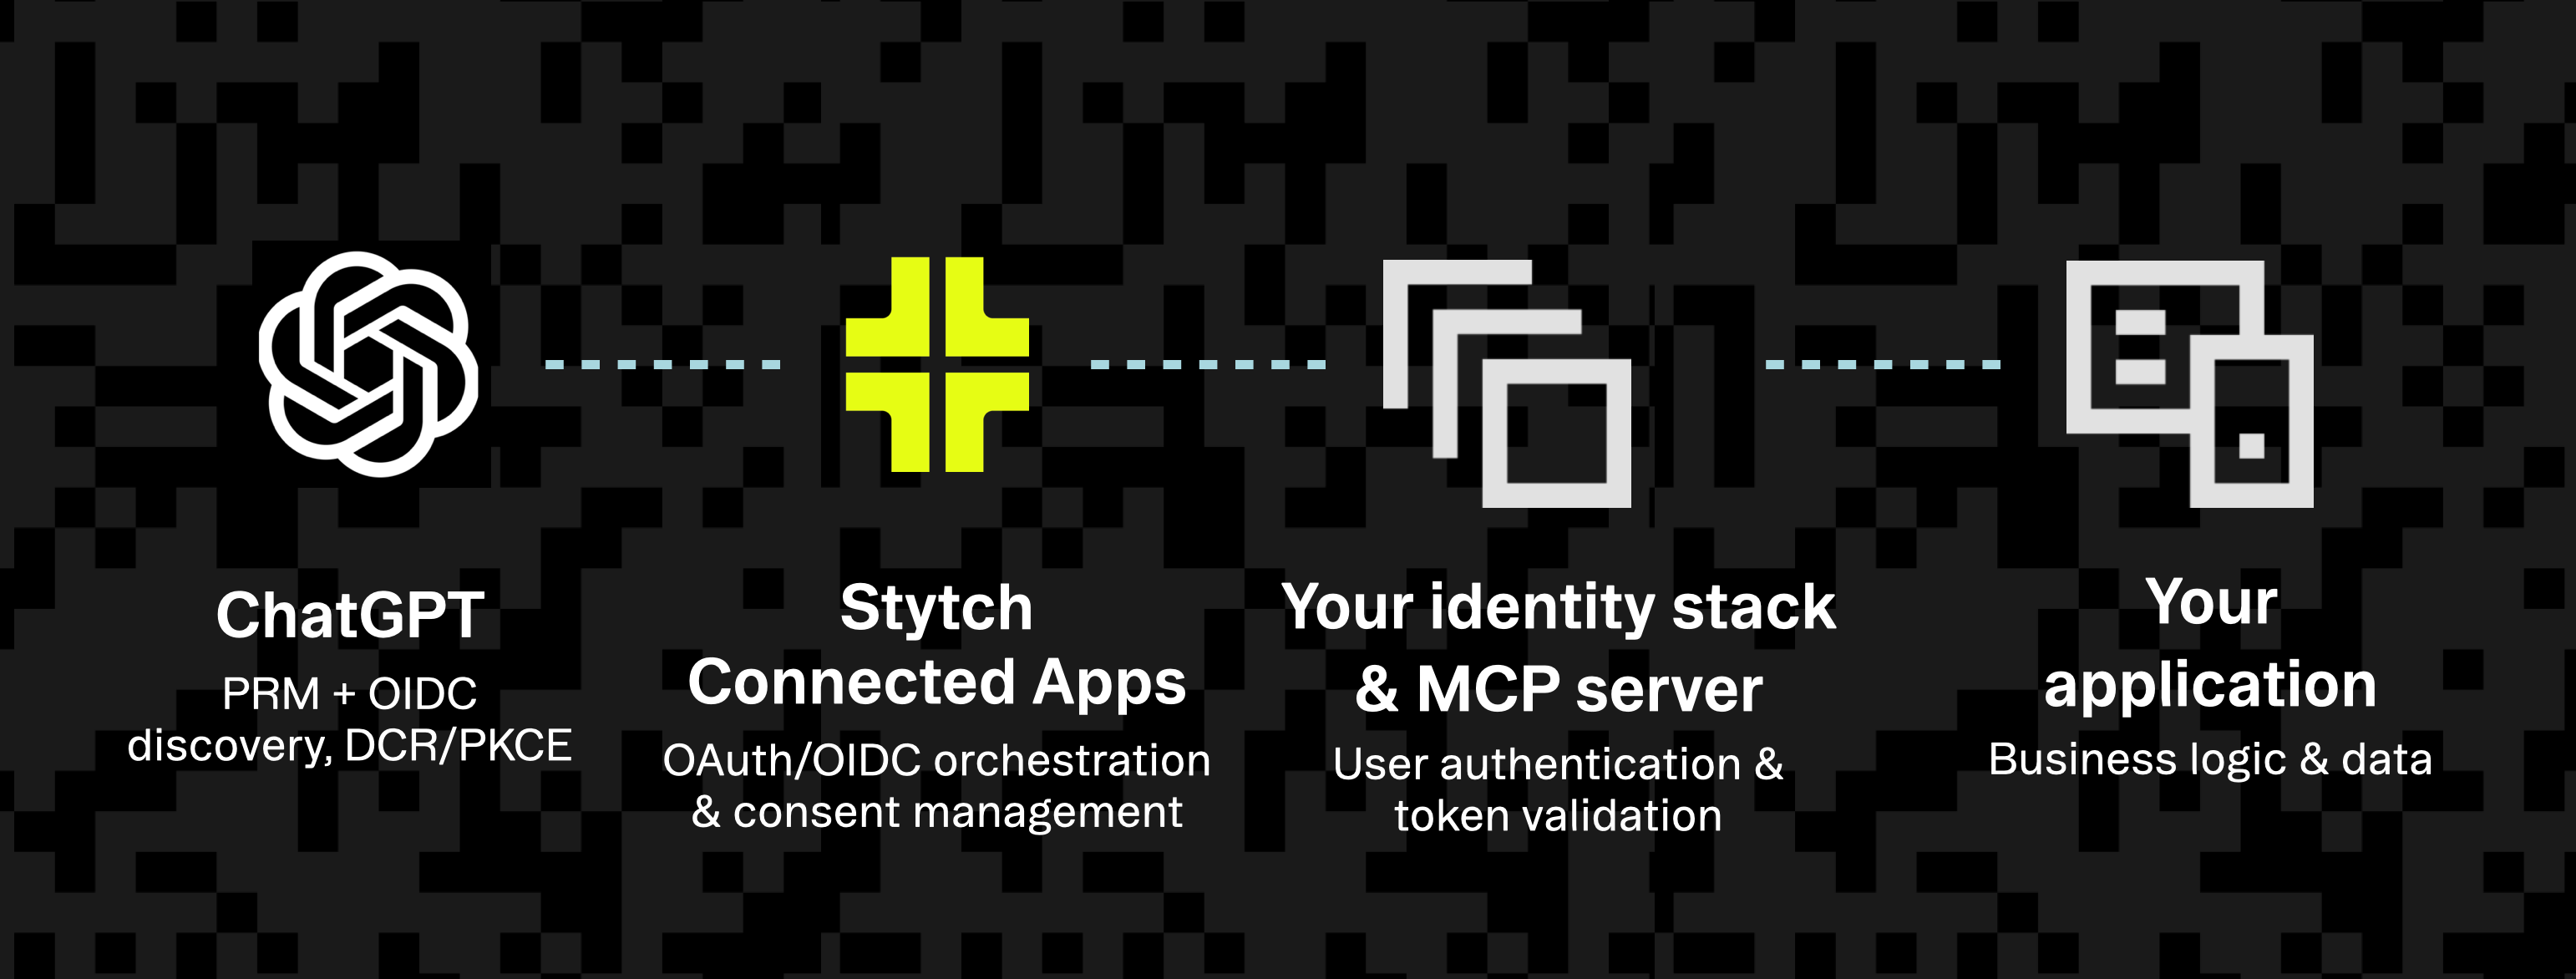
You can either rebuild your identity layer to act as the foundation for authentication and authorization, or use a service like Stytch Connected Apps on top of your existing auth infrastructure as a way to bridge your current JWT issuer and ChatGPT’s client expectations. Either approach results in a secure, standards-based connection between ChatGPT and your application.
Understanding the OAuth 2.1 + MCP flow
Once your app is registered, ChatGPT and your MCP server use a familiar OAuth 2.1 and OIDC flow to authenticate users and authorize actions. The process is almost identical to what you’d see in a standard web app, just adapted for how ChatGPT interacts with your tools and APIs.
1) Discovery
ChatGPT starts by reading metadata from your MCP authorization server’s /.well-known/oauth-protected-resource file, one of the required endpoints for OpenAI. This tells it where to find your authorization server’s metadata document, which lists endpoints for authorization, token exchange, and client registration.
2) Authorization
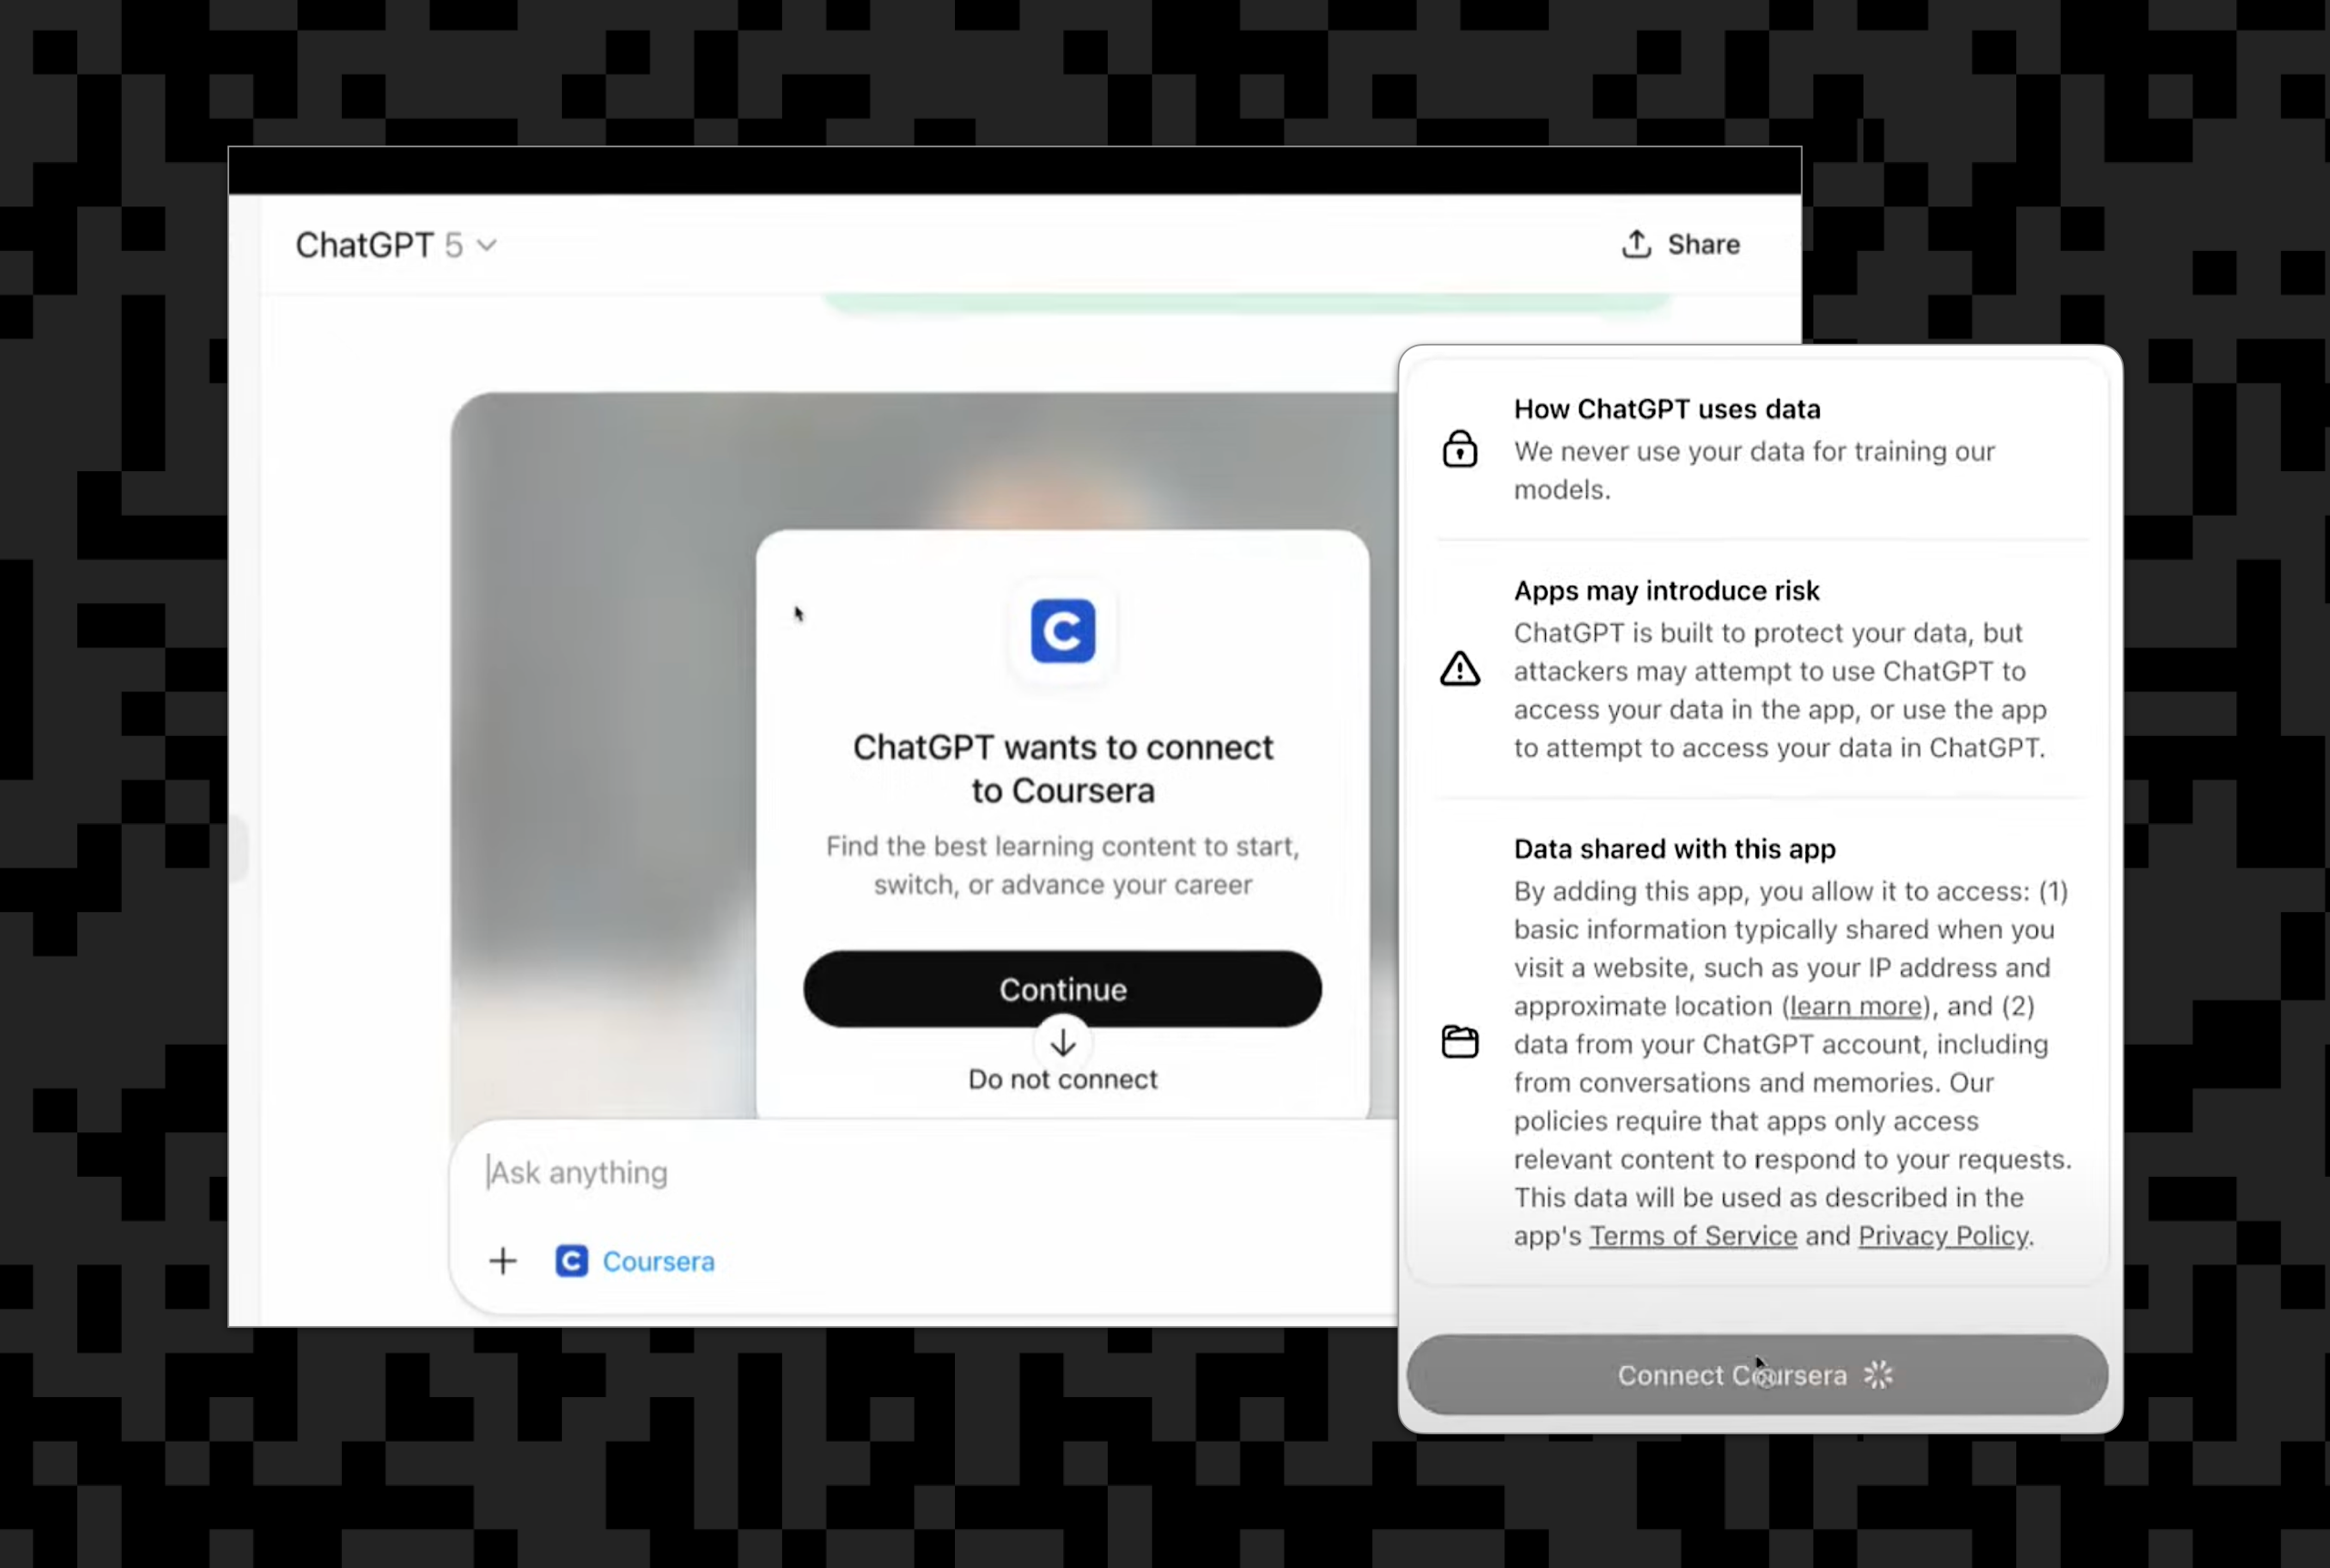
When a user connects your app for the first time, ChatGPT begins an Authorization Code flow with PKCE. The user signs in through your authorization server’s authorization_endpoint, approves requested scopes, and ChatGPT exchanges the authorization code for an access token at your token_endpoint. From that point on, every tool call includes the token in the Authorization: Bearer <token> header.
During this first connection, ChatGPT also displays a built-in consent screen that shows what your app will access and how data is shared. This ensures users clearly understand what they’re authorizing before any tools are used.
3) Enforcement
Your MCP server validates the access token, enforces scopes, and executes the requested action. If a token expires or becomes invalid, it can respond with a 401 and a WWW-Authenticate challenge to prompt ChatGPT to reauthorize automatically.
All of this runs on open standards—no custom protocols, no SDK lock-in. If your identity provider already supports OAuth 2.1 and OIDC, you can likely connect it directly. Platforms like Stytch can manage the entire OAuth/OIDC flow for you or even extend an existing legacy auth system to handle the additional details ChatGPT and MCP expect, like dynamic client registration, consent management, and token refresh.
Declaring tool-level auth with securitySchemes
OpenAI introduces some new things to the mix. Security Schemes are an MCP extension supported by the Apps SDK, designed to help ChatGPT understand which tools require authentication and what scopes are needed. They’re not yet part of the MCP core specification, but OpenAI’s implementation provides a strong reference model for the community.
Once your authentication flow is in place, you’ll want to tell ChatGPT which tools require a logged-in user. Each tool you define in your MCP server can declare its own security requirements through a securitySchemes field. ChatGPT uses this metadata to handle linking and reauthorization automatically.
For example, you might create a tool that generates a new board in your app and requires a valid OAuth token with the boards.write scope:
{
  "name": "create_board",
  "description": "Create a new board in the user’s account",
  "parameters": {
    "type": "object",
    "properties": {
      "title": { "type": "string" }
    },
    "required": ["title"]
  },
  "securitySchemes": {
    "oauth": {
      "type": "oauth2",
      "flows": {
        "authorizationCode": {
          "authorizationUrl": "https://auth.example.com/authorize",
          "tokenUrl": "https://auth.example.com/token",
          "scopes": {
            "boards.write": "Create and edit boards"
          }
        }
      }
    }
  }
}
Use "type": "noauth" for tools that anyone can access, and "type": "oauth2" with explicit scopes for protected tools.When ChatGPT detects a tool protected by OAuth, it begins the linking flow automatically and shows the built-in consent screen to the user.
Note: You can actually mark a tool with both
noauthandoauth2so it runs publicly but returns more when authenticated. This is useful for “preview” experiences (e.g., a “get docs” tool could show public docs with no auth, and both public + private docs with OAuth). The server still validates tokens and scopes on every call.
Your MCP server remains the source of truth: it enforces scopes, validates tokens, and returns a 401 if a token is missing or invalid, prompting ChatGPT to reconnect. Whether your tokens come directly from your IdP or through a service like Stytch Connected Apps, the integration point looks exactly the same inside your MCP server.
FastMCP equivalent
If you’re building your MCP server with FastMCP (part of the official MCP Python SDK), you can define the same requirement directly in Python. Here’s the equivalent implementation:
@mcp.tool(
    name="create_board",
    description="Create a new board in the user’s account",
    security_schemes=[auth.OAuth2(scopes=["boards.write"])]
)
def create_board(title: str) -> str:
    return f"Created board: {title}"
FastMCP enforces the declared scopes automatically and issues a standard WWW-Authenticate challenge if the token is missing or invalid. It’s functionally identical to the JSON schema above—just expressed in your server code.
Advertising discovery and authorization endpoints
Your app needs to advertise both its OpenID Connect discovery metadata and its OAuth Protected Resource Metadata (PRM) so ChatGPT can locate your authorization endpoints and understand what scopes are supported.
If you’re serving these manually, you can expose the following:
@app.get("/.well-known/oauth-protected-resource")
def protected_resource_metadata():
    return {
        "issuer": "https://your-auth-server.example.com",
        "authorization_servers": ["https://your-auth-server.example.com"],
        "scopes_supported": ["openid", "profile", "email"],
    }
If you’re building this from scratch, you can do the work of implementing these endpoints on your own. If you’re using an external service like Stytch Connected Apps, those OIDC and OAuth URLs are automatically provided for you and will appear in your discovery document. And if you’re running FastMCP, its RemoteAuthProvider will automatically expose the PRM endpoint and return proper WWW-Authenticate challenges — so you don’t need to serve those routes manually.
Validating tokens server-side
When ChatGPT calls your tool, it includes the OAuth access token from your identity layer in the Authorization: Bearer header. Your server should validate that token before executing any user-facing action.
If you’re using FastMCP, you can rely on its built-in RemoteAuthProvider, which handles OAuth Protected Resource Metadata, WWW-Authenticate challenges, and JWT validation for you.
Here’s a working example using Stytch as your OAuth/OIDC layer:
# server.py
from fastmcp import FastMCP, auth
from fastmcp.server.auth import RemoteAuthProvider
from fastmcp.server.auth.providers.jwt import JWTVerifier
from pydantic import AnyHttpUrl

# Verify access tokens issued by your identity layer
jwt_verifier = JWTVerifier(
    jwks_uri="https://test.stytch.com/v1/sessions/jwks/STYTCH_PROJECT_ID",  # JWKS endpoint
    issuer="https://STYTCH_PROJECT_DOMAIN",                                 # must match the token's `iss`
    audience=["STYTCH_PROJECT_ID"],                                         # must match the token's `aud`
)

# RemoteAuthProvider automatically advertises PRM and handles OAuth challenges
auth_provider = RemoteAuthProvider(
    token_verifier=jwt_verifier,
    authorization_servers=[AnyHttpUrl("https://STYTCH_PROJECT_DOMAIN")],
    base_url="https://your-mcp-server.example.com",  # your server’s public URL
)

mcp = FastMCP(name="My API", auth=auth_provider)

@mcp.tool(
    name="greet",
    description="Say hello to the current user",
    security_schemes=[auth.OAuth2(scopes=["openid", "profile"])],
)
def greet(name: str) -> str:
    return f"Hello, {name}!"

if __name__ == "__main__":
    mcp.run(transport="http", port=8000)
If you’re using an identity layer such as Stytch, token introspection and key management are handled automatically. You just verify the JWT claims and continue with your logic. Either way, your MCP server remains the final gatekeeper, ensuring every tool call is properly authorized.
Managing consent and write actions
Once authentication is in place, it’s time to think about how consent works in ChatGPT. Every time your tool performs an action that changes data—creating, updating, or deleting—ChatGPT surfaces that moment to the user through a write-action confirmation. You can configure this to happen automatically, but most developers leave it as a quick prompt so users can clearly approve what’s about to happen.
This built-in confirmation keeps users in control and ensures transparency, while your own backend handles longer-term permissions. The Apps SDK gives you both layers:
- ChatGPT’s in-the-moment consent: prompts users before a tool writes or shares data.
- Your app’s durable consent: manages scopes, refreshes, and policy logic behind the scenes.
If you’re using a managed identity layer such as Stytch Connected Apps, the durable consent piece is taken care of for you. It manages OAuth scopes and user approvals across sessions so you can rely on ChatGPT for quick confirmation and your identity layer for long-term authorization.
This split—ChatGPT handling user-facing consent, your app handling policy—keeps the UX simple, consistent, and secure.
Securing components and sandboxed UIs
When you include a visual component in your Apps SDK integration, ChatGPT renders it inside a secure sandboxed iframe. This isolation keeps users safe by ensuring that your app’s frontend can’t directly access ChatGPT or other external content.
Your component declares its allowed network connections through a Content Security Policy (CSP) in the _meta block of your MCP resource. This tells ChatGPT exactly which domains your component can talk to for APIs, assets, or script loading.
Here’s a simple example:
_meta: {
  "openai/widgetDescription": "Interactive Kanban board",
  "openai/widgetCSP": {
    "connect_domains": ["https://api.example.com"],
    "resource_domains": ["https://cdn.example.com"]
  }
}
This configuration means your component can:
- Fetch data only from
api.example.com - Load static assets only from
cdn.example.com
ChatGPT enforces these limits automatically inside the sandbox. Components are rendered in ChatGPT’s sandbox runtime (Skybridge) from a sandbox origin (e.g., https://web-sandbox.oaiusercontent.com). They cannot read your site’s cookies. Use MCP tool calls with bearer tokens for privileged operations; never pass credentials into the iframe.
Be sure to monitor connect_domains and resource_domains closely—this is different from building a web application that you host yourself. You’re relying on ChatGPT to serve your content, and you no longer have full access to the browser environment.
Mapping storage and user identity
Your MCP server needs to decide what data to store and how to associate it with each user. ChatGPT doesn’t persist tokens or internal data—it only holds enough context to make tool calls on the user’s behalf.
In most cases, your backend stores access tokens and maps each user’s unique sub claim to an internal record. When ChatGPT completes an OAuth flow, your server receives the token and claim, which you can reuse for subsequent tool calls.
If you’re building with FastMCP, you don’t need to manage this manually. The auth parameter handles token verification, claim extraction, and WWW-Authenticate challenges automatically:
auth = BearerAuthProvider(
    jwks_uri=f"{os.getenv('STYTCH_DOMAIN')}/.well-known/jwks.json",
    issuer=os.getenv("STYTCH_DOMAIN"),
    audience=os.getenv("STYTCH_PROJECT_ID"),
)
mcp = FastMCP(name="My API", auth=auth)
FastMCP validates tokens on every request and attaches verified claims to the tool context. If you’re using Stytch Connected Apps, it manages token issuance and refresh while your backend remains the source of truth for user data.
This setup keeps ChatGPT lightweight, your MCP server authoritative, and your backend securely in control of identity and storage.
Structuring content and templates
Once your tool is wired up for authentication, the next step is shaping both how it returns and receives data. The Apps SDK lets you define structured content so ChatGPT can render responses in richer, more readable formats, not just plain text.
Instead of dumping raw JSON, your MCP server can tag outputs as lists, tables, code snippets, or step-by-step results. ChatGPT then interprets those structures to produce interactive views, including collapsible sections, copyable commands, or formatted tables. This makes tools feel like native extensions of ChatGPT. A “list open issues” tool, for instance, could present issues as a sortable table with links and metadata, improving both usability and comprehension.
For user inputs, the SDK also supports input templates, which define how your tool’s parameters should appear in ChatGPT’s UI—text fields, dropdowns, date selectors, and similar guided controls. When users invoke your tool, ChatGPT automatically renders these inputs to produce a structured, form-driven workflow inside chat.
When your tool’s results are displayed, the SDK uses output components, bound via _meta["openai/outputTemplate"], to render those outputs as interactive UI elements. Values in _meta are UI-only (not visible to the model), while structured_content and content are visible to the model and form part of the conversation context.
In short, input templates shape how users provide parameters; structured content and output components shape how results are displayed.
Registering ChatGPT as a client (DCR)
Before ChatGPT can act as a client to your app, it needs to register so your authorization server knows how to issue tokens.
The OpenAI Apps SDK handles this through Dynamic Client Registration (DCR) — a standard OAuth 2.1 mechanism that lets ChatGPT securely register itself with your authorization server at runtime. Most modern identity providers, including Stytch Connected Apps, already support DCR out of the box.
Your server just needs to expose a registration_endpoint in its OIDC discovery document, for example:
{
  "registration_endpoint": "https://idp.example.com/register"
}
When ChatGPT connects, it dynamically registers with your authorization server, stores the resulting client_id, and proceeds with the standard OAuth 2.1 + PKCE flow. This eliminates manual setup, keeps credentials scoped, and simplifies app onboarding.
Note that if you’re using a platform like Stytch Connected Apps, the DCR, token exchange, and consent management layers are all handled for you, so your app can focus entirely on defining tools, scopes, and user experience inside ChatGPT.
Putting it all together
We’ve now covered all the moving parts, including how ChatGPT authenticates through OAuth 2.1, how your MCP server enforces scopes, and how your backend handles identity and data. Let’s zoom out and look at how it all fits together.
Here’s a minimal Python example using FastMCP to show the different layers in action:
# server.py
import os
from fastmcp import FastMCP
from fastmcp.server.auth import BearerAuthProvider  # Stytch-style bearer verification
from fastmcp.server.dependencies import get_access_token  # grab validated token/claims
from mcp.types import TextContent
from fastmcp.tools.tool import ToolResult

# --- Auth (Stytch) ---
# Minimal: validate incoming Bearer JWTs from your Stytch project
auth = BearerAuthProvider(
    jwks_uri=f"{os.getenv('STYTCH_DOMAIN')}/.well-known/jwks.json",
    issuer=os.getenv("STYTCH_DOMAIN"),
    algorithm="RS256",
    audience=os.getenv("STYTCH_PROJECT_ID"),
)

mcp = FastMCP(name="Boards Server", auth=auth)

# --- UI Component ---
# Serves an HTML widget bundle; CSP declares allowed network + asset origins.
@mcp.resource(
    "ui://widget/board.html",
    mime_type="text/html",
    meta={
        "openai/widgetDescription": "Board viewer/editor",
        "openai/widgetCSP": {
            "connect_domains": ["https://api.example.com"],
            "resource_domains": ["https://cdn.example.com"],
        },
    },
)
def board_widget_html() -> str:
    # Keep this minimal; host your real assets on your CDN.
    return """
    <div id="board-root"></div>
    <link rel="stylesheet" href="https://cdn.example.com/widgets/board.css" />
    <script type="module" src="https://cdn.example.com/widgets/board.js"></script>
    """.strip()

# --- Domain stub (replace with your API call) ---
def fetch_board_api(board_id: str, token: str) -> dict:
    # Replace with your HTTP call; keep a stub so the server runs.
    return {
        "id": board_id,
        "title": "Sprint Board",
        "items": [
            {"id": "t1", "title": "Auth wiring", "status": "In Progress"},
            {"id": "t2", "title": "Board UI", "status": "Todo"},
        ],
    }

# --- Tool bound to the widget output template ---
@mcp.tool(
    name="get_board",
    description="Display a board and its items.",
    meta={
        # Binds the tool’s result to render the widget in ChatGPT
        "openai/outputTemplate": "ui://widget/board.html",
        # Allow the widget to initiate follow-up tool calls if needed
        "openai/widgetAccessible": True,
    },
)
def get_board(board_id: str) -> ToolResult:
    # Token from Stytch (already verified by BearerAuthProvider)
    access_token = get_access_token()  # has .token and .claims
    token = access_token.token
    board = fetch_board_api(board_id, token=token)

    # Return human-readable content + machine-readable structuredContent
    return ToolResult(
        content=[TextContent(type="text", text=f"Board: {board['title']} ({len(board['items'])} items)")],
        structured_content={"board": board},
    )

if __name__ == "__main__":
    mcp.run()  # choose stdio/http per your deployment
This ties everything together: ChatGPT connects through OAuth, your identity layer issues tokens, the MCP server enforces them, and your app performs the actual action.
Use _meta for UI-only data that you don’t want surfaced to the model context, and keep user-visible data in content or structured_content, which are included in the conversation and can inform model reasoning.
Testing & rollout
Once your app’s wired up, it’s time to test it where it really matters, inside ChatGPT.
- Developer mode: Start by enabling Developer Mode in ChatGPT under Settings → Connectors → Developer Mode. This lets you load your app locally and test prompts end-to-end before publishing. You’ll see exactly how ChatGPT handles linking, consent prompts, and tool calls.
- Playground & Inspector: Use the API Playground to test real MCP requests and inspect structured responses. For deeper debugging, the MCP Inspector shows live request and response data, plus how your component renders in ChatGPT. It’s good for spotting auth or schema issues early.
- Regression: Keep a few “golden prompts” to test core user flows after changes — things like linking, creating data, and handling expired tokens. These ensure you catch regressions as your app evolves.
- Ship it!: When everything works in Developer Mode, you’re ready to submit for review or deploy privately. With OAuth discovery, token validation, and consent already baked in, your app will feel secure, consistent, and native inside ChatGPT.
Simplifying authentication
By now, you’ve seen how the Apps SDK relies on OAuth 2.1 and OIDC for secure user access. You can absolutely build this yourself — implementing the authorization endpoints, token exchange, and scope enforcement directly.
If you’d rather skip that plumbing, you can plug in a managed identity layer like Stytch Connected Apps, which handles client registration, consent, and token management while letting your existing auth system remain the source of truth. Either approach gives ChatGPT a clean, standards-based interface to your product.
Before you ship: security & privacy checklist
- Publish discovery docs: Expose /.well-known/oauth-protected-resource and OIDC metadata. Support DCR today and plan for CIMD as the newer standard that OpenAI is likely to adopt eventually.
- Require OAuth for user data: Any tool that touches private or external data should enforce scopes server-side.
- Declare security clearly: Use
securitySchemesper tool, and mark read-only ones withannotations.readOnlyHint. This field helps the model plan its actions but should never replace server-side enforcement. - Rely on built-in consent prompts: Let ChatGPT handle write confirmations, and keep your tool descriptions accurate and scoped.
- Sandbox everything: Define a strict widgetCSP so your component connects only to approved domains.
- Keep secrets out of the client:
widgetStateis per component and conversation. Use it only for small UI state, never for tokens, credentials, or identifiers. - Test and monitor: Use Developer Mode, the API Playground, and MCP Inspector to catch token or schema issues early.
- Respect enterprise controls: Assume accounts can be linked or revoked centrally, and handle those events gracefully.
Next steps: start building with the OpenAI Apps SDK
Integrating your product with ChatGPT through the OpenAI Apps SDK is mostly about following the standards you already know, including OAuth 2.0/2.1, OIDC, and clear scoping between clients and servers. The SDK just gives you a cleaner way to expose your tools and UI to 100s of millions of users inside ChatGPT.
Whether you build your own OAuth layer or use a service like Stytch to extend your existing identity system, the goal is the same: make user access seamless, secure, and transparent.
Once you have discovery, DCR, and token validation in place, you can focus on what really matters — creating great experiences inside ChatGPT that use your data responsibly and respect user consent.
Get started! Try connecting your first tool to ChatGPT using the Apps SDK docs, and Stytch Connected apps (you can even use Stytch with your existing auth infrastructure). Test it locally with the MCP Inspector, and watch your product come to life in a new interface.
Authentication & Authorization
Fraud & Risk Prevention
© 2020-2026 Stytch. All rights reserved.