Back to blog
Integrating SAML Single Sign-On with Python, Okta, and Stytch
Auth & identity
Jul 25, 2024
Author: Lucien Chemaly
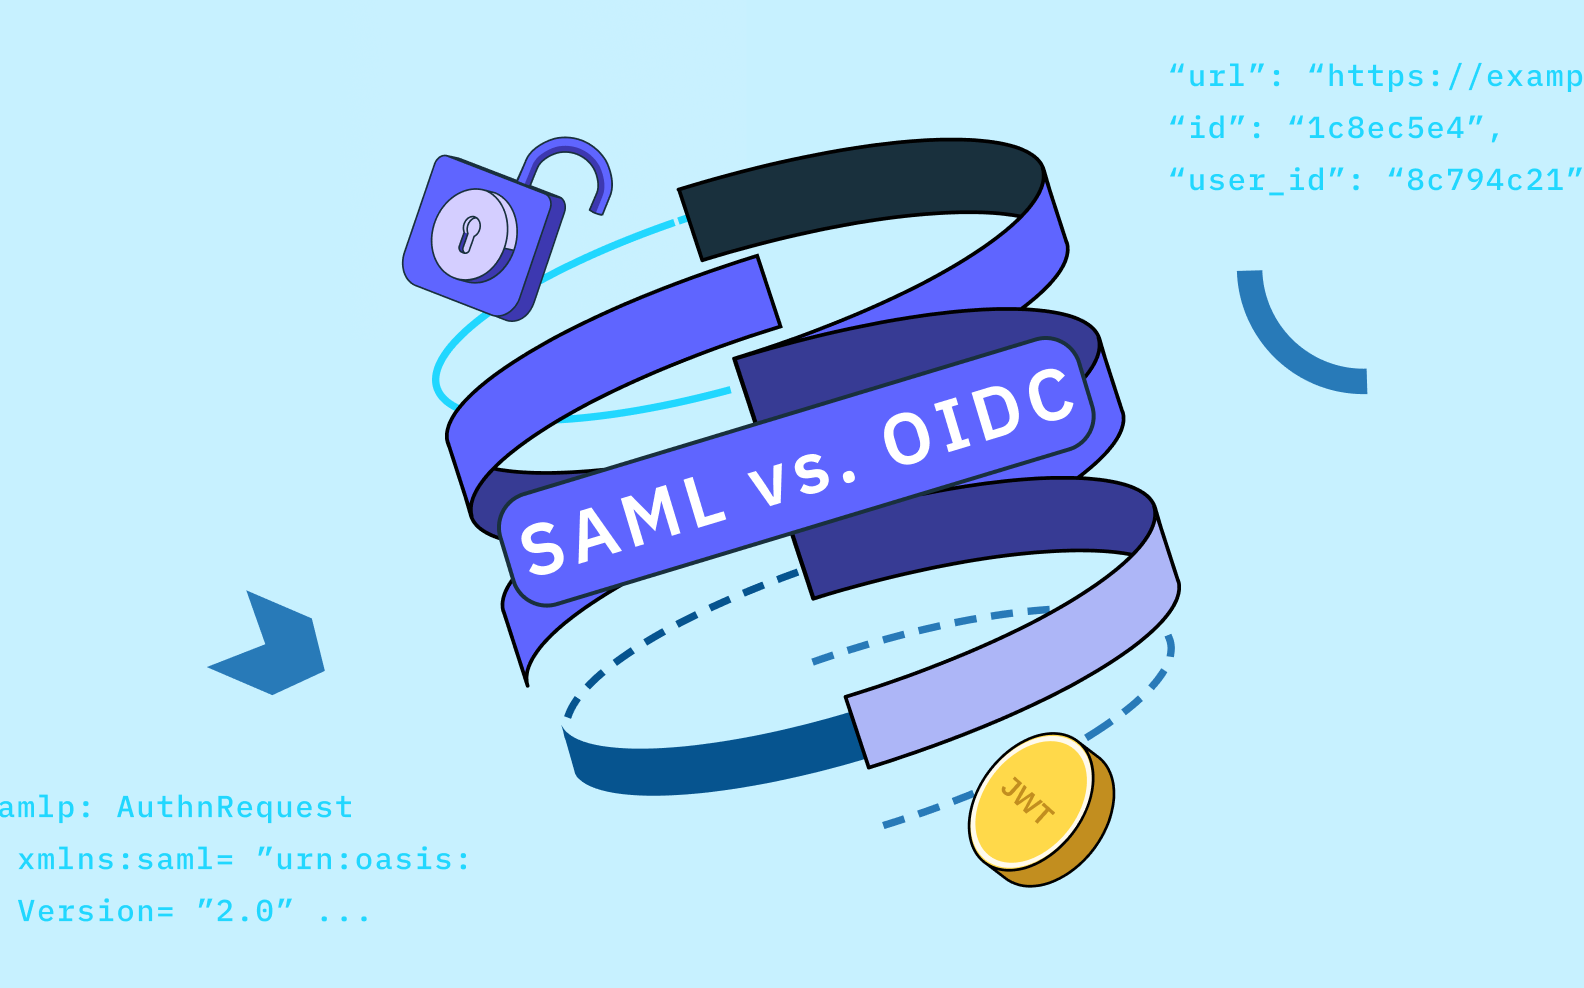
Security Assertion Markup Language Single Sign-On (SAML SSO) enables seamless communication between various websites or applications. This communication eliminates the need for repeated password entry by securely sharing user identity information. It's like having a master key that grants you access to multiple rooms in a building without needing to unlock each door separately.
SAML uses Extensible Markup Language (XML) to exchange information between websites. Rather than relying on secret keys or passwords to identify users, SAML uses assertions.
SAML SSO is commonly used for seamless authentication and authorization across multiple web applications, particularly in enterprise environments. It's also used in scenarios involving federated identity management, such as when organizations collaborate or share resources securely.
This article will teach you how to set up a Flask application that uses a SAML SSO login flow with Stytch as the B2B authentication provider and Okta as the identity provider (IdP).
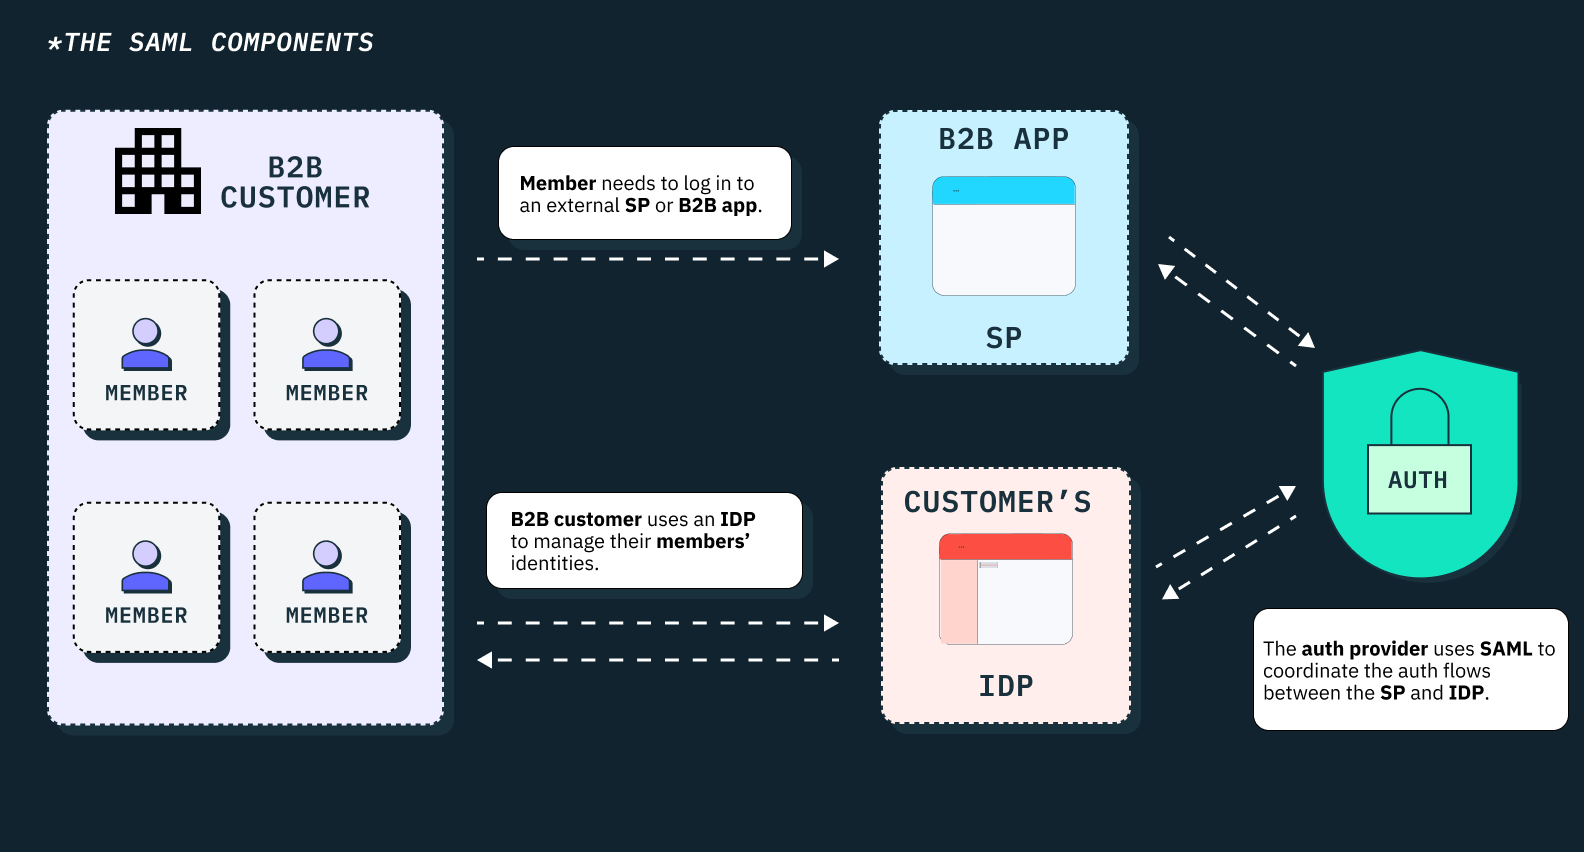
What Is SAML SSO
SAML SSO typically consists of three main components:
- The service provider (SP) is the application or service that users want to access. It consumes SAML assertions from the IdP to grant access.
- The identity provider (IdP) authenticates users and generates SAML assertions containing identity information. The B2B customers represent the companies or businesses that are using the service provider's app and trying to log in using SSO.
- User agents are web browsers or client applications that users utilize to interact with both the IdP and SP to facilitate SSO login.
As the authentication provider, Stytch coordinates and manages the auth flow between all parties (SP, IdP, and user agents) by providing developers with tools such as APIs and SDKs to build the full SSO flow.
At a high-level, when a user logs into their account on their IdP via SSO, their identity details are passed on to Stytch. Stytch then handles all the work needed to validate their identity by communicating between the IdP and your app (the SP) through the SAML protocol.
Aside: If you want to learn more about B2B authentication and how SAML SSO works, check out Stytch's B2B Auth School.
What You'll Build
In this article, you'll implement a Flask web application that uses Stytch to enable SAML SSO login with Okta as the IdP. The example app consists of two primary components:
- A Flask web server that uses the Stytch Python SDK to handle the SSO auth flow on the server-side.
- A React UI that renders the login form and logged-in page, which utilizes the Stytch React SDK to manage the session post-login.
Once running, the example app will enable the following auth flow for users:
- The user opens the login page for their company or organization, and then prompted to log in with Single Sign-On.
- The user authenticates into their Okta account and is redirected back to the application.
- The user logs into the application with an authenticated session.
You can visit the repo and explore the source code here on Github.
Implementing SAML SSO with Python and Flask
Before you start, make sure you have the following:
- Python 3.8+ installed on your machine.
- An Okta account. You can register for a free thirty-day trial account.
- A Stytch account. Make sure you register for Stytch's B2B SaaS authentication product.
- Node.js v20.10.0+ installed on your machine.
Setting Up Your Project
To get started, open your terminal or shell and run the following command to clone the existing repository, which has both the frontend and backend setup:
git clone https://github.com/stytchauth/stytch-blog-example-app-b2b-saml-sso-python-flask.gitCreating a New SAML SSO Connection
Before you get into the code, you need to configure a few settings in Stytch to create a new SAML SSO Connection.
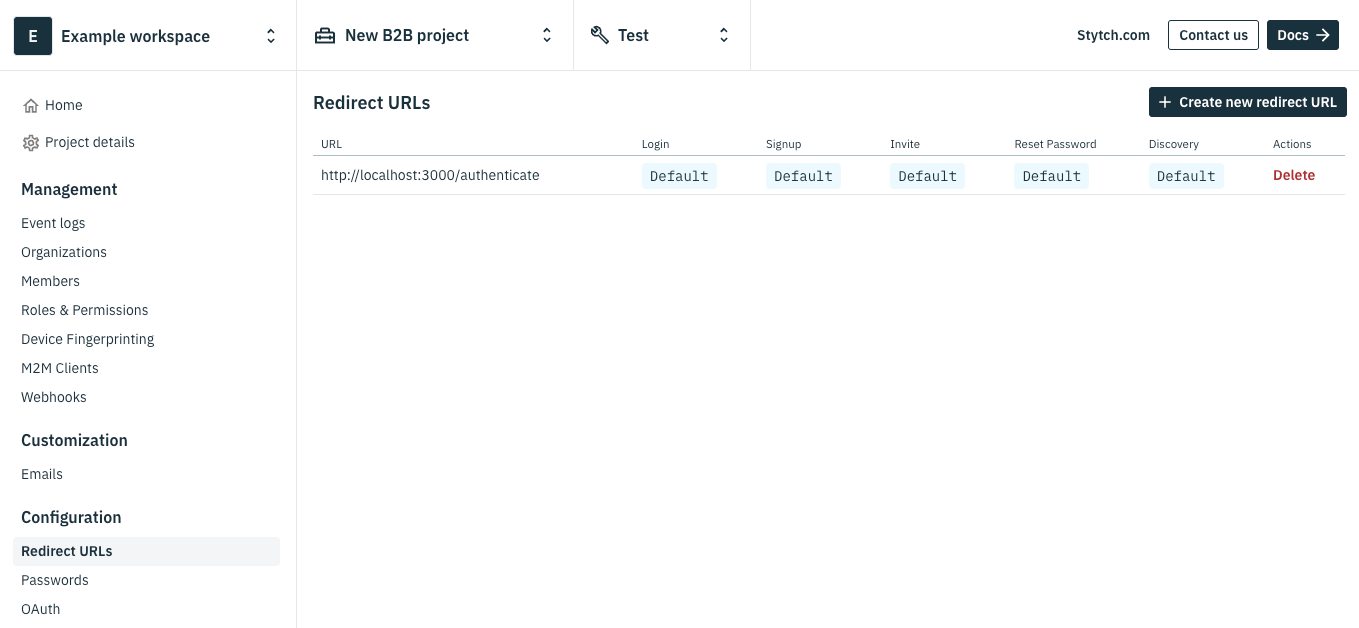
The first step is to sign up for a Stytch account and create a B2B Authentication Project. Navigate to Redirect URLs in the sidenav and add http://localhost:3000/authenticate for both login and signup. This URL is already be added by default for newly created Stytch B2B Projects.
Next, navigate to Organizations in the sidenav and select Create new organization. Enter a name and a slug before saving. This is the organization the user will log into.
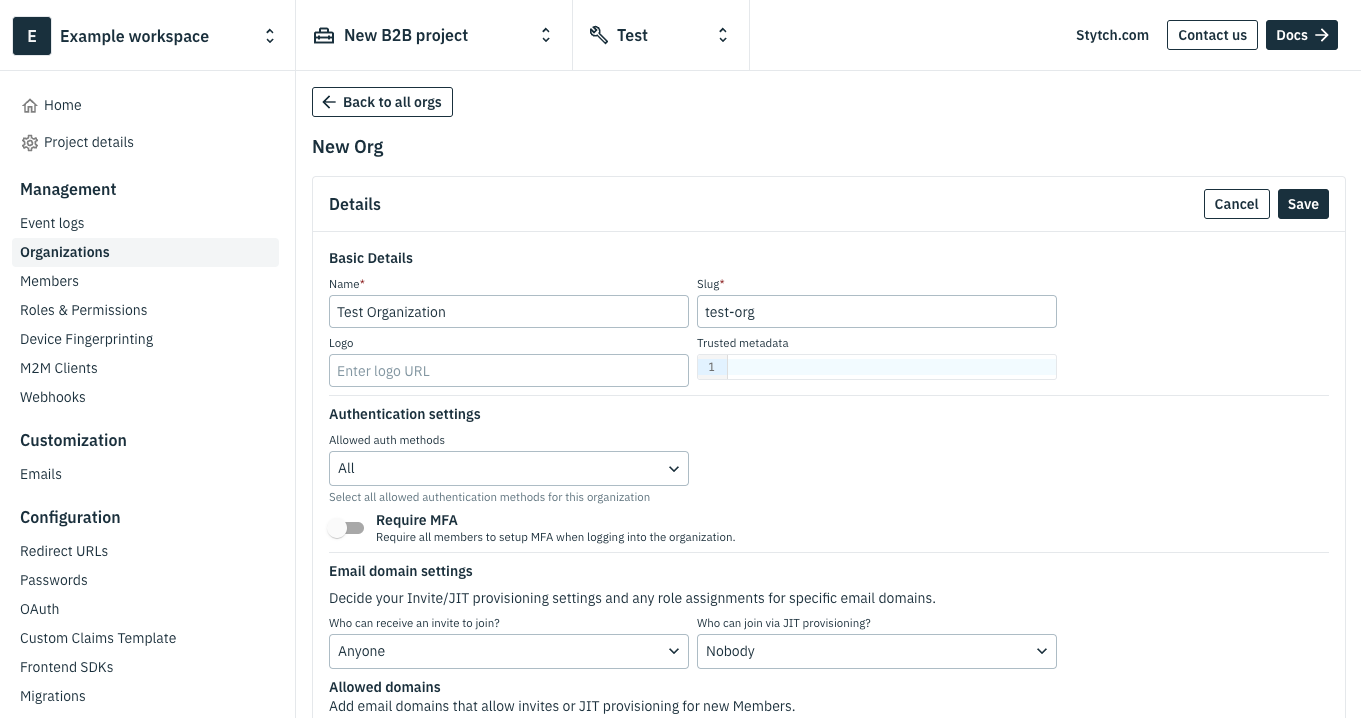
Once your organization is created, scroll down to the Configure SSO Connections section and click + Add new. Give the SSO Connection a name and select Okta SAML as the identity provider.
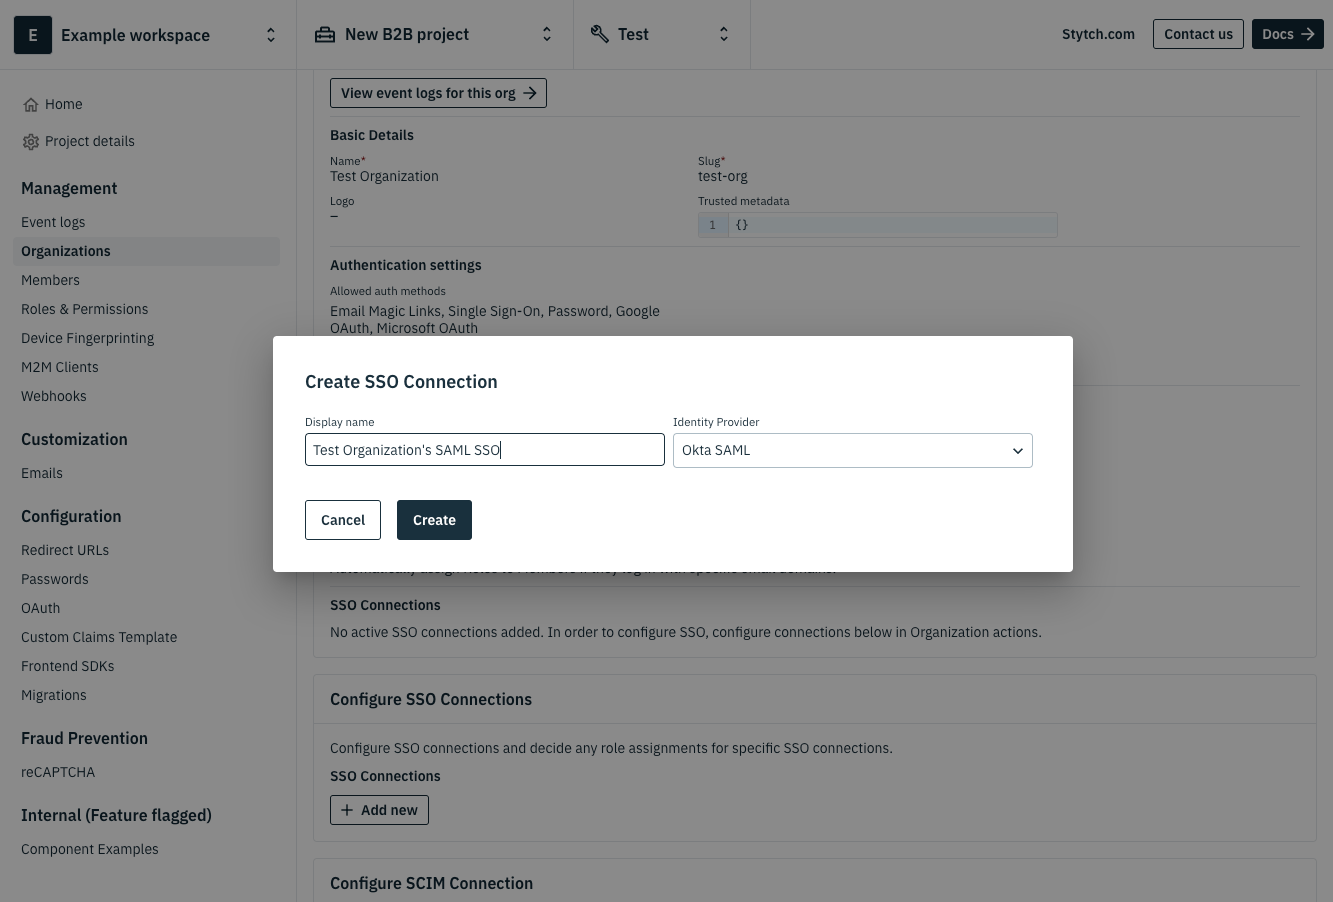
Click Create. Your new Stytch SSO Connection will auto-generate several SSO values that you'll need to input into your identity provider, which is Okta in this case.
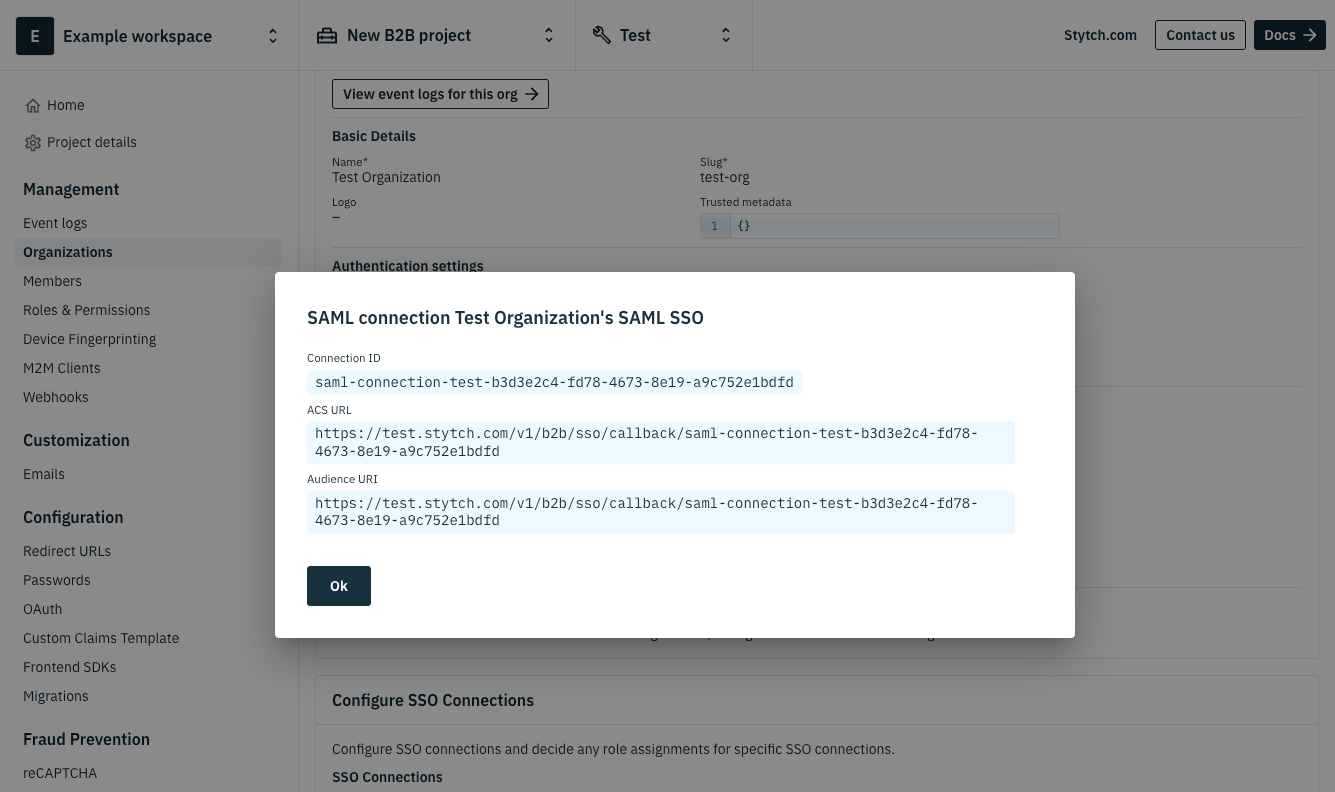
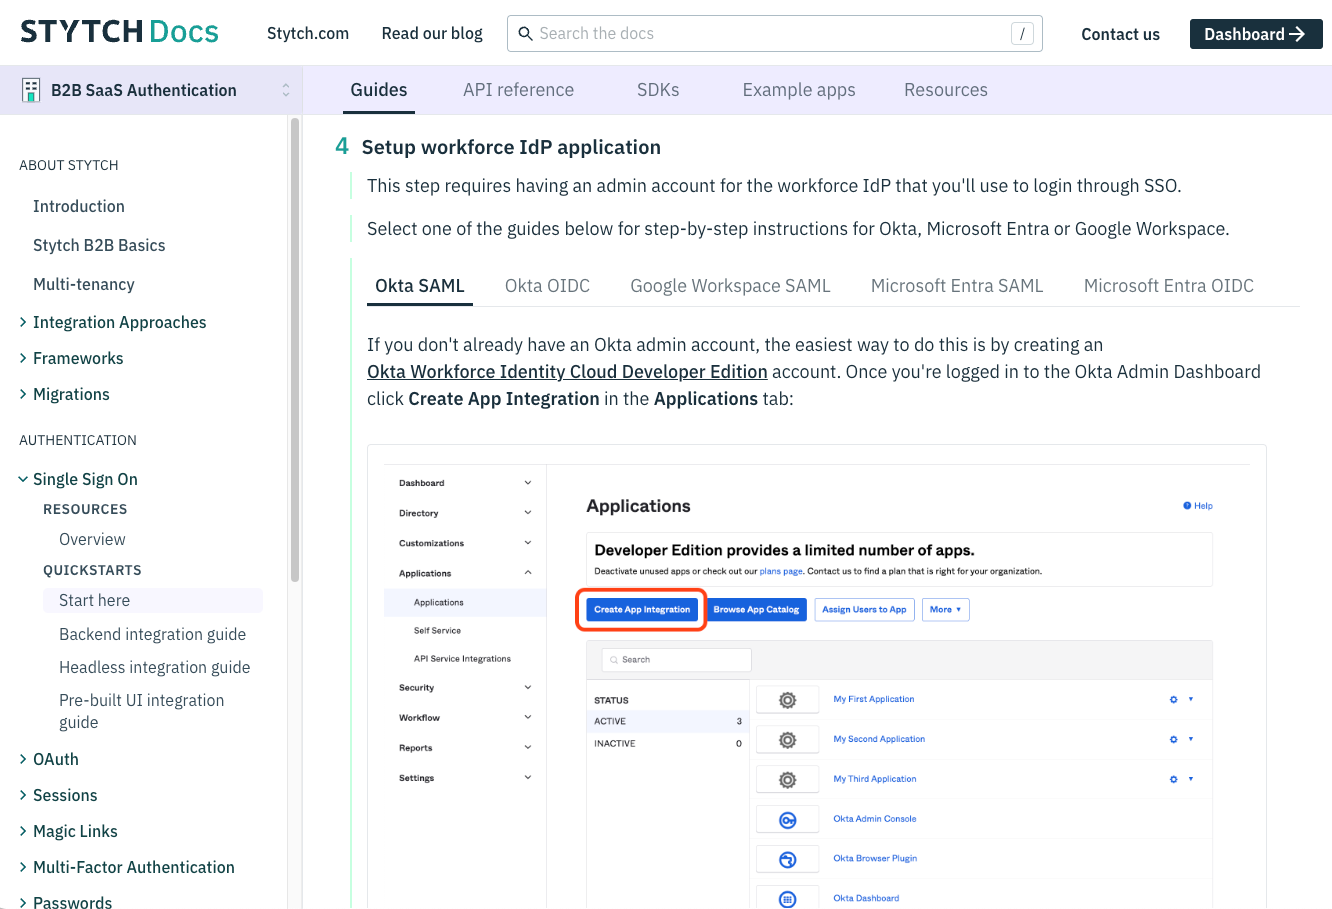
The last few steps are to configure Okta as your identity provider, which mostly involves copying over your new SSO Connection values. Please refer to Step 4: Setup workforce IdP application in this Stytch guide that includes detailed instructions and screenshots on how to complete the setup with Okta.
Once you've finished the Okta set up, go back to the Stytch Dashboard and confirm that your Organization's new SSO Connection shows as active under your organization. You should also see the Default connection ID automatically set to the SSO connection you just made with Okta.
The last step is to change the Who can join the organization via JIT provisioning? setting to Anyone.
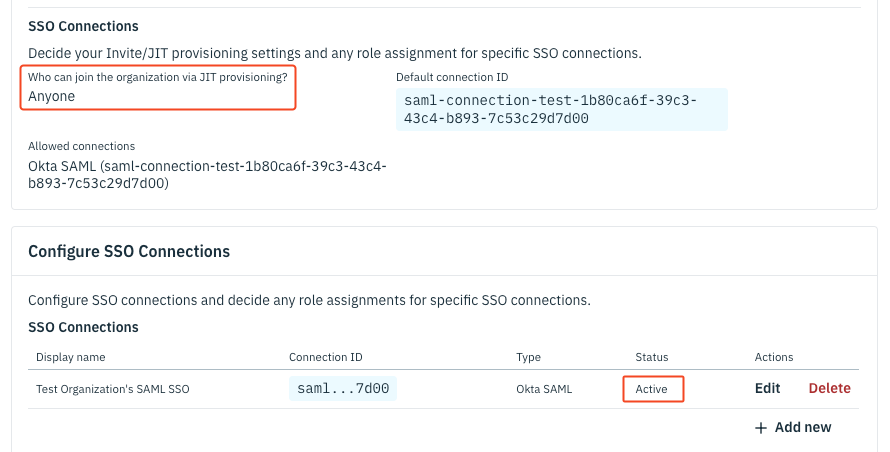
The Just-In-Time (JIT) provisioning setting is a convenient feature that automatically creates a user account in your application the first time a user logs in through Single Sign-On (SSO). This means that you don't have to manually create Stytch user accounts in advance; instead, they are created the exact moment when users authenticate through the identity provider, Okta.
Setting Up the Flask Server
Now that your Stytch Project and identity provider are ready, you need to set up the Flask backend APIs.
You'll start by creating a virtual environment, and then install the necessary packages. Open your terminal or shell, navigate to the api folder, and run the following:
python3 -m venv venvThis command creates the virtual environment, but you still need to activate it. The activation commands differ depending on your operating system.
If you're using Windows, you can use the following:
.\venv\Scripts\activateIf you're on macOS/Linux, use the following:
source venv/bin/activateOnce the virtual environment is activated, you can install the packages with pip:
pip3 install Flask flask-cors stytch requests python-dotenvThis command installs Flask to build your backend APIs, flask-cors to handle the cross-origin resource sharing (CORS), stytch as the Python client library for Stytch API, requests to make HTTP requests, and python-dot-env to handle environment variables.
Next, copy the api/.env-TEMPLATE file to your own .env file.
cp api/.env-TEMPLATE api/.env In the .env file, set the environment variables with your Project's credentials from the Stytch Dashboard, which you'll find in API Keys.
HOST = "localhost"
PORT = "3000"
STYTCH_PROJECT_ID = ""
STYTCH_SECRET = ""
STYTCH_PUBLIC_TOKEN = ""
Creating the API routes
Open app.py under the api folder which consists of two primary API endpoints.
On line 58, you'll see an API route which returns the data needed for an organization login page. This route starts the SSO login process for end users associated with a specific organization. When a user wants to log in, they navigate to a URL that includes the organization's unique identifier (e.g. /org/company-name).
@app.route("/org/<string:slug>", methods=["GET"])
def org_index(slug: str):
    resp = stytch_client.organizations.search(
        query=SearchQuery(
            operator=SearchQueryOperator.AND,
            operands=[{"filter_name": "organization_slugs", "filter_value": [slug]}],
        )
    )
    if resp.status_code != 200 or len(resp.organizations) == 0:
        return "Error fetching org"

    organization = resp.organizations[0]
    connection_id = organization.sso_active_connections[0].connection_id
    return {
        "sso_url": f"https://test.stytch.com/v1/public/sso/start?connection_id={connection_id}&public_token={STYTCH_PUBLIC_TOKEN}",
        "org_name": organization.organization_name,
    }
The API GET endpoint has a parameterized URL /org/<string:slug>, where slug is a dynamic value that represents the organization's unique identifier. You already specified the slug identifier when creating the organization in an earlier step.
The API endpoint then uses the Stytch Python SDK, stytch_client, to fetch the organization using the provided slug, constructing a query to search through organizations.
resp = stytch_client.organizations.search(
  query=SearchQuery(
      operator=SearchQueryOperator.AND,
      operands=[{"filter_name": "organization_slugs", "filter_value": [slug]}],
  )
)
If the organization is found, it retrieves the organization's details, including the connection_id for SSO. The API route then constructs a Stytch SSO start URL and returns it back to the client along with the organization's name.
This SSO URL is used to start the SSO authentication flow on the client-side and redirects the user to the Identity Provider (IdP) with all the required information. Refer to our documentation for more details.
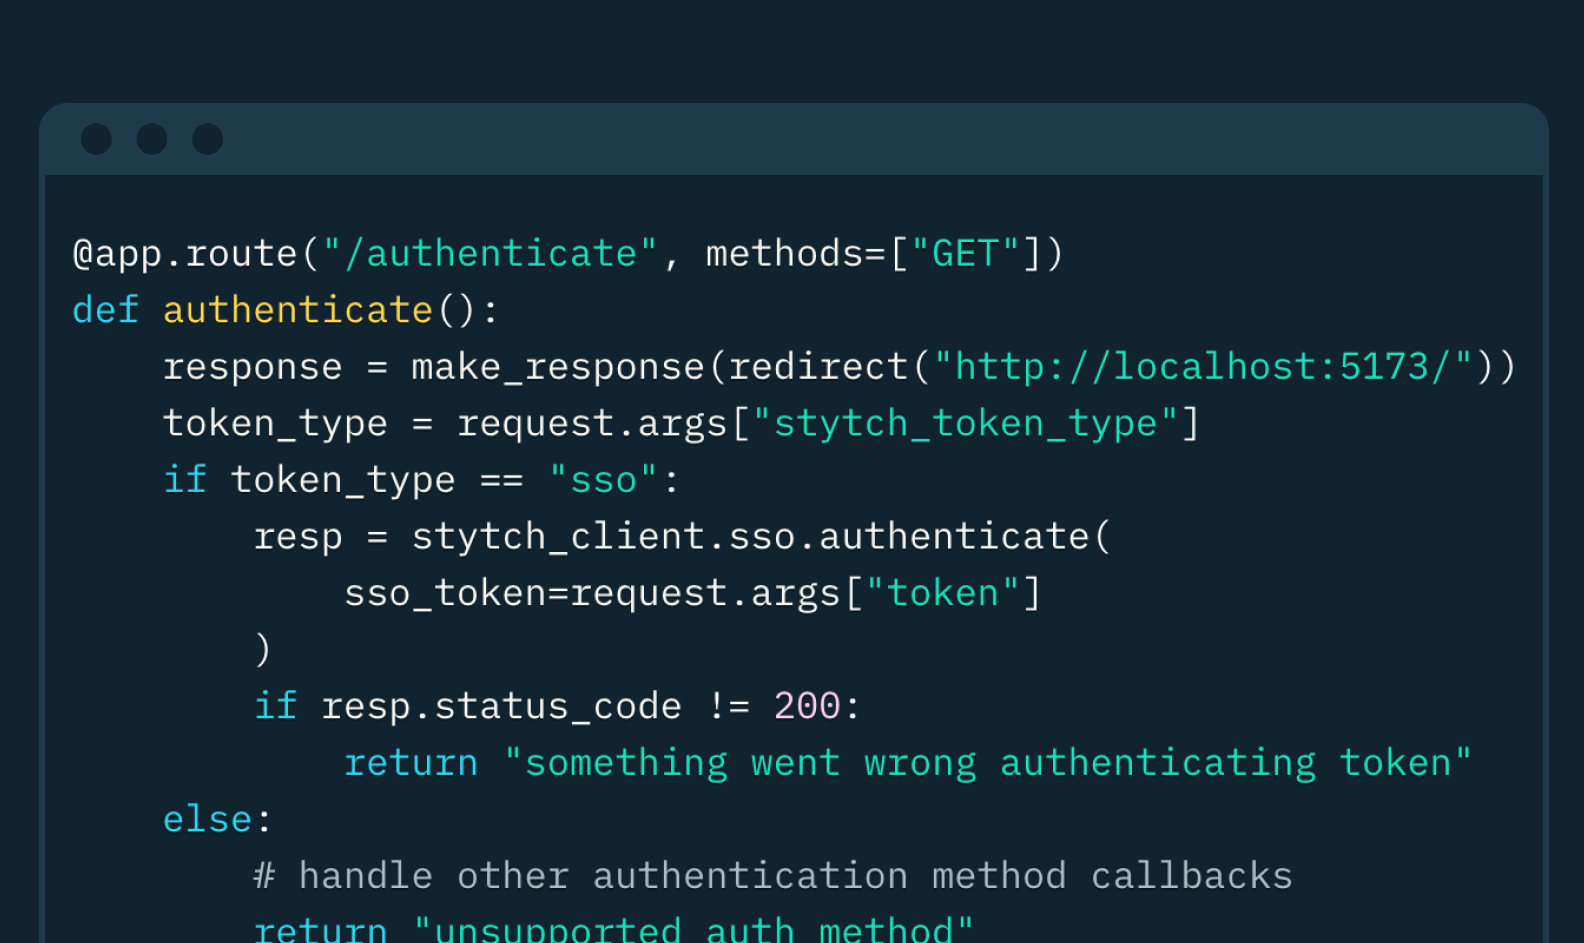
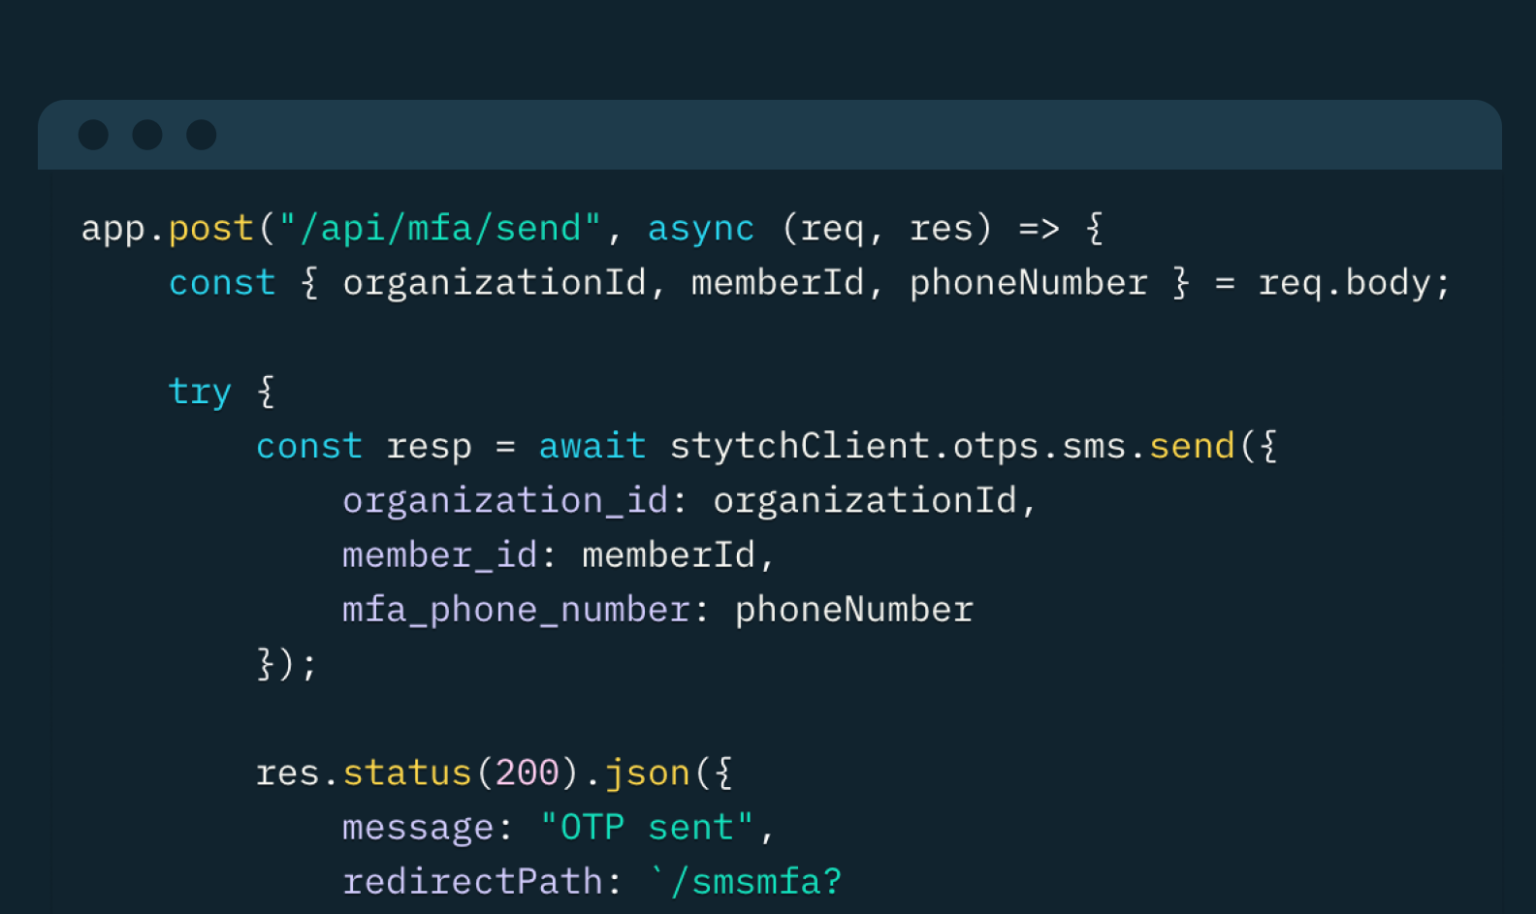
On line 42, you'll see the /authenticate API route which handles the redirect after the user authenticates with Okta.
@app.route("/authenticate", methods=["GET"])
def authenticate():
    response = make_response(redirect("http://localhost:5173/"))
    token_type = request.args["stytch_token_type"]
    if token_type == "sso":
        resp = stytch_client.sso.authenticate(sso_token=request.args["token"])
        if resp.status_code != 200:
            return "something went wrong authenticating token"
    else:
        # handle other authentication method callbacks
        return "unsupported auth method"

    response.set_cookie("stytch_session", resp.session_token)
    return response
The endpoint extracts the stytch_token_type and token query params from the URL. If it's an SSO token, it uses the Stytch Python SDK to authenticate the token. If the authentication is successful, it sets a cookie with the session token returned by Stytch before sending the response back to the client.
This completes the server-side setup for handling SSO login with Stytch and Okta. Next, you can proceed with the client-side UI implementation and final touches to complete your SSO integration.
Setting Up the UI with React
To start with the frontend application, run the following command using your terminal or shell in the ui directory to install the necessary packages:
npm installThis command installs the libraries @mui/material , @emotion/react and @emotion/styled to style Material UI components. You'll also use react-router-dom to handle navigation and URLs in your app. Most importantly, you'll install the stytch-react SDK to manage the logged-in session.
Next, copy the api/.env-TEMPLATE file to your own .env file.
cp ui/.env-TEMPLATE ui/.env In the .env file, set the environment variables with your Project's public token credentials from the Stytch Dashboard, which you'll find in API Keys.
VITE_STYTCH_PUBLIC_TOKEN=''Next, open the main.jsx file in the src directory to see how the overall front-end app structure is organized.
import React from 'react';
import ReactDOM from 'react-dom/client';
import App from './App.jsx';
import './index.css';

import { StytchB2BProvider } from '@stytch/react/b2b';
import { StytchB2BHeadlessClient } from '@stytch/vanilla-js/b2b/headless';
import { BrowserRouter } from 'react-router-dom';

const stytch = new StytchB2BHeadlessClient(
  import.meta.env.VITE_STYTCH_PUBLIC_TOKEN, // or process.env.STYTCH_PUBLIC_TOKEN for non-Vite based projects
);

ReactDOM.createRoot(document.getElementById('root')).render(
  <React.StrictMode>
    <BrowserRouter>
    <StytchB2BProvider stytch={stytch}>
      <App />
    </StytchB2BProvider>
    </BrowserRouter>
  </React.StrictMode>
)
In this React application setup, the file configures the BrowserRouter, which handles client-side routing and manages navigation between pages, and the StytchB2BHeadlessClient, which is used to interact with Stytch’s authentication services. The StytchB2BProvider wrapped around the <App /> component makes this client available throughout the app.
The App component serves as the root of the UI, rendering the main interface of the application. Open the App.jsx file to see the main component of the application:
import { Button, Container } from '@mui/material';
import { useStytchB2BClient, useStytchMemberSession } from '@stytch/react/b2b';
import React, { useCallback } from 'react';
import { Route, Routes } from 'react-router-dom';
import './App.css';
import Home from './Home';
import ProductsList from './ProductsList';
import SSOLogin from './SSOLogin';

function App() {
  const stytch = useStytchB2BClient();
  const { session, fromCache } = useStytchMemberSession();

  const logout = useCallback(() => {
    stytch.session.revoke();
  }, [stytch]);

  return (
    <Container>
      {session && (
        <>
        <Button
          variant="outlined"
          color="secondary"
          onClick={logout}
          sx={{ position: "absolute", top: 16, right: 16 }}
        >
          Sign Out
        </Button>
      </>
      )}

      <Routes>
        <Route path="/org/:orgId" element={<SSOLogin />} />
        <Route path="/" element={session || fromCache ? <ProductsList /> : <Home />} />
      </Routes>
    </Container>
  );
}

export default App;
The App component primarily performs two functions.
- Session management: The Stytch SDK's
useStytchMemberSessionhook automatically retrieves the current authenticated session if detected in the cookies and validates it. If the user is logged in, then alogoutbutton is rendered which calls a function tiggers Stytch'ssession.revokemethod. - Route rendering: The
/org/:orgIdroute renders theSSOLogincomponent for organization-specific login, while the/route conditionally renders either theProductsListcomponent if a session exists and the user is logged in, or theHomecomponent if there is no session and the user is logged out.
This structure ensures that unauthenticated users can access their organization's specific SSO login page, while authenticated users are directed to the product list page for a logged-in view.
Running and Testing the Code
From your terminal or shell in your api directory, run the following command:
python3 app.pyThen from your ui directory, run the following command to run the React application:
npm run devIn the broswer, visit localhost:5173/org/:orgSlug in the browser to load the organization's login page. Replace :orgSlug with the slug identifier you defined when creating the organization.
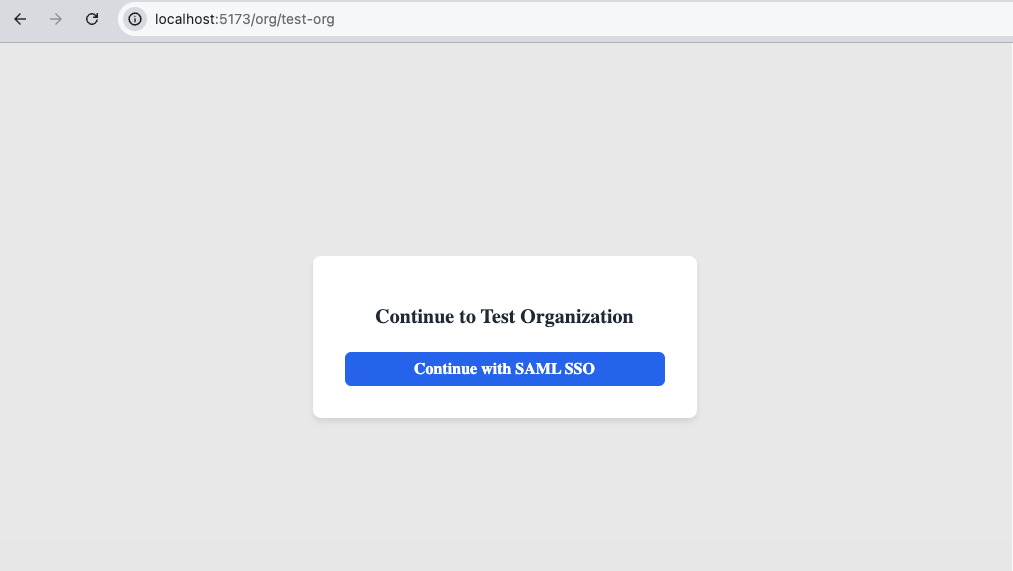
Click the Continue with SAML SSO button, which links to the Stytch SSO Start URL that was constructed server-side from the organization's SSO connection.
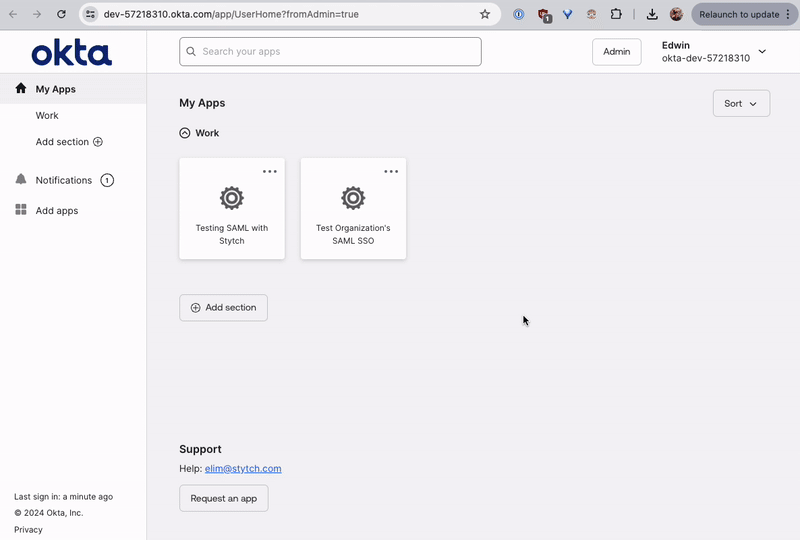
Log into Okta with the user's credentials and you'll be redirected back to the application's logged in view of a private products list. Here's the entire SSO login flow in action:
Users can also log in to the application directly from Okta for an IdP-initiated SSO login flow. To do this, navigate to your Okta dashboard and open the application.
All the code for this tutorial is available in this GitHub repo.
Conclusion
In this article, you learned how to implement SAML SSO into your app using Python and Flask for the backend, React for the frontend. Okta as the IdP, and Stytch as the auth provider to build the SSO flow.
Stytch offers a variety of authentication methods and dev tools to integrate robust authentication systems alongside your application. Check out Stytch's docs if you're looking for a feature-rich, scalable, and enterprise-ready solution to build B2B SaaS authentication.
Build auth with Stytch
Pricing that scales with you • No feature gating • All of the auth solutions you need plus fraud & risk
Authentication & Authorization
Fraud & Risk Prevention
Resources
Community
© 2020-2026 Stytch. All rights reserved.