Back to blog
The ultimate guide to building user authentication into your Next.js application
Engineering
Oct 4, 2021
Author: Stytch Team
Next.js is a popular React framework and we’re in the process of migrating our main stytch.com website to Next.js because of the developer experience and performance wins. We’re thankful to benefit from the Next.js ecosystem for our own product and wanted to open source that work.
Building user signup and login can be a frustrating task, especially when you just want to focus on building your core product. Stytch makes it easy to build user authentication, we offer flexible SDKs and APIs so that you can own your UX and let us do the heavy lifting.
In this tutorial, we’ll walk through building a Next.js app with Stytch for user authentication. We’ll be using this example app to show you how you can use our API integration to build user sign up and log in with SMS one-time passcodes.
Create your Next.js app
It’s simple to get an app up and running using create-next-app. You’ll need to have the Next.js cli installed if you don’t already, instructions on that here. Then you’ll want to run:
$ npx create-next-app --typescriptNow you’ll want to run the following command to install all of your dependencies:
$ npm installYour app is now ready for you to get started. Follow the instructions printed in your terminal to cd into your app and then start it in development mode with:
$ npm run devSetting up Stytch
To start, you’ll need to have a Stytch account, you can sign up here. Next, you’ll need a .env.local file. You can copy our template here. For the purpose of this guide, you only need to fill out the STYTCH_PROJECT_ID and STYTCH_SECRET env variables, which you can find in the Stytch Dashboard API keys tab.
Sending and authenticating SMS One-time Passcodes(OTP)
One benefit of Next.js is that it supports creating backend API routes under the pages/api/ folder. These routes are made accessible at <your domain>/api/<route name>.
In this guide we will leverage Next.js API routes and the Stytch API by using the Stytch Node client library. Start by installing the client with:
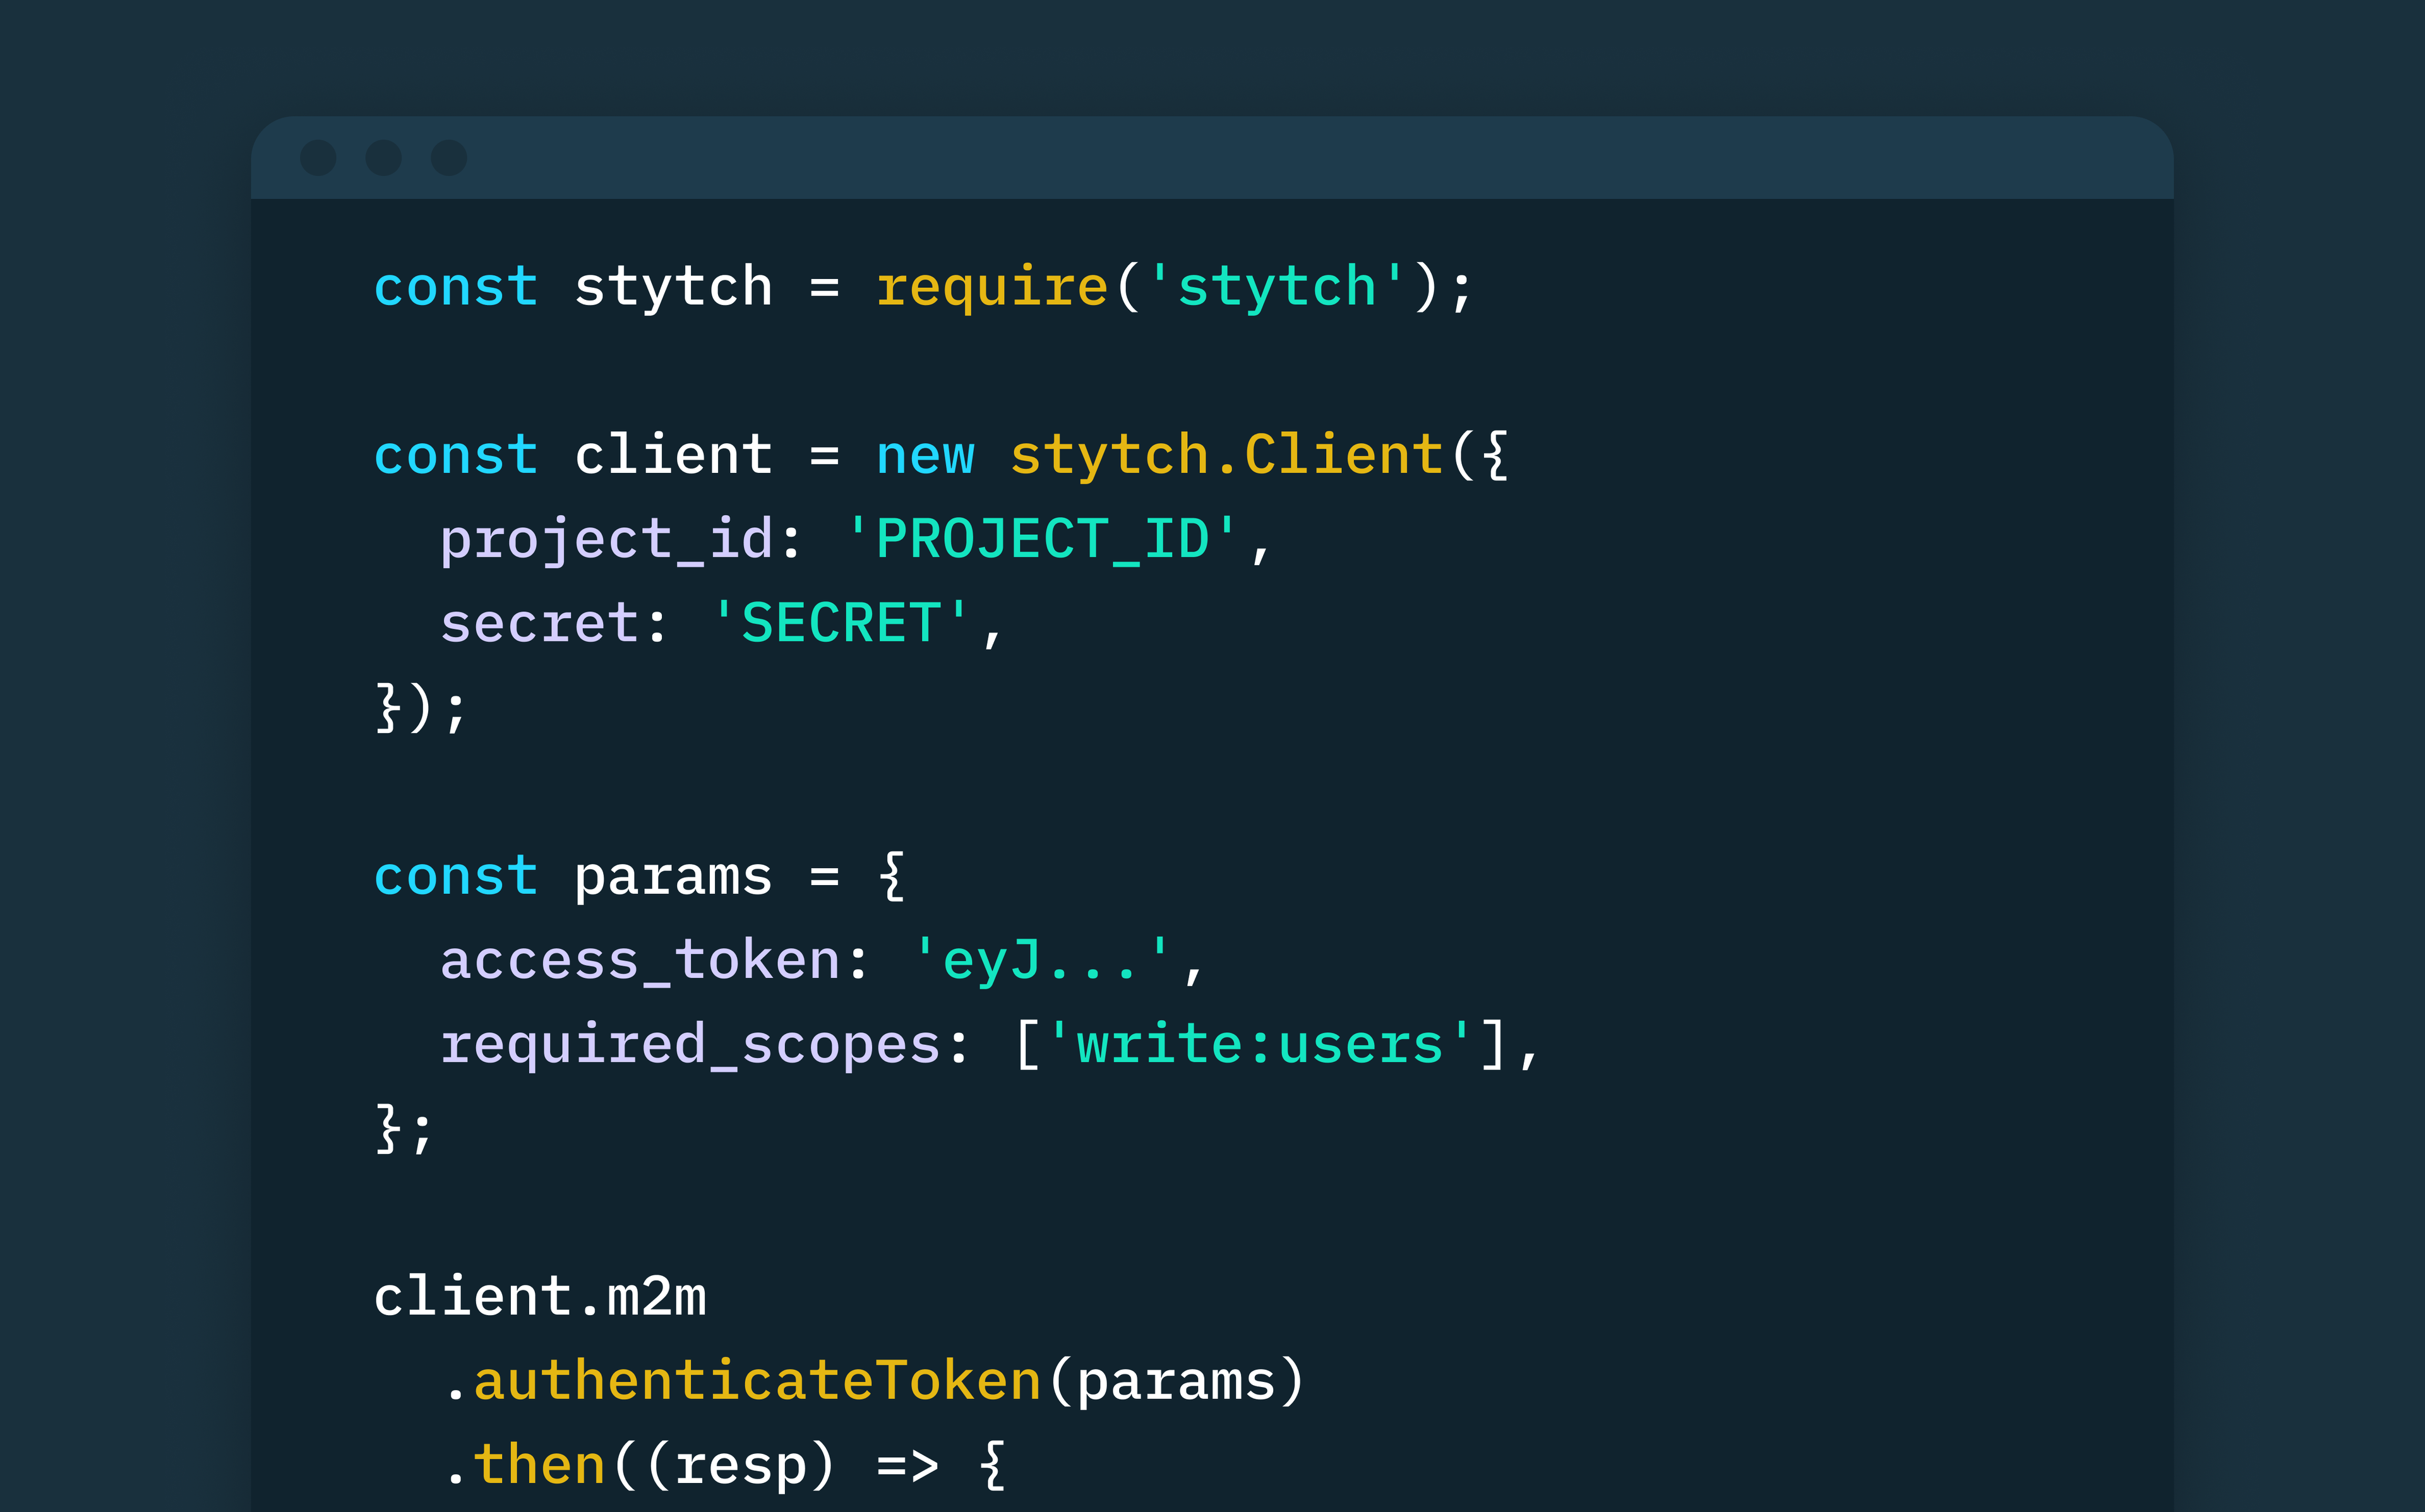
$ npm install stytchIn order to use the Stytch Node client library, your app needs to instantiate a Stytch client. In our example project, we created a utility function to do this for you under lib/loadStytch.ts, as long as you created your .env.local file above, you don’t need to do anything else here.
let client: stytch.Client;
const loadStytch = () => {
    if (!client) {
        client = new stytch.Client({
            project_id: process.env.STYTCH_PROJECT_ID || '',
            secret: process.env.STYTCH_SECRET || '',
            env: stytch.envs.test,
        });
    }
    return client;
};
Next, we created an API route called send_otp under pages/api/. This endpoint will be available at <your domain>/api/send_otp (e.g. http://localhost:3000/api/send_otp) and will take a phone number in +1XXXXXXXXXX format in the request body. Using the Stytch client, call the otps.sms.loginOrCreate method. This will send a text to the provided phone number with a OTP. The otps.sms.loginOrCreate method also returns a methodId; return and keep track of this methodId as it will be required for the authentication endpoint later. You can take a look at how we built our send_otp endpoint here.
export async function handler(req: NextApiRequest, res: NextApiResponse < Data > ) {
    if (req.method === 'POST') {
        const client = loadStytch();
        const data = JSON.parse(req.body);
        try {
            const phoneNumber = data.phoneNumber.replace(/\D/g, ''); // params are of type stytch.LoginOrCreateUserBySMSRequest
            const params = {
                phone_number: `${data.intlCode}${phoneNumber}`,
            };
            const resp = await client.otps.sms.loginOrCreate(params);
            res.status(200).json({
                methodId: resp.phone_id
            });
        } catch (error) {
            console.log(error);
            res.status(400);
        }
    } else {
      // Handle any other HTTP method
    }
}
Finally, we created an authentication endpoint called authenticate_otp under pages/api/. This endpoint will be available at <your domain>/api/authenticate_otp and takes the methodId from the prior send_otp response and the user supplied otpInput(the six digit OTP sent to the user’s phone). Using the Stytch client, call the otps.authenticate method, if the response status is 200, the user has successfully authenticated! You can take a look at how we built out our authenticate endpoint here.
export async function handler(req: NextIronRequest, res: NextApiResponse < Data > ) {
    if (req.method === 'POST') {
        const client = loadStytch();
        const data = JSON.parse(req.body);
        try { // params are of type stytch.LoginOrCreateUserBySMSRequest
            const params = {
                code: data.otpInput,
                method_id: data.methodId,
            };
            const resp = await client.otps.authenticate(params);
            if (resp.status_code.toString() === '200') {
                // Set session req.session.destroy();
                // Save additional user data here
                req.session.set('user', {
                    id: resp.user_id,
                });
                await req.session.save();
                res.status(200).send({
                    msg: `successfully authenticated ${resp.user_id}`
                });
            } else {
                throw Error('Error authenticating your code');
            }
        } catch (error) {
            console.log(error);
            res.status(400).json({
                msg: error
            });
        }
    } else {
        // Handle any other HTTP method
    }
}
Now that you’ve set up your authentication API routes, it’s time to build a UI!
Building your login page
In addition to API routes, Next.js also automatically converts all remaining files under the /pages directory into page routes in your application. To add your login page, directly edit the pages/index.tsx file.
For your login UI, you will want to create two separate forms. One for the user to enter their phone number (which will send them an OTP), and the other for the user to enter and verify their OTP. You can take a look at the examples we’ve built for both at SendOTPForm.tsx and VerifyOTPForm.tsx. Here’s an example of how you can tie these two forms together for your log in flow, see LoginWithSMS.tsx:
const LoginWithSMS = () => {
const [otpSent, setOTPSent] = useState(false);
const [phoneNumber, setPhoneNumber] = useState('');
const [methodId, setMethodId] = useState('');
return (
<StytchContainer>
{!otpSent ? (<SendOTPForm phoneNumber={phoneNumber} setMethodId={setMethodId} setOTPSent={setOTPSent} setPhoneNumber={setPhoneNumber} />) : (<VerifyOTPForm methodId={methodId} phoneNumber={phoneNumber} />)}
</StytchContainer>
);
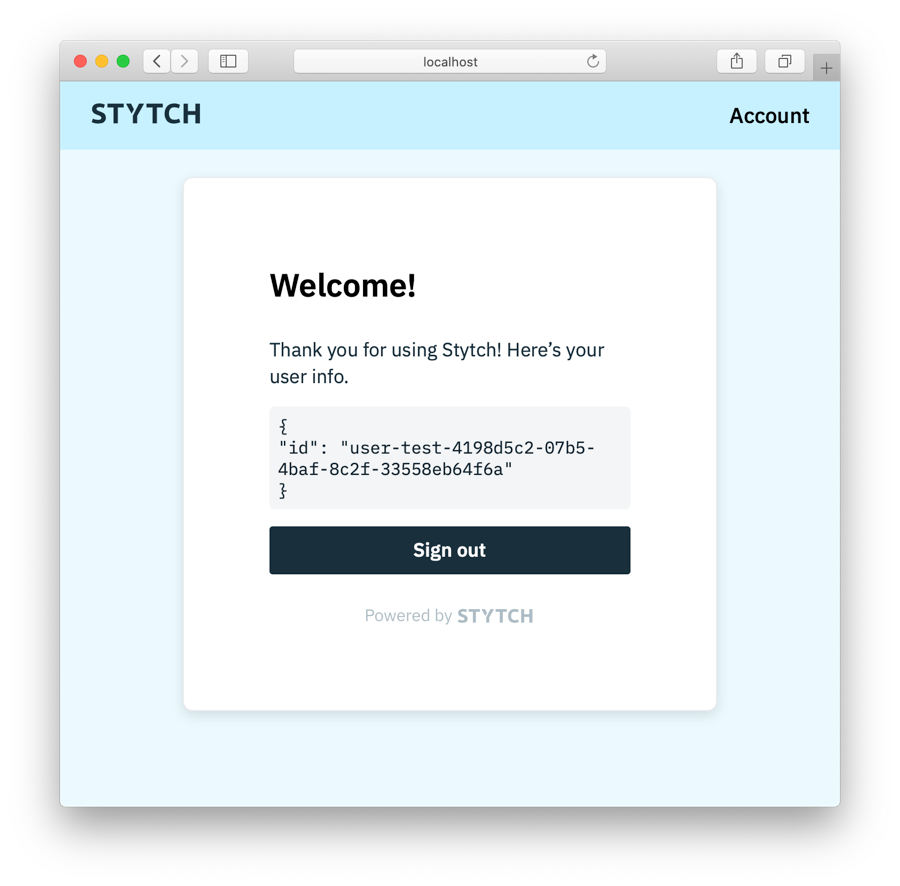
};Finally, you will want to create a logged-in page that the VerifyOTPForm can push to once a user has been successfully authenticated. You can see our logged-in view here and what it looks like below:
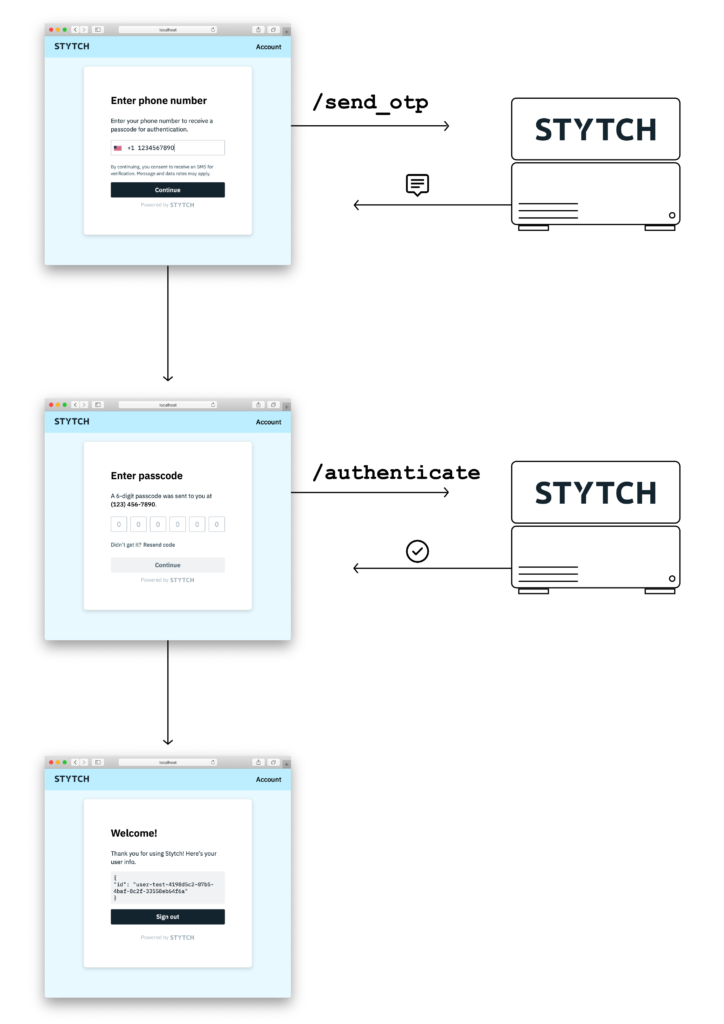
Once you’ve created the login UI and your logged-in page, you are now ready to hook up your components to your API routes. Below is a diagram of what the user authentication flow should look like:
Congratulations! You’ve successfully used the Stytch API in Next.js to build user sign up and log in with SMS OTP.
What's next?
Stytch is a platform for user infrastructure, we offer many more options when it comes to your user authentication. Explore more ways to authenticate, including email or embeddable magic links, email or WhatsApp OTP, and OAuth in our Docs!
Build auth with Stytch
Pricing that scales with you • No feature gating • All of the auth solutions you need plus fraud & risk


Authentication & Authorization
Fraud & Risk Prevention
© 2025 Stytch. All rights reserved.