Headless Integration of OAuth
In Stytch’s B2B product there are two different versions of the OAuth authentication flow:
- Discovery Authentication: used for self-serve Organization creation or login prior to knowing the Organization context
- Organization-specific Authentication: used when you already know the Organization that the end user is trying to log into
This guide walks through how to offer OAuth for both scenarios.
Discovery Sign-Up or Login
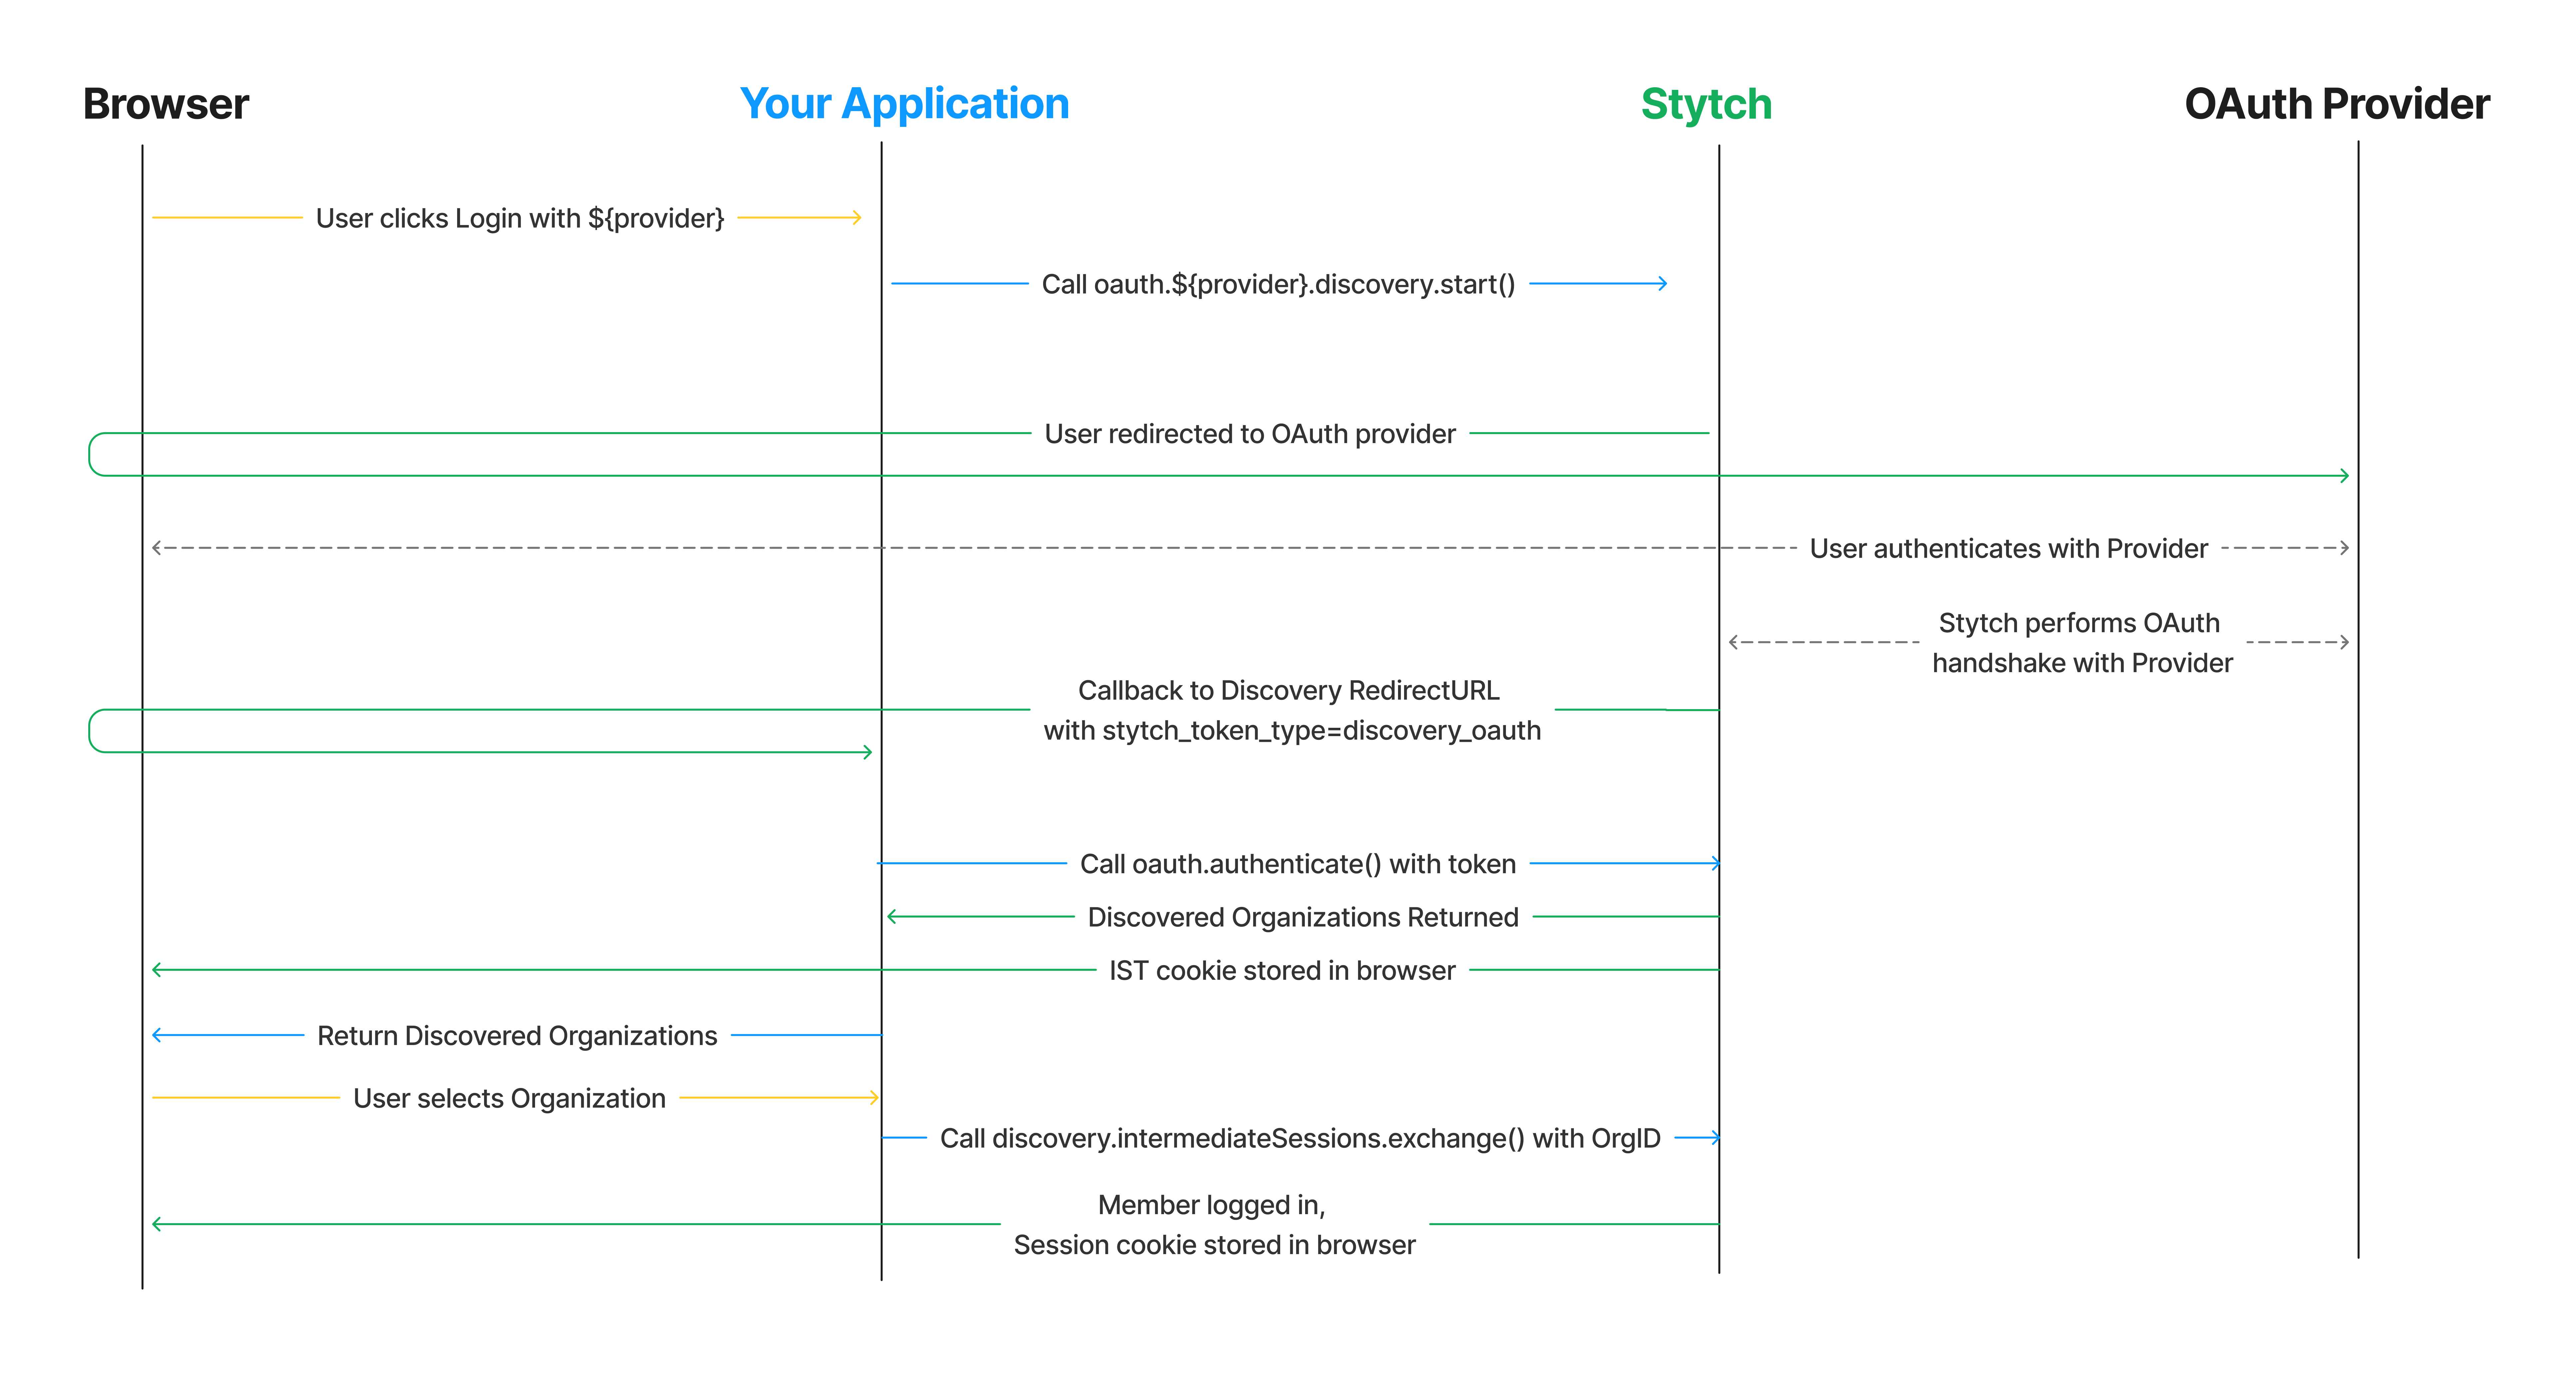
The discovery flow is designed for situations where your end users are signing up or logging in from a central landing page, and have not specified which organization they are trying to access or are attempting to create a new Organization.
The sequence for how this flow works when using a headless integration approach is as follows:

1Complete config steps
If you haven't done so already:
- Complete the steps in the OAuth Integration Guide Start Here
- Enable the Frontend SDKs in your Stytch Dashboard
- Once the FE SDK is enabled, enable Create Organizations under "Enabled Methods"
2Configure discovery start
In your application’s UI, introduce oauth.discovery.$provider.start() to allow users to begin the OAuth discovery flow.
For example, to add Google OAuth you would do the following in our React SDK:
import { useStytchB2BClient } from '@stytch/react/b2b';

export const Login = () => {
  const stytchClient = useStytchB2BClient();

  const startOAuth = () =>
    stytchClient.oauth.google.discovery.start();

  return <button onClick={startOAuth}>Log in with Google</button>;
};
To add Google OAuth with our vanilla JS SDK you would add:
<script>
  import { StytchB2BHeadlessClient } from '@stytch/vanilla-js/b2b/headless';
  const stytch = new StytchB2BHeadlessClient('STYTCH_PUBLIC_TOKEN');

  document.getElementById('login-with-oauth').onclick = () => stytch.oauth.google.discovery.start();
</script>

<button id="login-with-oauth">Login with Google</button>3Configure callback
Stytch will send a callback to the Discovery RedirectURL you specified in the Stytch Dashboard earlier. Upon receiving this callback you will exchange the token in the call for a list of Discovered Organizations that the user can choose to log into. An intermediate_session_token (IST) will also be returned, but the headless SDK will take care of setting this in cookies and including it in the follow up calls.
In React this looks like:
import React, { useEffect } from 'react';
import { useStytchB2BClient, useStytchMemberSession } from '@stytch/react/b2b';

export const Authenticate = () => {
  const stytchClient = useStytchB2BClient();
  const { session } = useStytchMemberSession();

  useEffect(() => {
    if (session) {
      window.location.href = 'https://example.com/profile';
    } else {
      const token = new URLSearchParams(window.location.search).get('token');
      stytchClient.oauth.discovery.authenticate({
        discovery_oauth_token: token,
      });
    }
  }, [stytchClient, session]);

  return <div>Loading</div>;
};
In vanilla Javascript this looks like:
<script>
  import { StytchB2BHeadlessClient } from '@stytch/vanilla-js/b2b/headless';
  const stytch = new StytchB2BHeadlessClient('STYTCH_PUBLIC_TOKEN');

  const token = new URLSearchParams(window.location.search).get('token');
  stytch.oauth.discovery.authenticate({
    discovery_oauth_token: token
  });
</script>4Handle user selection
If the end user selects to login to an existing Organization, you can call the exchange intermediate session method with the selected OrgID.
For example, in React you would add:
import React, { useEffect } from 'react';
import { useStytchB2BClient } from '@stytch/react/b2b';

export const exchangeIntermediateSession = () => {
  const stytch = useStytchB2BClient();

  useEffect(() => {
    stytch.discovery.intermediateSessions.exchange({
      organization_id: 'organization-test-07971b06-ac8b-4cdb-9c15-63b17e653931'
    });
  });

  return <div>Log In</div>;
};
In vanilla Javascript you would add the following:
// in JavaScript
import { StytchB2BHeadlessClient } from '@stytch/vanilla-js/b2b/headless';
  const stytch = new StytchB2BHeadlessClient('STYTCH_PUBLIC_TOKEN');
  const exchangeIntermediateSession = () => {
    stytch.discovery.intermediateSessions.exchange({
      organization_id: 'organization-test-07971b06-ac8b-4cdb-9c15-63b17e653931'
    });
  };

  // in HTML
  <button onclick="exchangeIntermediateSession()">Log In</button>
You can also optionally allow users the ability to create a new Organization instead of logging into an existing one. In order to enable this, ensure that you have enabled Create Organizations in the FE SDKs section of the Stytch Dashboard.
To support creating a new Organization through discovery in your application, add the following code with our React SDK:
import React, { useEffect } from 'react';
import { useStytchB2BClient } from '@stytch/react/b2b';

export const CreateOrganization = () => {
  const stytch = useStytchB2BClient();

  useEffect(() => {
    stytch.discovery.organizations.create();
  });

  return <div>Create Organization</div>;
};
Or with our vanilla Javascript SDK:
// in JavaScript
import { StytchB2BHeadlessClient } from '@stytch/vanilla-js/b2b/headless';
const stytch = new StytchB2BHeadlessClient('public-token-test-678e2e02-0db0-45c6-a52f-29b3f3b90673');
const createOrganization = () => {
  stytch.discovery.organizations.create();
};

// in HTML
<button onclick="createOrganization()">Create Organization</button>
You can also optionally prompt the user for the name and slug of their new organization, but if not provided Stytch will auto generate a name and slug based on the end user’s email address.
5Test it out
Run your application and test out doing discovery login and sign-up!
Organization Login
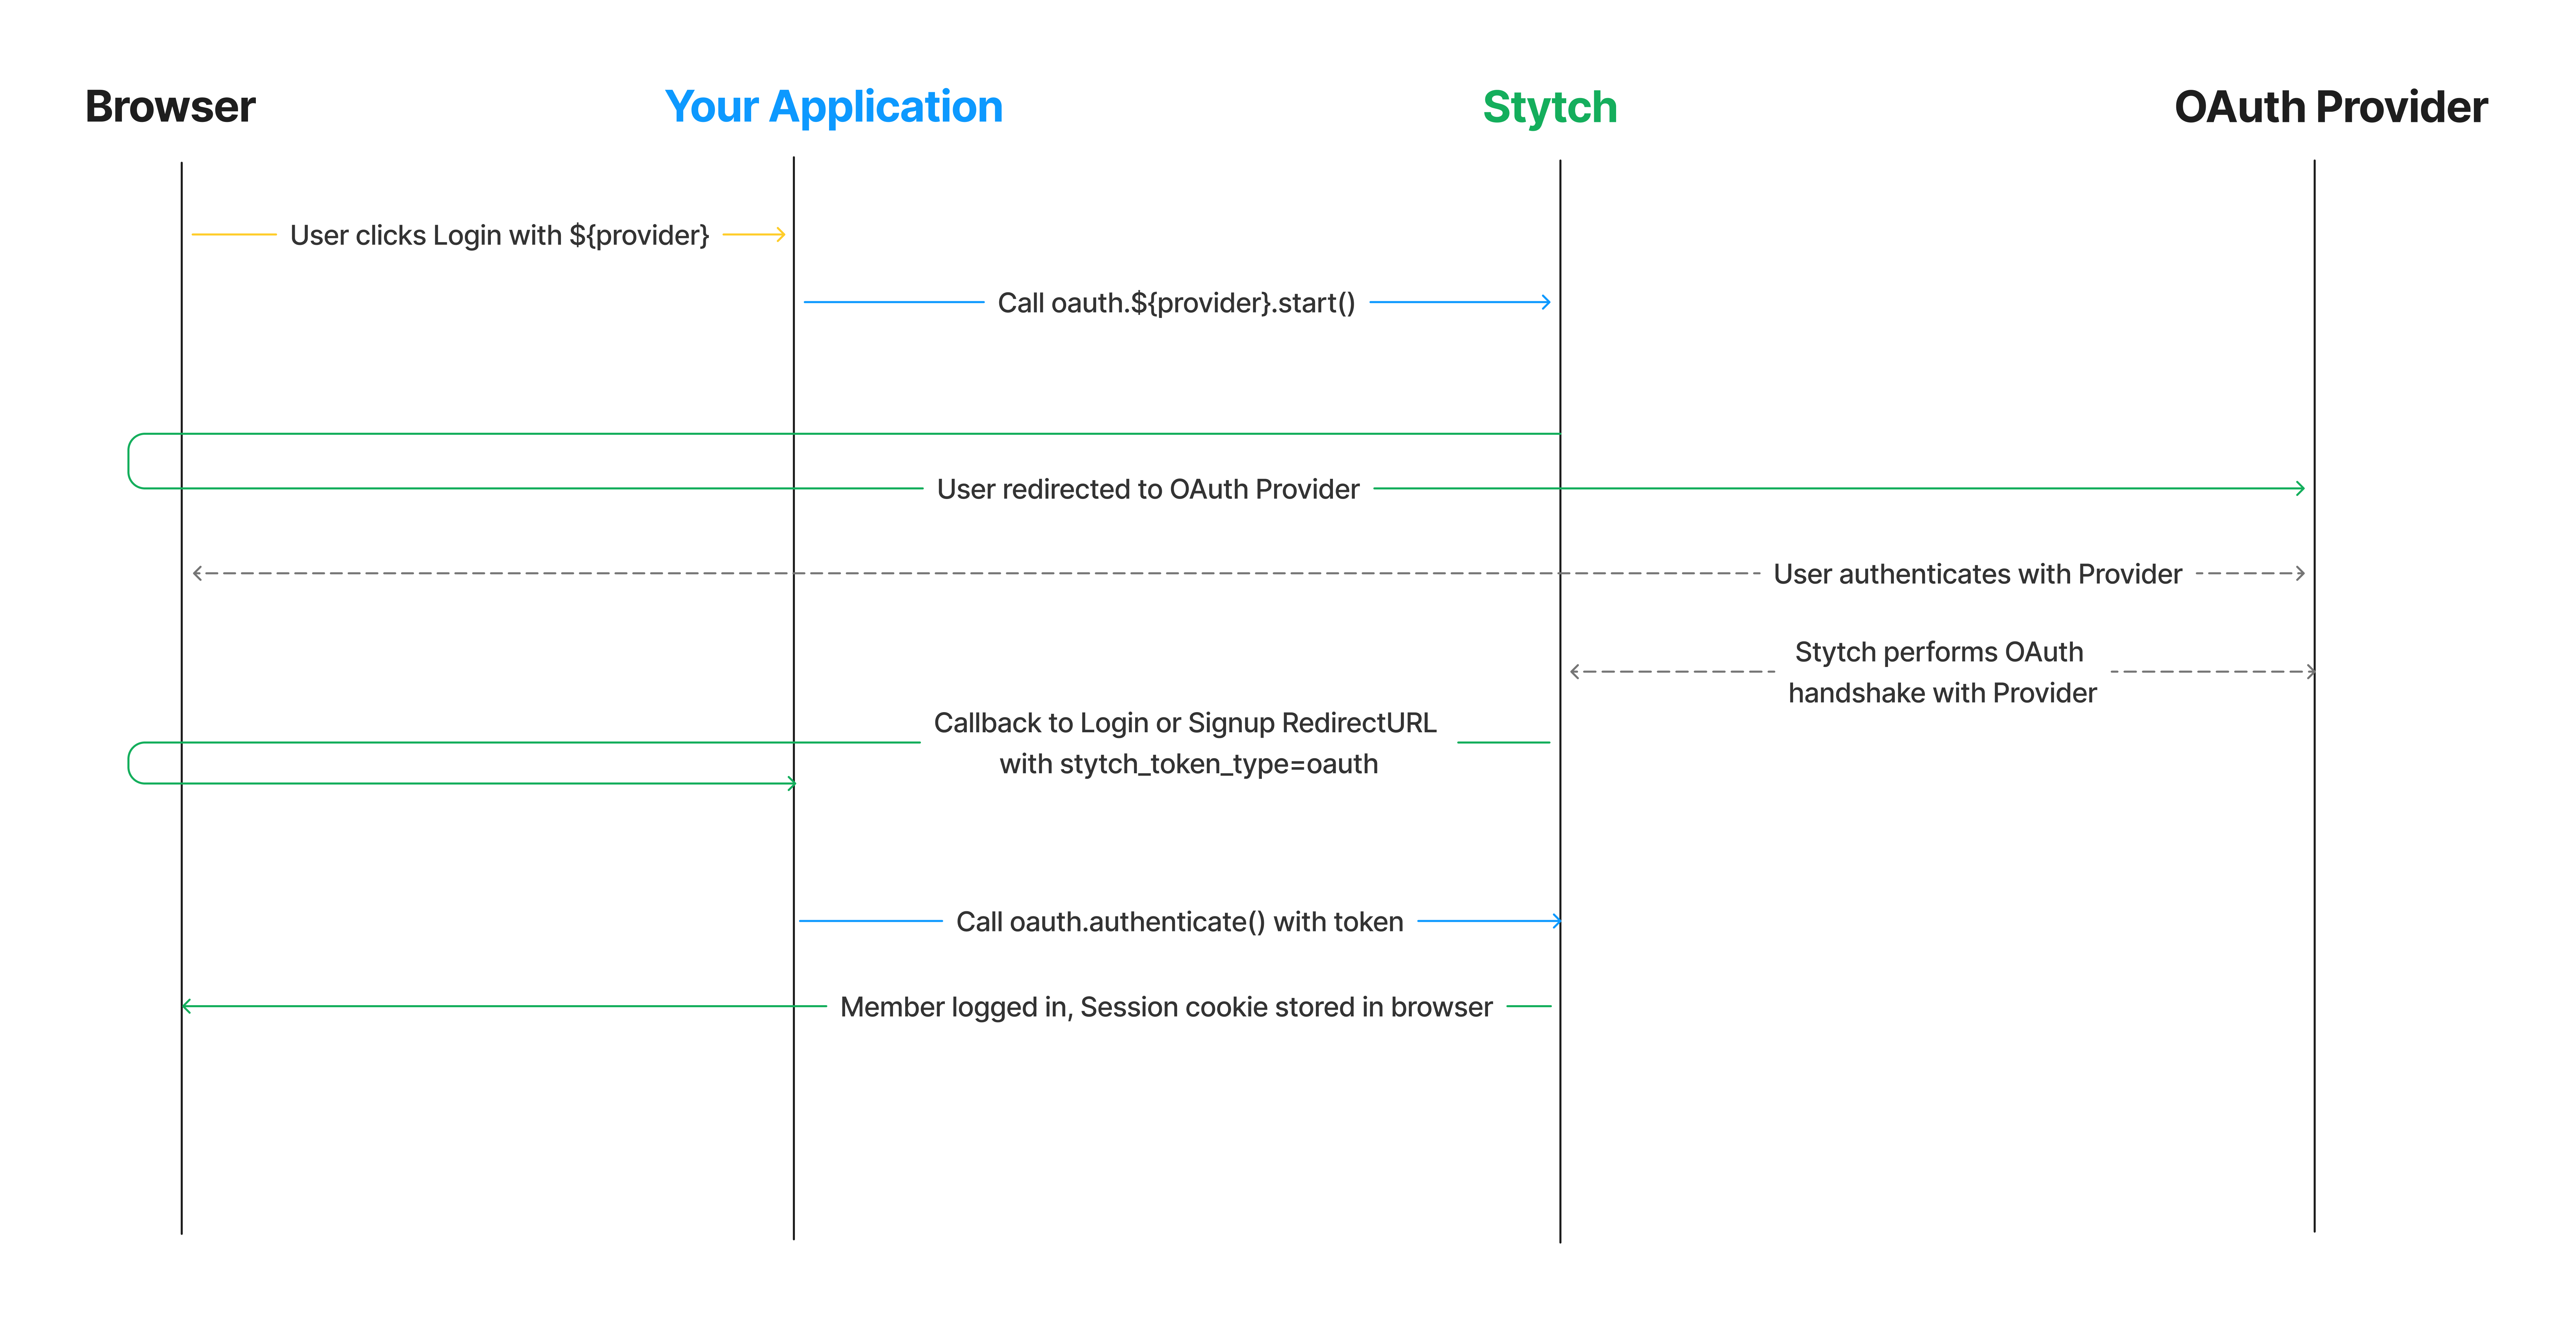
If end users of your application login via a page that indicates which Organization they are trying to log into (e.g. <org-slug>.your-app.com or your-app.com/team/<org-slug>) you can offer organization login on that page.
The high level flow using our headless SDK is as follows:

1Complete config steps
If you haven't done so already:
- Complete the steps in the OAuth Integration Guide Start Here
- Enable the Frontend SDKs in your Stytch Dashboard
2Configure login start
In your application’s UI use the oauth.$provider.start() method to initiate the OAuth flow. If you are building google this would look as follows using our React SDK:
import { useStytchB2BClient } from '@stytch/react/b2b';

export const Login = () => {
  const stytchClient = useStytchB2BClient();

  const startOAuth = () =>
    stytchClient.oauth.google.start({
      slug: 'your-org-slug'
    });

  return <button onClick={startOAuth}>Log in with Google</button>;
};
In vanilla Javascript this would look as follows:
<script>
  import { StytchB2BHeadlessClient } from '@stytch/vanilla-js/b2b/headless';
  const stytch = new StytchB2BHeadlessClient('STYTCH_PUBLIC_TOKEN');

  document.getElementById('login-with-oauth').onclick = () => stytch.oauth.google.start({
    slug: 'your-org-slug'
  });
</script>

<button id="login-with-oauth">Login with Google</button>3Configure callback
Stytch will redirect the user to the Login or Signup RedirectURL that you specified in the oauth.$provider.start() call, or the default in the Stytch Dashboard. The URL’s query parameters will contain stytch_token_type=oauth and an authentication token. Your application should extract the token from the URL and call the appropriate authentication method to finish the login process.
In our React SDK you would add the following:
import React, { useEffect } from 'react';
import { useStytchB2BClient, useStytchMemberSession } from '@stytch/react/b2b';

export const Authenticate = () => {
  const stytchClient = useStytchB2BClient();
  const { session } = useStytchMemberSession();

  useEffect(() => {
    if (session) {
      window.location.href = 'https://example.com/profile';
    } else {
      const token = new URLSearchParams(window.location.search).get('token');
      stytchClient.oauth.authenticate({
        oauth_token: token
      });
    }
  }, [stytchClient, session]);

  return <div>Loading</div>;
};
In vanilla Javascript you would add:
<script>
  import { StytchB2BHeadlessClient } from '@stytch/vanilla-js/b2b/headless';
  const stytch = new StytchB2BHeadlessClient('STYTCH_PUBLIC_TOKEN');

  const token = new URLSearchParams(window.location.search).get('token');
  stytch.oauth.authenticate({
    oauth_token: token
  });
</script>4Test it out
Run your application and test out the flow using the Organization that you created earlier through discovery!