Stytch and frontend development (pre-built UI)
Our frontend and mobile SDKs offer pre-built UI components for an out-of-the-box developer experience. Get started in minutes with ready-to-use login and signup forms. Configure your preferred auth methods and customize the styles to match your app’s brand. This guide covers the fundamental aspects and key considerations when implementing pre-built UI with our frontend SDKs.
Here’s a list of libraries and options we offer for frontend development with pre-built UI components:
- Frontend SDKs
- Mobile SDKs
Refer to each SDK's UI config reference page for full documentation. Explore the example apps to get hands-on with the code.
We also offer an interactive frontend SDK builder that you can use to demo our pre-built UI components with just a few clicks.
Overview

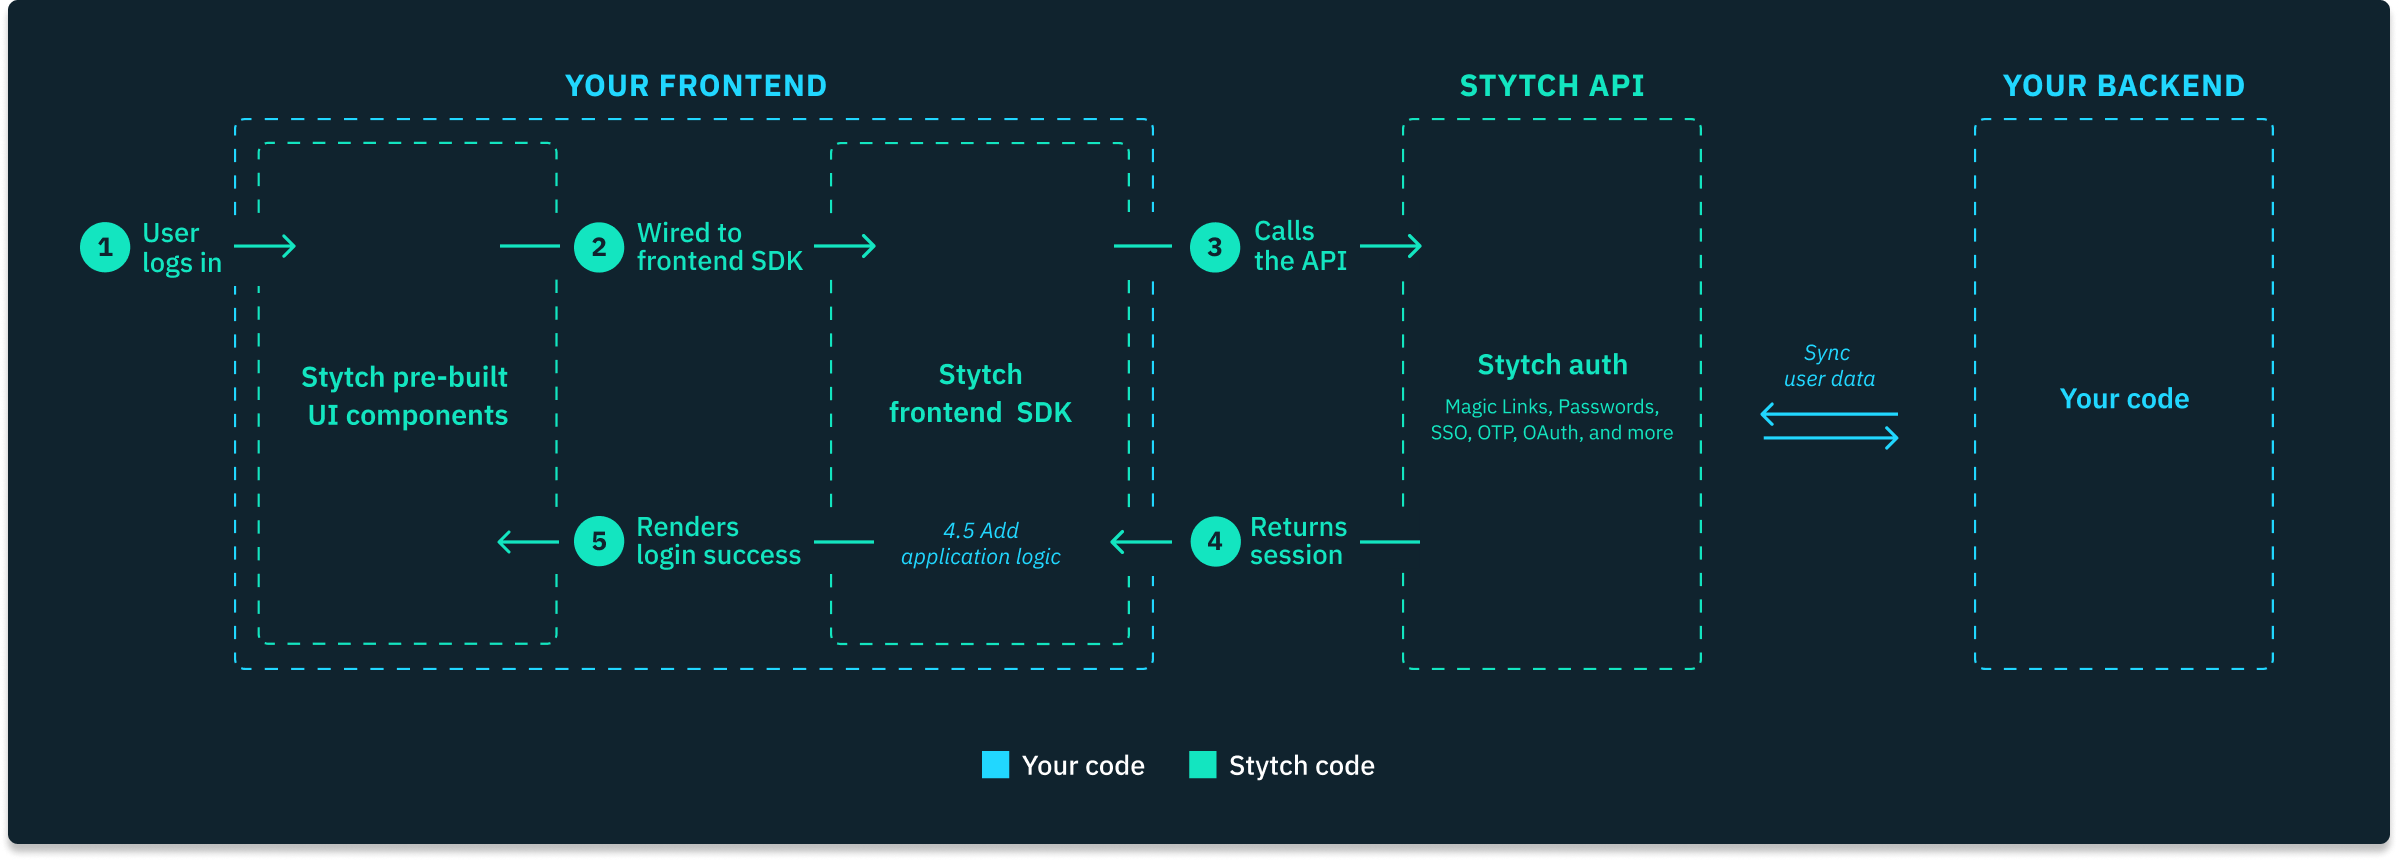
At a high-level, implementing Stytch on the client-side with pre-built UI involves the following steps:
- The end user attempts to log into your application with Stytch’s pre-built UI components configured on your frontend.
- Stytch’s frontend SDK automatically handles the UI events and calls the Stytch API with the necessary authentication data.
- The Stytch API processes the request and returns a response with pertinent data.
- Your frontend handles the response as needed via event callbacks or redirect URLs, which may involve using Stytch's frontend SDK headlessly, updating your UI, or relaying the data to your backend.
- Once the end user successfully authenticates, Stytch’s frontend SDK automatically manages the storage of session tokens using browser cookies or mobile storage.
The pre-built UI approach is a great way to quickly configure production-ready login forms for your application. However, if you require more client-side control over the UI or the auth flow logic, we recommend using our frontend SDK headlessly where needed.
Code examples
Here are some example code snippets that demonstrate the general idea of implementing our pre-built UI.
Configuring pre-built UI and authentication flows
import { StytchLogin } from "@stytch/nextjs";
import { Products } from "@stytch/vanilla-js";

const Login = () => {
  const REDIRECT_URL = "http://localhost:3000/authenticate";
  // Configure the pre-built UI and authentication methods
  const config = {
    products: [Products.emailMagicLinks, Products.oauth],
    emailMagicLinksOptions: {
      loginRedirectURL: REDIRECT_URL,
      loginExpirationMinutes: 60,
      signupRedirectURL: REDIRECT_URL,
      signupExpirationMinutes: 60,
    },
    oauthOptions: {
      providers: [{ type: "google"},{type: "apple" }],
      loginRedirectURL: REDIRECT_URL,
      signupRedirectURL: REDIRECT_URL,
    },
    passwordOptions: {
      loginExpirationMinutes: 30,
      loginRedirectURL: REDIRECT_URL,
      resetPasswordExpirationMinutes: 30,
      resetPasswordRedirectURL: REDIRECT_URL,
    },
  };

 return <StytchLogin config={config}/>;
 ...
Applying custom styling
// Apply custom styles to the pre-built UI components
const styles = {
  fontFamily: "Arial",
  hideHeaderText: false,
  logo: { logoImageUrl: IMAGE_URL },
  container: {
    backgroundColor: "#FFFFFF",
    width: "400px"
  },
  colors: {
    primary: "#19303D",
    success: "#0C5A56",
    error: "#8B1214"
  },
  buttons: {
    primary: {
      backgroundColor: "#19303D",
      textColor: "#FFFFFF",
    }
  },
  inputs: {
    borderColor: "#19303D",
    borderRadius: "4px",
  }
};

return <StytchLogin config={config} styles={styles} />;
...
Event callbacks
// Add callback logic to auth events
const callbacks = {
  onEvent: ({ type, data }) => {
    if (type === "MAGIC_LINK_LOGIN_OR_CREATE") {
      // add frontend logic
    }
    if (type === "PASSWORD_RESET_START") {
      // add frontend logic
    }
    if (type === "PASSWORD_AUTHENTICATE") {
      // add frontend logic
    }
  }},
  onError: (err) => {
    console.error(err);
      // add frontend logic
  });
}

return <StytchLogin config={config} styles={styles} callbacks={callbacks} />;
...
Considerations when using our pre-built UI components
Headless frontend SDK methods
When using our pre-built UI components, you will need to use our frontend SDK headlessly (or our backend API and SDKs) in order to fully implement certain auth flows like, for example, Email Magic Links.
// Complete the Email Magic Link flow after redirect
const token = router?.query?.token?.toString();
stytchClient.magicLinks.authenticate(token, {
   session_duration_minutes: 60,
});
This also extends to features like session management and user management, which require you to utilize our frontend SDK headlessly to some degree.
The main difference between the pre-built UI approach and the headless approach is how you start the auth flows. With the headless approach, you need to wire your UI components to Stytch’s frontend SDK to trigger auth events. Beyond that, the two implementation methods are essentially the same.
We strongly advise reading the headless frontend SDK implementation guide, as it covers key considerations for client-side development that also apply to the pre-built UI approach.
Unsupported auth methods
Our pre-built UI components support a wide variety of authentication methods including Email Magic Links, OAuth, OTP, Passwords, and more. However, some auth methods like TOTP and WebAuthn are only available by using our frontend SDKs headlessly or by using our backend API and SDKs. Refer to the SDK UI config reference for an exact list.
Hosted UI
Our pre-built UI components are hosted by your application on your domain.
What’s next
Read our headless frontend SDK implementation guide.
If you have additional questions about our different integration options, please feel free to reach out to us in our community Slack, our developer forum, or at support@stytch.com for further guidance.