Back to blog
Build a custom client portal on Airtable using Sequin, Stytch and Next.js
Product
Mar 30, 2022
Author: Stytch Team

Sequin syncs APIs like Airtable to your database in real time. Stytch makes authentication easy. We’re thrilled to join forces and host one of Sequin's most popular tutorials on our blog. Read on to learn how to build a custom client portal on Airtable that uses Stytch for user authentication...
In this tutorial, you’ll see how to build a scalable, secure, and flexible client portal on Airtable using Sequin, Stytch, and Next.js.
You’ll set up a custom application that allows your clients to log in securely and access only the data you want them to access. Finally, you’ll see how to make this application interactive so that your clients can sign off on projects directly from the portal.
Each step will be outlined in this tutorial, but if you’d like to get a working copy of the final code, you can find it on GitHub.
Setting up the Airtable base
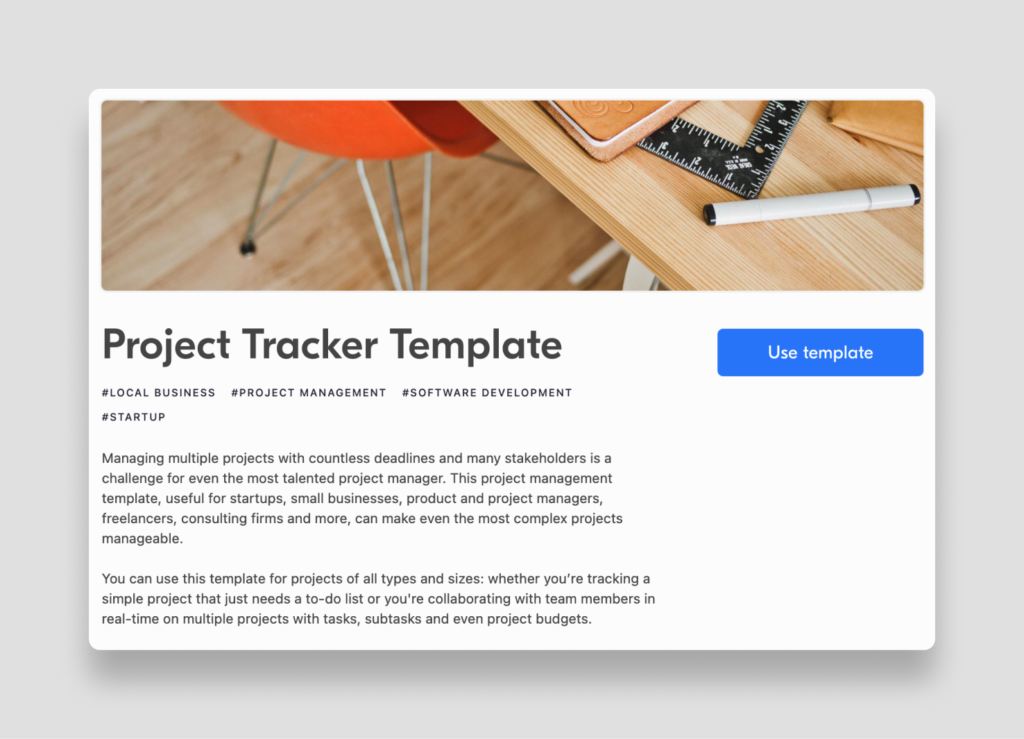
This demo project will start with the Airtable Project Tracker template. Copy this template to your Airtable account and open up the base.
This base includes three tables: Design projects, Tasks, and Clients. Tasks are for internal use only, so in this tutorial, you’ll focus on the projects and clients.
You’ll use Stytch to authenticate users by their email address, but this template doesn’t come with a client email field. So, you need to add a new column to the Clients table called Email.
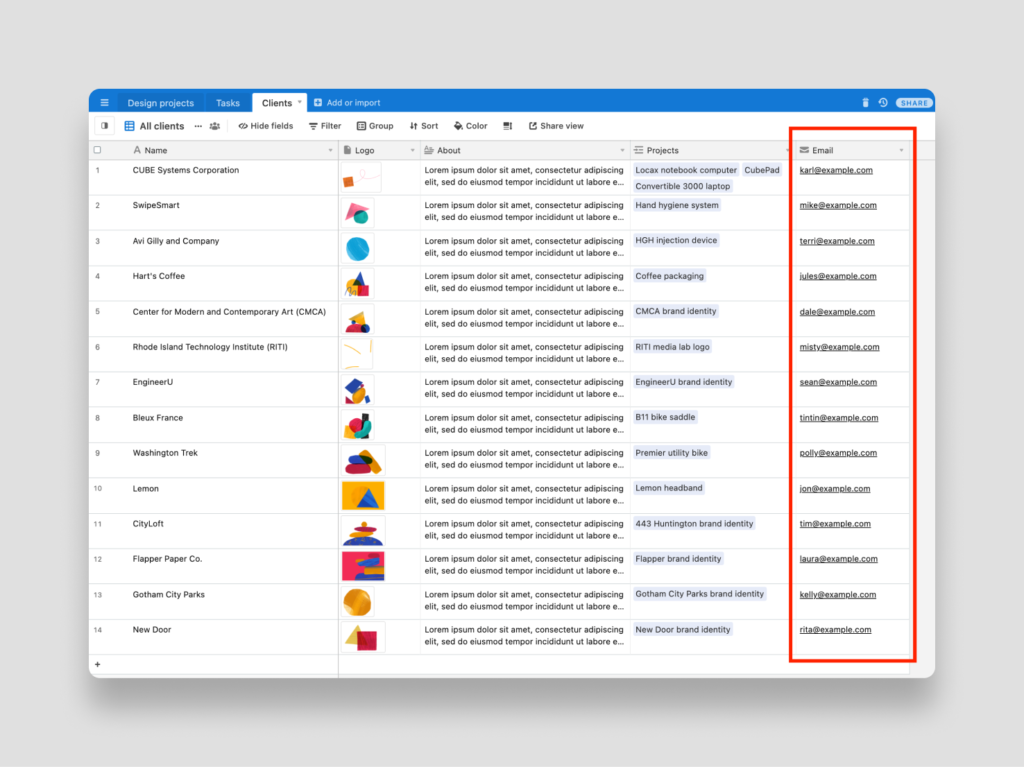
Add some dummy data to each of the fields, but use your own email address for one of them. This will be your test client account so you can verify that the web app works.
Connecting Sequin to Airtable
While you could build a client portal that queries the Airtable API directly, this has some major drawbacks, including the following:
- Airtable’s API limits you to just five requests per second, so it won’t scale well.
- Querying related records using the Airtable API is cumbersome and often involves multiple API calls. This can significantly reduce your app’s performance, especially when coupled with the API limit mentioned above.
- Finding, sorting and filtering via Airtable’s API isn't easy.
If you haven’t already, sign up for a Sequin account.
Once you’re logged in, click the Add Base button in the top right corner. Add your Airtable API key, select the base you want to replicate (it’s called Project tracker by default), select Sync all tables in this base, and make the destination for the replica New Sequin database.
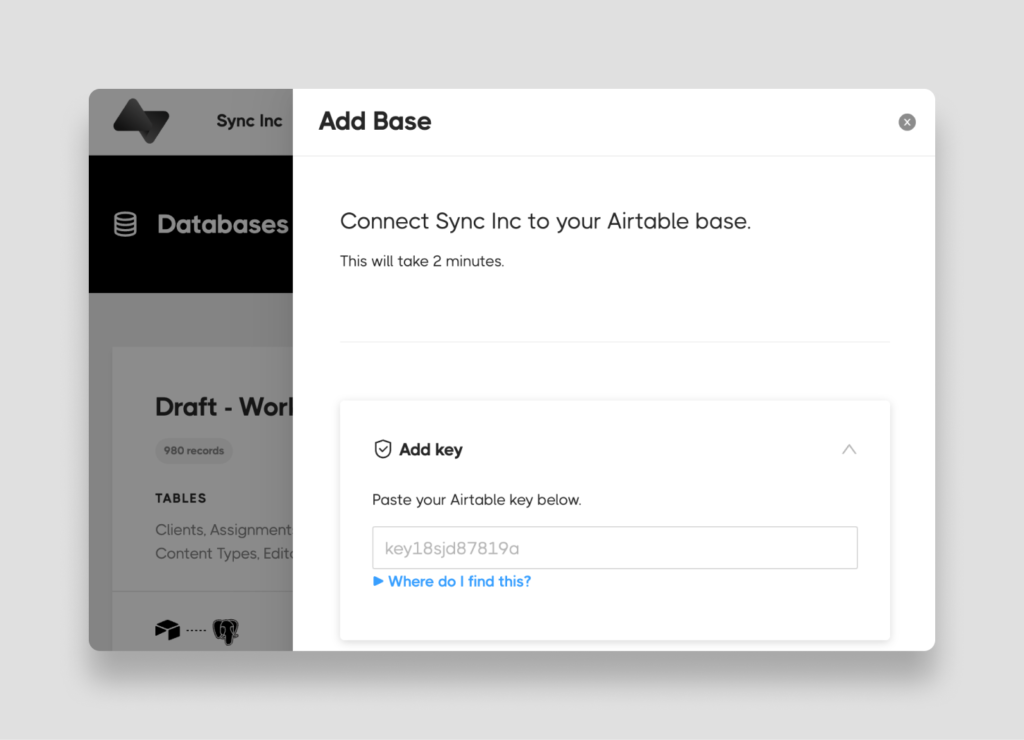
When you’re done, hit Create, and within a few seconds you’ll have a Postgres replica of your Airtable data.
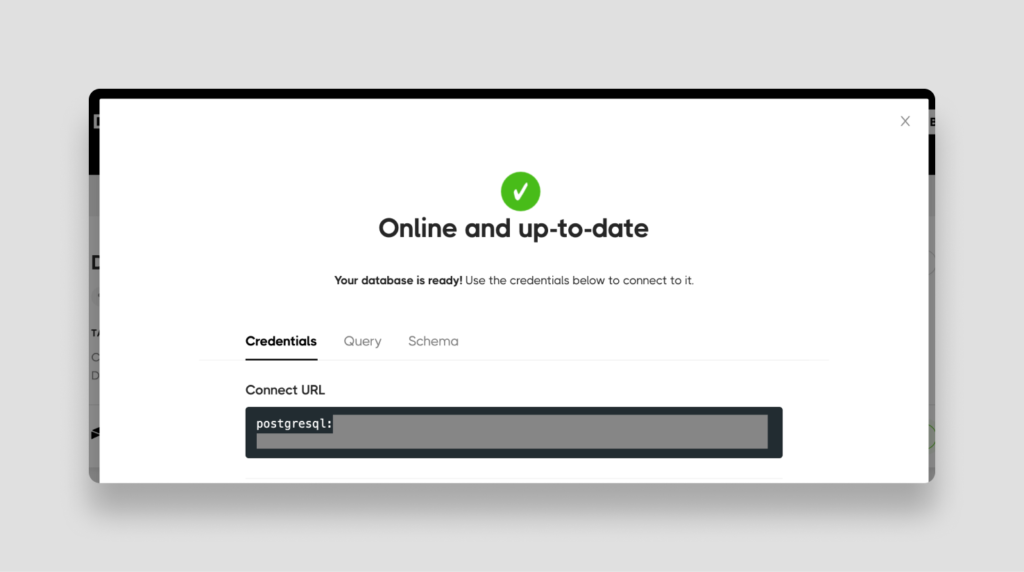
Be sure to save the Postgres connection string shown, as you’ll need it for your web application.
Creating a new Next.js application
Next.js is a React-based web development framework designed to run seamlessly on Vercel. While you could set up a new React application with a backend, Next.js makes the setup and configuration process much simpler, so it’s a great starting point for building simple frontend applications like this one.
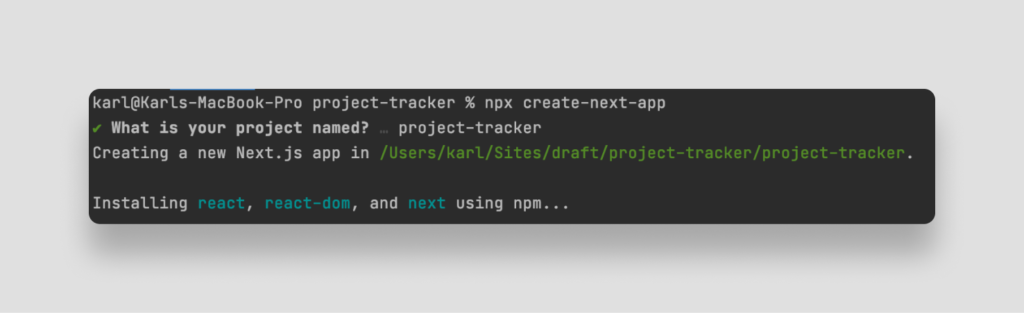
Assuming you’ve got a recent version of Node.js installed (version 10+ is recommended), use `npx` to create a new application from your terminal:
npx create-next-appEnter a name when prompted (project-tracker in this example), and the required base packages will be installed.
This project includes several API endpoints and one frontend route, which you’ll modify later in this tutorial. For now, navigate into the new project folder:
cd project-trackerAnd open the project in your text editor or IDE of choice.
Setting up Stytch for authentication
To allow clients secure access to your portal, you need a way to authenticate them via their email address. While you could build this feature yourself, you can also use Stytch to set this up with very little custom code.
Setting up Stytch is pretty straightforward, but here is a tutorial for setting up Stytch authentication if you'd like to see how it works. This tutorial makes use of Stytch's Email Magic Links product.
First, sign up for Stytch and get your project ID, secret, and public token from the Dashboard. Next, from your terminal, you need to install Stytch and a few other required dependencies. In this demo application, Stytch is being coupled with the next-iron-session utility to help with managing user sessions and data.
npm i --save stytch @stytch/stytch-react next-iron-session Next, create a `.env.local` file in the root directory of your project. This will allow you to securely store your environment variables without checking them into version control.
# .env.local file AIRTABLE_API_KEY="..." AIRTABLE_BASE="..." PG_CONNECTION_STRING="..." STYTCH_PROJECT_ENV='test' STYTCH_PROJECT_ID="..." NEXT_PUBLIC_STYTCH_PUBLIC_TOKEN="..." STYTCH_SECRET="..." IRON_SESSION_COOKIE_NAME="stytch_next_example_cookie" IRON_SESSION_PASSWORD="complex_password_at_least_32_characters_long"Replace each `...` with the corresponding environment variable from each of the services used in this tutorial. As a reminder, `PG_CONNECTION_STRING` is the Postgres connection string for your project from your Sequin account.
Note that the Stytch public token must be prefixed with `NEXT_PUBLIC_`. This signals to Next.js that the variable should be made available in the browser, while the other environment variables will be kept securely on the server only.
Now, add in the necessary elements to implement Stytch authentication, starting with a library folder containing two components: one that allows you to load the Stytch client, and another that will be used in managing session data.
To do so, create a new `lib` directory containing a file: `loadStytch.js`.
import * as stytch from 'stytch';
let client;
const loadStytch = () => {
    if (!client) {
        client = new stytch.Client({
            project_id: process.env.STYTCH_PROJECT_ID || '',
            secret: process.env.STYTCH_SECRET || '',
            env: process.env.STYTCH_PROJECT_ENV === 'live' ? stytch.envs.live : stytch.envs.test,
        });
    }
    return client;
};
export default loadStytch;
Here, you are initializing the Stytch client by retrieving the project_id, secret, and environment variables from your `.env.local` file.
Now, add another file to the `lib` directory called `withSession.js`. This file will contain a helper function to create a session stored in your browser's cookies via a signed and encrypted seal.
import {
    withIronSession
} from 'next-iron-session';
const withSession = (handler) => withIronSession(handler, {
    password: process.env.IRON_SESSION_PASSWORD || '',
    cookieName: process.env.IRON_SESSION_COOKIE_NAME || '', // if your localhost is served on http:// then disable the secure flag
    cookieOptions: {
        httpOnly: true,
        secure: process.env.NODE_ENV === 'production',
    },
});
export default withSession;
Next, you will create a Stytch login component in `pages/components/LoginWithMagicLinks.js`, which includes all the UI to send users a Magic Link for login.
import {
    Stytch
} from '@stytch/stytch-react';
import React from 'react'; //This is the Stytch public token associated with your project
const stytchPublicToken = process.env.NEXT_PUBLIC_STYTCH_PUBLIC_TOKEN //This is the style set for Stytch's SDK and can be customized
const sdkStyle = {
    fontFamily: '"Helvetica New", Helvetica, sans-serif',
    primaryColor: '#19303d',
    primaryTextColor: '#090909',
    width: '321px',
    hideHeaderText: true,
}; //These are key parameters used in the Magic Link email sent to users; you'll need to define the product and login / signup URLs, as seen below
const magicLinksView = {
    products: ["emailMagicLinks"],
    emailMagicLinksOptions: {
        loginRedirectURL: 'http://localhost:3000/api/authenticate_magic_link',
        loginExpirationMinutes: 30,
        signupRedirectURL: 'http://localhost:3000/api/authenticate_magic_link',
        signupExpirationMinutes: 30,
        createUserAsPending: false,
    },
};
const LoginWithMagicLinks = ({
    styles
}) => {
    return ( < div className = {
            styles.stytchContainer
        } > < h2 > Sign up or log in < /h2> <p> Enter your email address to receive an Email Magic Link for authentication.</p > < Stytch publicToken = {
            stytchPublicToken || ''
        }
        loginOrSignupView = {
            magicLinksView
        }
        style = {
            sdkStyle
        }
        /> </div > );
};
export default LoginWithMagicLinks;
Now you can build the two Stytch API endpoints to be used for user authentication - you'll need one for authenticating Magic Links sent to users, and a second for handling logging out of the app.
Conveniently, Next.js API routes allow you to build these server-side API routes in the same repository as your frontend application by adding serverless functions to your `./pages/api` folder.
Create your first API endpoint by adding a file called `authenticate_magic_link.js` to the `api` directory. Then add the code below to authenticate the user from a magic link and create a long-living session:
// This API route authenticates a Stytch magic link.
import withSession from '../lib/withSession';
import loadStytch from '../lib/loadStytch';
export async function handler(req, res) {
    if (req.method === 'GET') {
        const client = loadStytch();
        const {
            token
        } = req.query;
        try { // Set session
            const resp = await client.magicLinks.authenticate(token, {
                session_duration_minutes: 20160
            });
            req.session.destroy(); //User's email address and token will be used in authentication and to pull projects
            const user_details = await client.users.get(resp.user_id) req.session.set('user', {
                email: user_details.emails[0].email,
                session_token: resp.session_token
            }); // Save additional user data here
            await req.session.save();
            return res.redirect('/');
        } catch (error) {
            const errorString = JSON.stringify(error);
            console.log(error);
            return res.status(400).json({
                errorString
            });
        }
    } else {
        // Handle any other HTTP method
    }
}
export default withSession(handler);
Once that's done, you'll add `api/logout.js` to delete the user session and effectively log the user out:
// This API route logs a user out.
import withSession from '../lib/withSession';
export async function handler(req, res) {
    if (req.method === 'POST') {
        try { // Set session
            req.session.destroy();
            return res.redirect('/');
        } catch (error) {
            const errorString = JSON.stringify(error);
            console.log(error);
            return res.status(400).json({
                errorString
            });
        }
    } else {
        // Handle any other HTTP method
    }
}
export default withSession(handler);
Note that both of the `handler` functions in these authentication endpoints are wrapped in the `withSession()` helper function to help secure and manage the user's sessions.
Finally, update the `pages/index.js` file to display the Stytch login form when a user is not logged in.
import Head from 'next/head'
import styles from '../styles/Home.module.css'
import {
    useEffect,
    useState
} from "react";
import LoginWithMagicLinks from './components/LoginWithMagicLinks';
import withSession from './lib/withSession';
export default function Home(props) { //This state holds the projects associated with the user
    const [clientProjects, setClientProjects] = useState(null); //This state contains the logged in status of the user
    const [isLoggedIn, setIsLoggedIn] = useState(false); //User's session details
    const {
        user
    } = props // Sets local isLoggedIn variable
    useEffect(() => {
        if (user_id) {
            setIsLoggedIn(true);
        }
    }, []); // Logs a user out
    const logOut = async () => {
        setIsLoggedIn(false);
        const resp = await fetch('/api/logout', {
            method: 'POST'
        });
    }; // Display the client portal page
    return ( < div className = {
            styles.container
        } > < Head > < title > Client Portal < /title> <link rel="icon" href="/favicon.ico "/> </Head> <main className={styles.main}> <h1 className={styles.title}>Welcome to Your Client Portal</h1> {isLoggedIn ? ( <div> <p>You are now logged in.</p> <p style={{textAlign: "
        center ", cursor: "
        pointer "}} onClick={logOut}>Log Out</p> </div> ): (<LoginWithMagicLinks styles={styles} />)} </main> </div>
    )
}
const getServerSidePropsHandler = async ({
    req
}) => { // Get the user's session based on the request
    const user = req.session.get('user') ?? null;
    const props = {
        user
    };
    return {
        props
    };
};
export const getServerSideProps = withSession(getServerSidePropsHandler);
If you’d like to test the login functionality at this point, you can run your Next.js application from your terminal.
npm run devNow, visit localhost:3000. Because you did not arrive at the page through a Magic Link, you don't have an active authenticated session and should instead see a Login / Sign Up form like this:
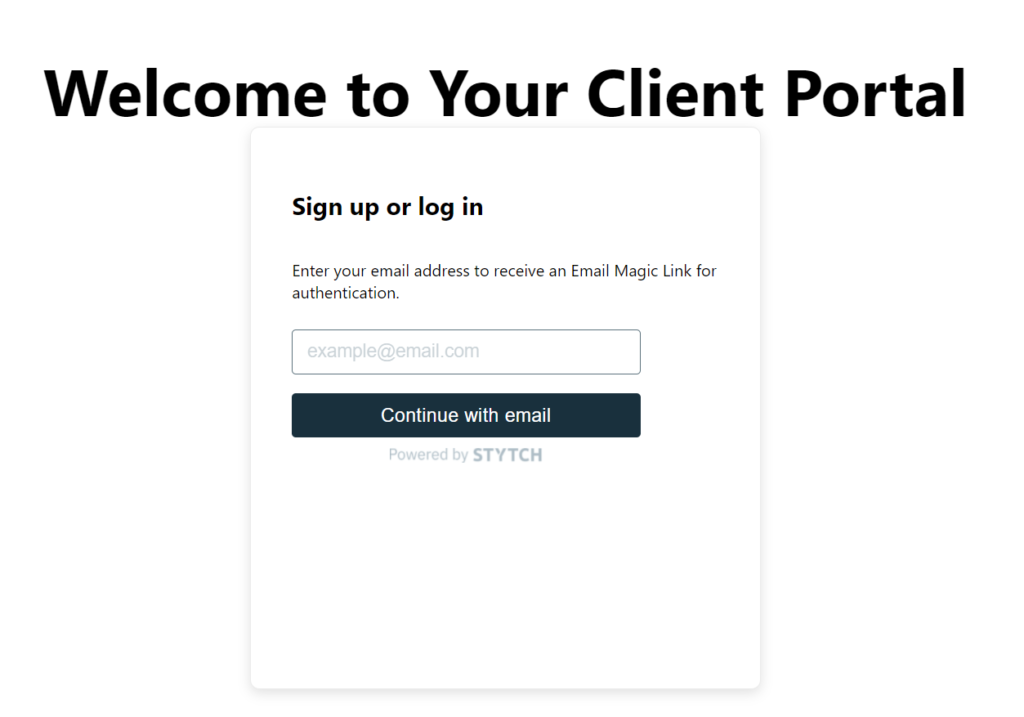
After entering your email address on the form, you will receive an email with the Magic Link. Clicking the link from the email will send you to your authentication endpoint, where you undergo Stytch's authentication process based on the data passed through from your environment file, including the Stytch token.
Upon verification, a session is established and you are routed back to your app's home page. The session data is passed from the backend to the frontend using Props and the `withSession` helper function, and you are now successfully logged in!
You’re now ready to integrate the frontend with Sequin to retrieve data for each client.
Querying data stored by Sequin
Now that your clients are authenticated with Stytch, you can use the email address of each authenticated user to make a PostgreSQL query that retrieves only the projects belonging to that client. In order to accomplish this, you’ll create another API endpoint that queries your Sequin database.
First, install the node-postgres package using NPM.
npm i --save pgSince you don’t want to expose your Postgres connection string in the browser, you need to connect to Postgres from a server-side application. Create a new file at `pages/api/projects/index.js`, import the Stytch client for authorization, and connect to your Postgres database:
import loadStytch from '../../lib/loadStytch';
const client = loadStytch();
const {
    Pool
} = require("pg");
const connectionString = process.env.PG_CONNECTION_STRING;
const pool = new Pool({
    connectionString,
});
Next, you need to export a function that Next.js will call when the `/api/projects` route is called.
... export default async (req, res) => {
  // Authorization and database connection code will go here
}
To check whether the the current user is authorized, you can use Stytch session authentication and make a call to the Stytch authentication endpoint using the Stytch client, wrapped in a 'try/catch' block. Add the following to your exported function:
... //User's token and email are passed through in the request body
const body = JSON.parse(req.body) try { //Authenticate session using Stytch
    const resp = await client.sessions.authenticate({
        session_token: `${body.session_token}`
    });
    if (resp.status_code == 200) {
        //Get the client's projects
    } else {
        return res.status(400).json({
            errorString
        });
    };
} catch (error) {
    const errorString = JSON.stringify(error);
    console.log(error);
    return res.status(400).json({
        errorString
    });
}
Once the user is authenticated, you can access their email from the request body. If the user doesn’t have an email or the token is invalid, this code will throw an error, so wrap it in another try/catch block.
... const email = body.email try {
// Get design_projects by clients.email here
} catch (e) {
  // Handle any errors console.log(e); res.statusCode = 500;
  res.end("Server error. Something went wrong.");
}
Finally, you can use the following code to get all this client’s projects. Because Airtable (and therefore, Sequin) stores the relationship between clients and projects as an array of IDs, you can use Postgres’ `ANY` clause to join clients and projects.
// Get design_projects by clients.email
const query = `select design_projects.* from design_projects join clients on clients.id = ANY (design_projects.client) where clients.email like $1;`;
const {
    rows
} = await pool.query(query, [email]); // Respond with results res.statusCode = 200; res.json(rows);
This endpoint is now able to query directly from Sequin, so you can avoid Airtable’s rate limits. Having your data in Postgres also allows you to create more dynamic and efficient queries to get your data from Airtable.
Calling the project’s endpoint
Now that you’ve got an endpoint set up, you need to call it from your frontend, but only after a user logs in. You'll need to include the user's email and Stytch session token in the request body for authentication. In the `Home` class you created in `pages/index.js`, add the following:
…
export default function Home() { //This state holds the projects associated with the user
    const [clientProjects, setClientProjects] = useState(null); // Gets this client's projects when they're logged in
    const getClientProjects = async () => {
        const resp = await fetch("/api/projects", {
            method: 'POST', //Send the user's token and email in the request body
            body: JSON.stringify({
                session_token: user.session_token,
                email: user.email
            })
        });
        if (resp.status === 200) {
            setClientProjects(await resp.json());
        }
    }…
If you restart your Next.js application and log in again with your browser’s inspector open, you can see that a call is being made to `/api/projects`.
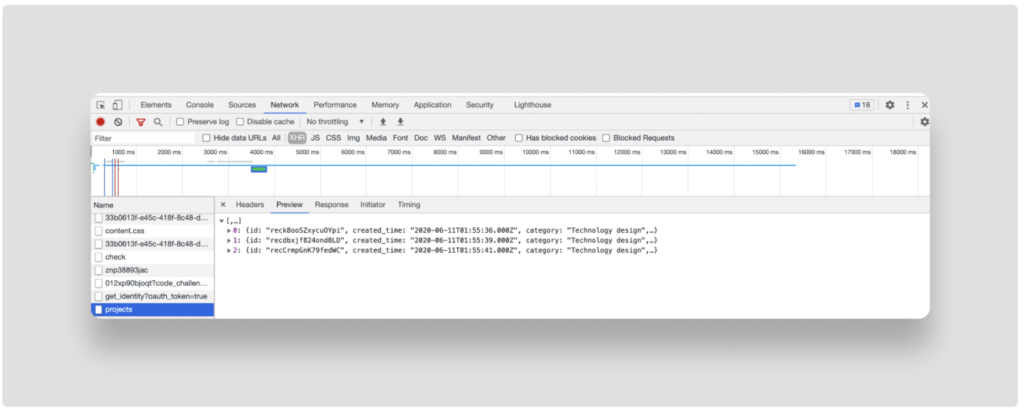
In the next step, you’ll use the results from that API call to populate your client portal.
Displaying projects in the portal
Now that you’re able to authenticate a user and retrieve their projects from Sequin’s Postgres replica, you’re ready to display the results in the UI. Next.js already includes some basic styling, but don’t feel limited by it. One of the big advantages of building a custom portal like this is that you have complete control over the user interface and experience.
Open your `pages/index.js` file again and add the following within the code that checks whether a user is logged in:
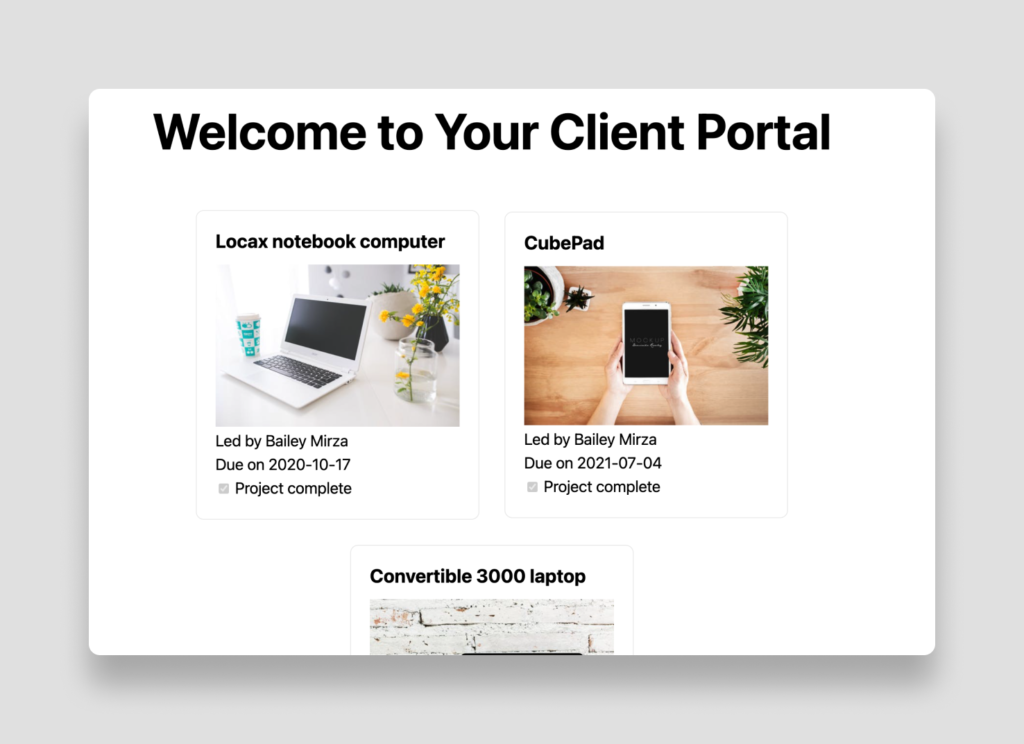
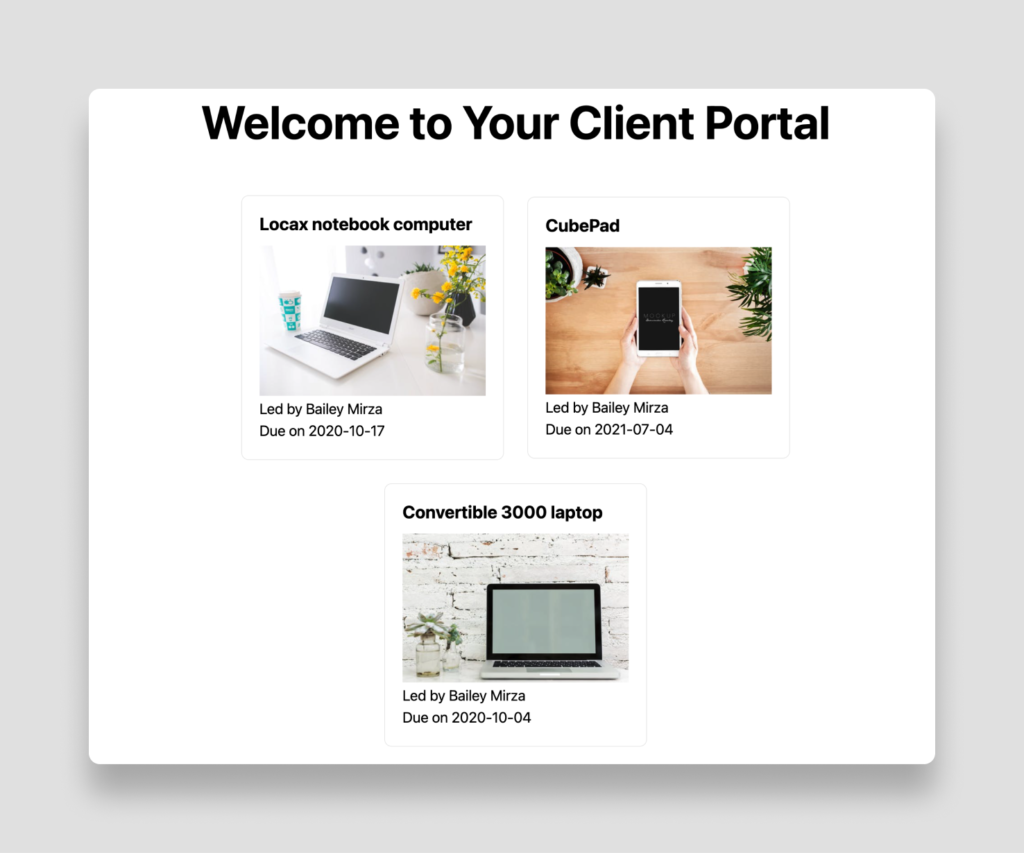
… {isLoggedIn ? ( <div> {clientProjects ? ( <div className={styles.grid}> {clientProjects.map(project => <div className={styles.card} key={project.id}> <h3>{project.name}</h3> <img src={project.project_images[0]} style={{maxWidth: "100%"}} /> <p>Led by {project.project_lead.name}</p> <p>Due on {project.due_date.split('T')[0]}</p> </div> )} </div> ) : (<p>You currently have no projects attached to this account.</p>)} <p style={{textAlign: "center", cursor: "pointer"}} onClick={logOut}>Log Out</p> </div> ): <p>Log in to view your projects.</p>)} …Start the app again and log in, making sure to use your email address that you attached to one of the client accounts in Airtable. You should see a list of all this client’s projects like this:
You now have a working client portal that will allow your clients to securely access limited data about their projects only. But what if you want to allow clients to interact with the projects in the portal? In the last section of this tutorial, you’ll see how to allow clients to save data to Airtable using Sequin’s documentation on writes.
Writing data with Sequin
Your clients will probably need to sign off on each project as it’s completed. To let them do this in your new portal, you can add a checkbox on each project that lets clients mark projects as complete.
Sequin gives you a read-only Postgres replica of your Airtable base. This ensures that you have a single source of truth for your data, but it means that you can’t use typical Postgres `UPDATE` queries to make changes in Airtable.
Fortunately, Sequin has a solution to this limitation. By using their proxy server instead of the standard Airtable API server, your updates will be instantly saved to both Airtable and your Postgres database.
To use the Sequin proxy in JavaScript, install the Airtable NPM package:
npm i --save airtableNext, create a new endpoint in your Next.js application that will handle update requests. Make a new file at `pages/api/projects/[projectId].js` and add the following:
import Airtable from "airtable";
import loadStytch from '../../lib/loadStytch';
const client =
    loadStytch(); // Instantiate the Airtable client using the Sequin proxy
const base = new Airtable({
    apiKey: process.env.AIRTABLE_API_KEY,
    endpointUrl: "https://proxy.syncinc.so/api.airtable.com",
}).base(process.env.AIRTABLE_BASE);
export default async (req, res) => {
    const {
        projectId
    } = req.query; //User's token is passed through in the request body
    const body = JSON.parse(req.body) try { //Authenticate session using Stytch
        const resp = await client.sessions.authenticate({
            session_token: `${body.session_token}`
        });
        if (resp.status_code == 200) {
            try { // Update project complete status
                await base('Design projects').update([{
                    "id": projectId,
                    "fields": {
                        "Complete": true
                    }
                }]); // Respond with a 204
                res.statusCode = 204;
                res.end();
            } catch (e) { // Handle any errors
                console.log(e);
                res.statusCode = 500;
                res.end("Server error. Something went wrong.");
            }
        } else {
            return res.status(400).json({
                errorString
            });
        };
    } catch (error) {
        const errorString = JSON.stringify(error);
        console.log(error);
        return res.status(400).json({
            errorString
        });
    }
}
Similar to when you pulled the user's projects, this endpoint validates the user’s authentication using Stytch to ensure that unauthenticated users cannot access this endpoint, and then uses the Airtable API library to update the Complete field to true. Also notice that at the top, the Sequin proxy URL was specified as the API’s `endpointUrl`. This routes requests through Sequin to keep your Postgres database up-to-date at the same time as the Airtable base.
Next, you need a checkbox in your template and a method to call the new endpoint from the frontend. Add this method to your `Home` component before the `return` statement:
… // Allow clients to mark a project as complete
const markProjectComplete = async (e) => {
    const completeProjectId = e.target.value;
    setClientProjects(clientProjects.map(project => {
        if (project.id === completeProjectId) {
            project.complete = true;
        }
        return project
    }));
    await fetch("/api/projects/" + completeProjectId, {
        method: "PUT",
        body: JSON.stringify({
            session_token: user.session_token
        })
    });
};…
Finally, add this paragraph just below your due date inside the loop that displays all your clients’ projects in the same file:
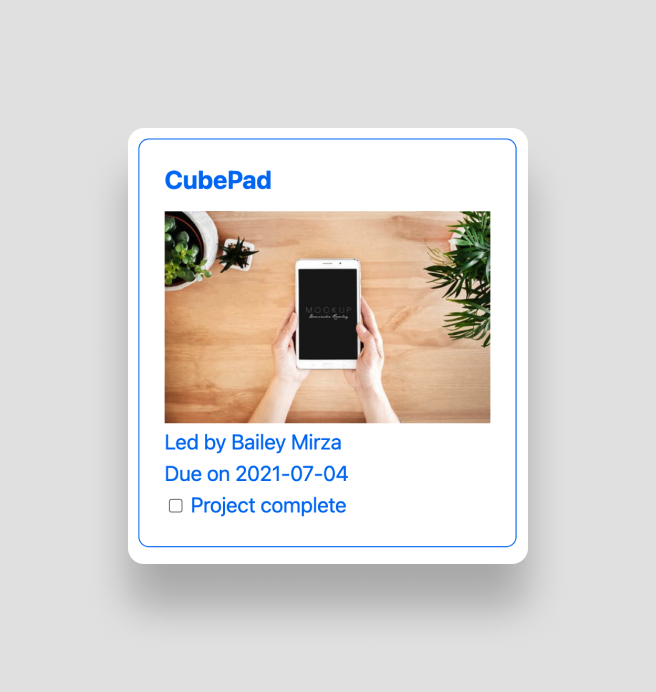
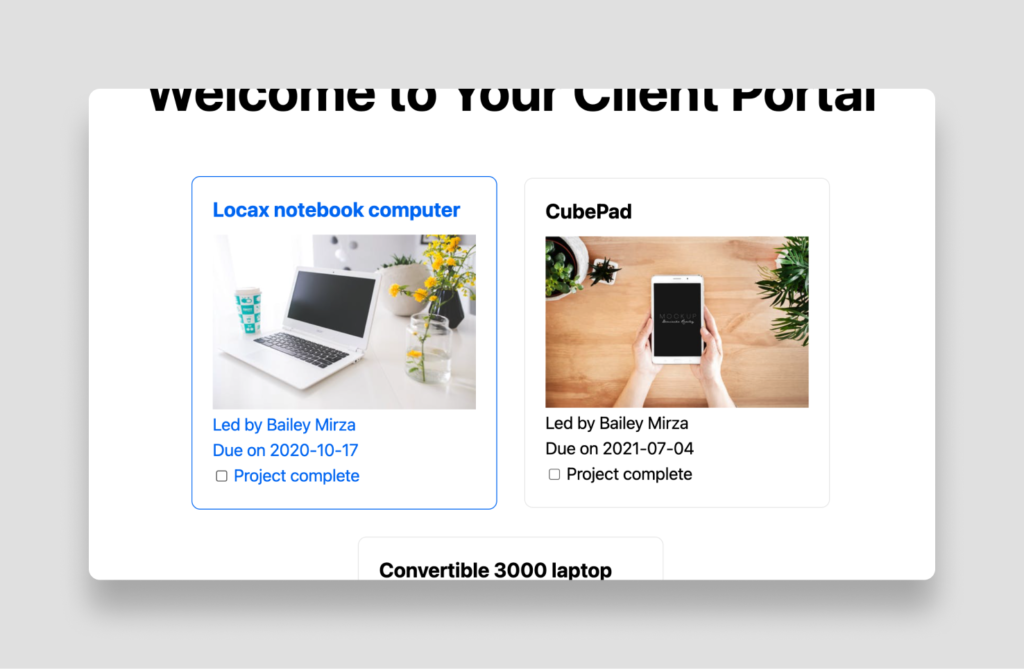
… <p><input type="checkbox" name="complete" value={project.id} onChange={markProjectComplete} disabled={project.complete} defaultChecked={!!project.complete} /> Project complete</p> …Start your Next.js application again and log in at localhost:3000. This time you’ll see a checkbox next to each project. Check one of the records, and you’ll see that the checkbox will be disabled. This prevents clients from approving the same project multiple times, but of course, you can modify this behavior to fit your use case.
To make sure the synchronization works, go to your Airtable base to see if the record has been synced yet. If you’re fast, you can see Airtable marking the project complete in the base.

Next steps
In this tutorial, you’ve seen how to build a flexible, scalable client portal on top of Airtable. You used Sequin to replicate your data to Postgres, Stytch to authenticate users via email, and Next.js to build a frontend with two serverless endpoints.
As you adapt this demo to your use case, you might consider adding pages for each project so that clients can see more details about each of them. Or you might connect multiple emails to each client to allow different stakeholders to get access to their portal. You could even integrate Stripe to allow clients to make payments directly in your custom portal.
Original post by Karl Hughes. Post updated for Stytch authentication by Charles Qian. Post updated and re-posted by the Stytch team (March 30, 2022).Any questions?
Please contact Stytch at support@stytch.com, or visit sequin.io for any questions related to Sequin.
Build auth with Stytch
Pricing that scales with you • No feature gating • All of the auth solutions you need plus fraud & risk
Related Articles
Auth & identity
May 30, 2024
How to Enforce Multi-Factor Authentication with Node.js and Stytch
Auth & identity
Engineering
Jan 12, 2024
How to securely implement M2M authentication and authorization in Node.js using Stytch
Engineering
Product
Dec 5, 2023
Log in with Passkeys: an example app using React and Stytch’s frontend SDK
Authentication & Authorization
Fraud & Risk Prevention
Resources
Community
© 2020-2026 Stytch. All rights reserved.