New device notifications are a key security measure to help identify potentially unauthorized access to user accounts. When there is a login from a new device, IP address, or location, they should receive a notification. If the login is unauthorized, the user can take immediate action like revoking sessions, resetting their password, or contacting your support team.
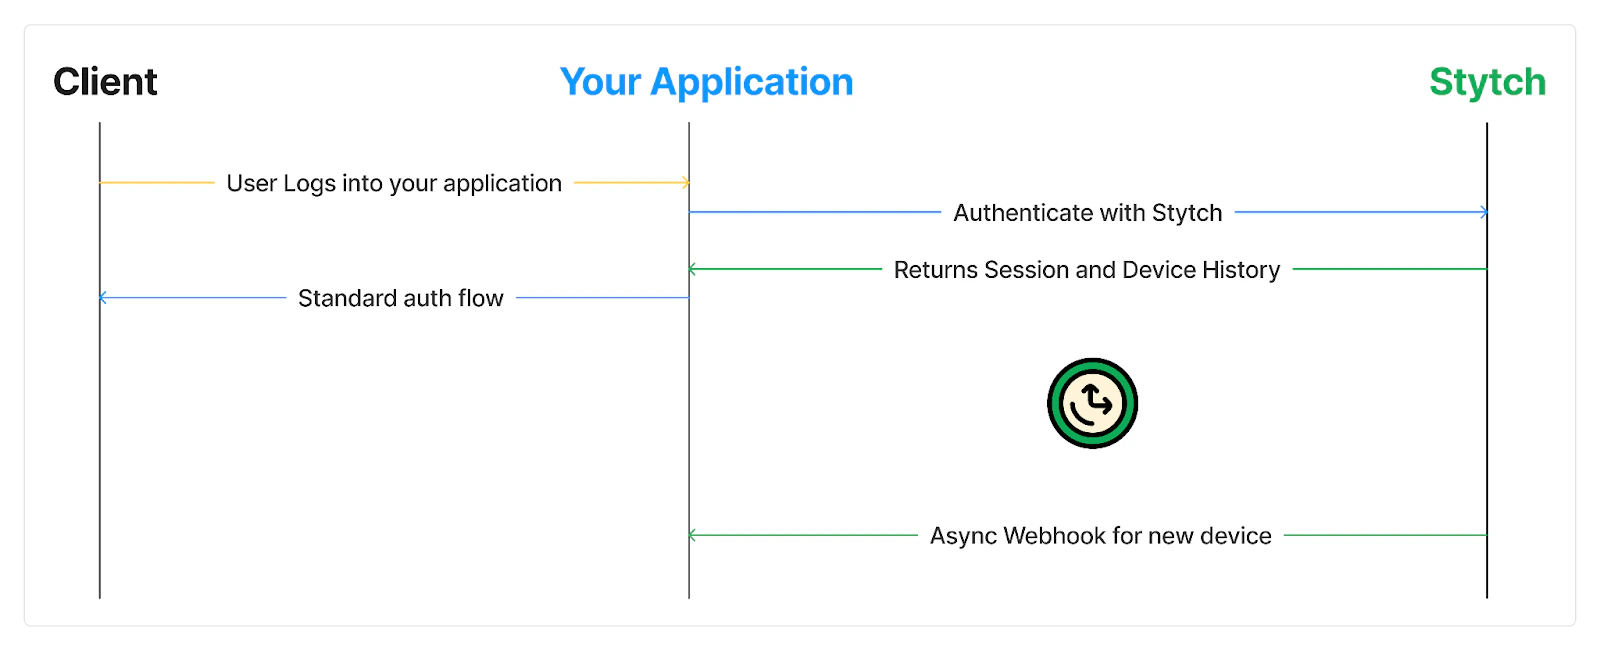
You can easily send notifications for new devices, IP address, and login locations with Stytch Device Fingerprinting. At a high level, you will include a Telemetry ID (for device information) in your authentication requests. Stytch will return new device flags in the authentication response and as a webhook event.
In this guide, you will learn how to use Stytch’s user device history to send notifications about new devices. You will:
- Collect device fingerprints from the frontend and submit them as part of the authentication request
- Use the Stytch response or webhook to detect new devices
- Implement your own method to notify your user about unusual logins
This guide uses an integrated approach where you use Stytch authentication and Device Fingerprinting together.This guide uses Consumer authentication. If you are using B2B authentication, the methods are similar.
Prerequisites
- A Stytch project for Consumer Authentication.
- If you don’t have one already, in the Dashboard, click on your existing project name in the top left corner of the Dashboard. Click Create Project, and then select B2B Authentication or Consumer Authentication.
- Access to Device Fingerprinting. If you don’t have access, you can request a trial.
- An application that has already implemented an authentication method with Stytch.
Collecting device fingerprints and submitting them
You will use Stytch Device Fingerprinting to collect device information. The implementation differs depending on whether you use a frontend SDK or a backend SDK.
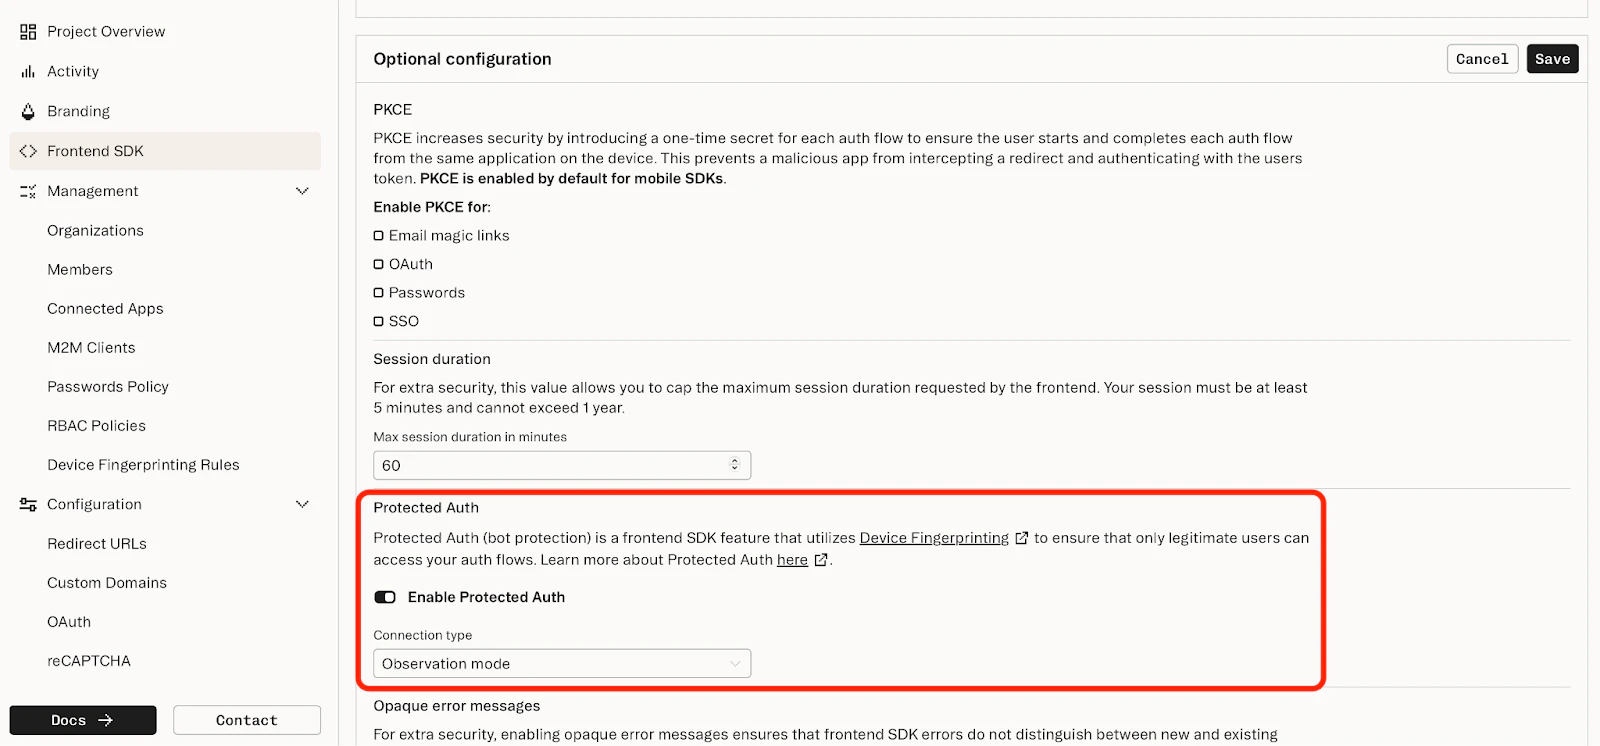
If you’re using one of Stytch’s frontend or mobile SDKs, you can automatically collect and submit fingerprints by turning on Protected Auth.On the dashboard Frontend SDK page, under optional configuration, enable Protected Auth.In Observation mode, this will collect and record device information. In Enforcement mode, Protected Auth will also block authentication attempts that receive a BLOCK verdict.For sending new device notifications, you can use either mode. These code snippets are equivalent to steps 1 and 2 of the Getting Started API guide.If you’re using one of Stytch’s backend SDKs or integrating directly with the Stytch API, you will need to add the Device Fingerprinting script to your application frontend, call GetTelemetryID(), and pass the resulting Telemetry ID to the backend SDK call. <html>
<head>
<script src="https://elements.stytch.com/telemetry.js"></script>
</head>
<body>
<button id="login" onclick="login()">Click here to login!</button>
<script>
function login() {
var publicToken = "public-token-test-feee2622-4abc-46a8-9609-a27130735214"; // public token from Stytch Dashboard
GetTelemetryID({
publicToken: publicToken
}).then((telemetry_id) => {
var request = new XMLHttpRequest();
request.open('POST', 'https://www.customer.com/login', true);
// include telemetry_id as part of the login request
request.setRequestHeader('X-Telemetry-ID', telemetry_id);
request.send(null);
});
}
</script>
</body>
</html>
(req, res) => {
  const telemetryId = req.headers['x-telemetry-id'];

  const params = {
    token: "SeiGwdj...mXD4=",
    telemetry_id: telemetryId,  // include the telemetry_id
  };

  const response = await client.magicLinks.authenticate(params);
  console.log(response);
};
Detecting new devices through webhook or response
You can detect new devices in two ways:
- Using a webhook sent by Stytch
- Or, in the response body for a backend authenticate request
Webhook
You can use webhooks to receive data about new devices.
If you’re using one of Stytch’s frontend or mobile SDKs, this is the only way to send new device notifications. If you’re using a backend integration, you can use either webhooks or the authenticate response.
With webhooks, you can de-couple the core application logic and any notifications you send.
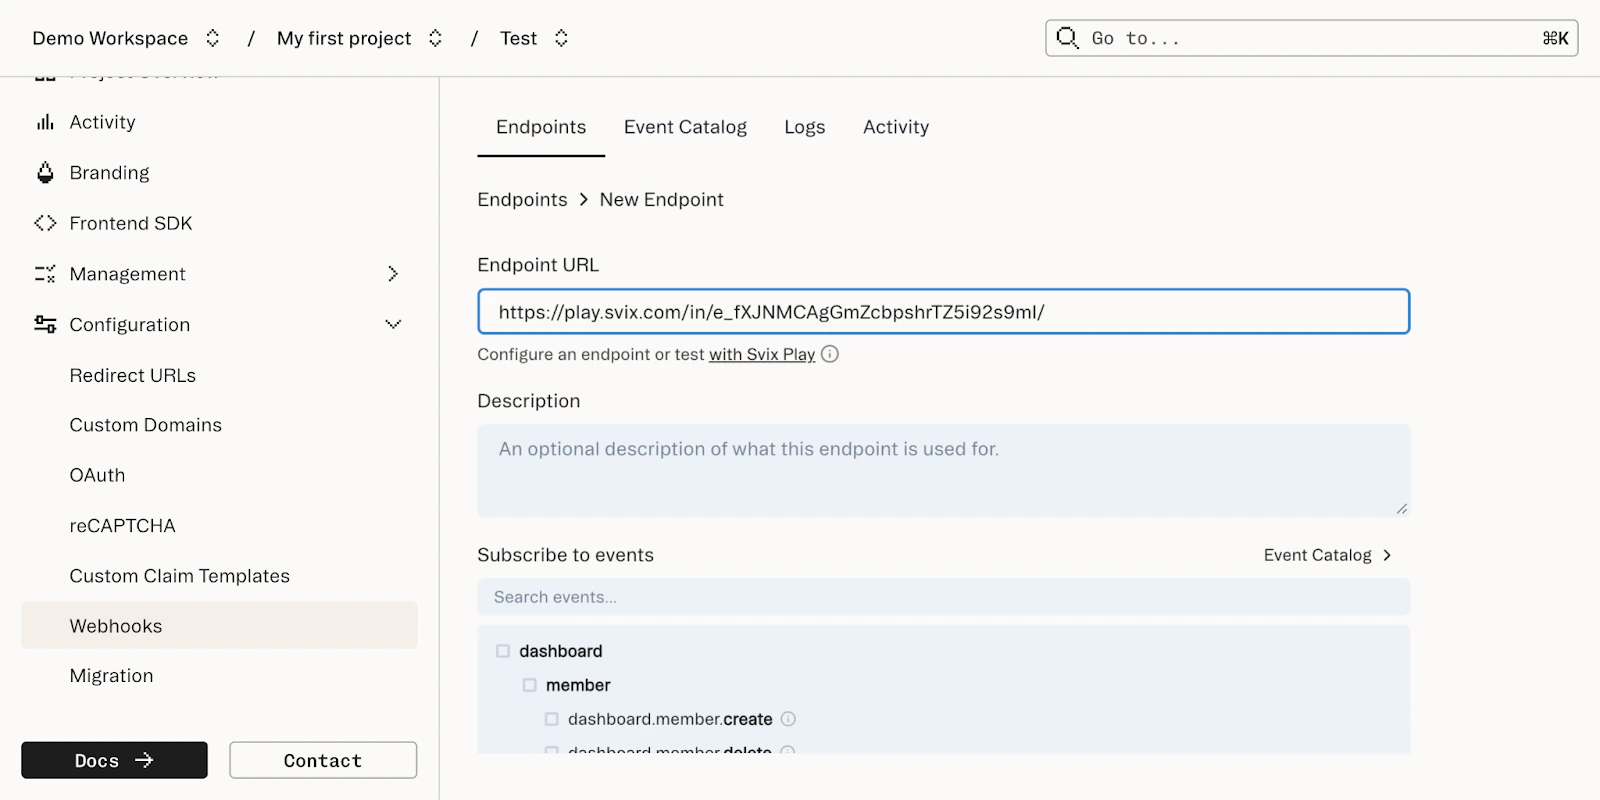
In the Webhooks page of the Dashboard, you will configure a new webhook URL. Your application should listen on this URL for new device events.
 The webhook event name differs depending on which kind of Stytch auth you are using.
Consumer auth
Multi-tenant auth
In Consumer auth, you can subscribe to the direct.user_device.new_device_attribute event to receive notifications about new devices. The resulting events will look like this:USER_DEVICE = {
"action": "NEW_DEVICE_ATTRIBUTE",
"event_id": "webhook-test-...",
"id": "user-test-...",
"object_type": "user_device",
"project_id": "project-test-...",
"source": "DIRECT",
"timestamp": "2025-01-02-...",
"vertical": "CONSUMER",
"user_device": {
"visitor_id": "visitor-...",
"visitor_id_details": {
"is_new": true,
"first_seen_at": "2025-01-02-....",
"last_seen_at": null
},
"ip_address": "1.2.3.4",
"ip_address_details": {
"is_new": false,
"first_seen_at": "2024-12-02-....",
"last_seen_at": "2025-01-02-...."
},
"ip_geo_city": "San Francisco",
"ip_geo_country": "US",
"ip_geo_country_details": {
"is_new": false,
"first_seen_at": "2024-11-02-....",
"last_seen_at": "2025-01-02-...."
},
"ip_geo_region": "California"
}
}
In Multi-tenant auth, you can subscribe to the direct.member_device.new_device_attribute event to receive notifications about new devices. The resulting events will look like this:MEMBER_DEVICE = {
"action": "NEW_DEVICE_ATTRIBUTE",
"event_id": "webhook-test-...",
"id": "member-test-...",
"object_type": "member_device",
"project_id": "project-test-...",
"source": "DIRECT",
"timestamp": "2025-01-02-...",
"vertical": "B2B",
"member_device": {
"visitor_id": "visitor-...",
"visitor_id_details": {
"is_new": true,
"first_seen_at": "2025-01-02-....",
"last_seen_at": null
},
"ip_address": "1.2.3.4",
"ip_address_details": {
"is_new": false,
"first_seen_at": "2024-12-02-....",
"last_seen_at": "2025-01-02-...."
},
"ip_geo_city": "San Francisco",
"ip_geo_country": "US",
"ip_geo_country_details": {
"is_new": false,
"first_seen_at": "2024-11-02-....",
"last_seen_at": "2025-01-02-...."
},
"ip_geo_region": "California"
}
}
.is_new will be true if this is the first time any of the following attributes have been seen for this user:
- Device (based on Visitor ID)
- IP address
- Country (based on IP geolocation)
You can also use the first_seen_at and last_seen_at fields for additional context.
If a user logs in with a combination of device, IP address, and country that are all already-known, no webhook event will be sent.
You can write custom code that listens for the new_device_attribute. When a new device is detected, notify the user through email, push notification, or in-app inbox.
Authenticate response (backend only)
The new device data in the response body should only be used in backend integrations.On the frontend, an attacker could modify the response body. The response body should not be used for security-sensitive purposes in a frontend integration.
Consumer auth
Multi-tenant auth
Every endpoint supported by user device history will return a user_device field. For example, if you are using Email Magic Links, the response will look something like this:{
"user_device": {
"visitor_id": "visitor-....",
"visitor_id_details": {
"is_new": true,
"first_seen_at": "2025-01-02-....",
"last_seen_at": null
},
"ip_address": "1.2.3.4",
"ip_address_details": {
"is_new": false,
"first_seen_at": "2024-12-02-....",
"last_seen_at": "2025-01-02-...."
},
"ip_geo_city": "San Francisco",
"ip_geo_country": "US",
"ip_geo_country_details": {
"is_new": false,
"first_seen_at": "2024-11-02-....",
"last_seen_at": "2025-01-02-...."
},
"ip_geo_region": "California"
},
"session": {
"authentication_factors": [
{
"delivery_method": "email",
...
}
],
"custom_claims": {},
...
}
"user_id": "user-live-..",
...
},
Every endpoint supported by member device history will return a member_device field. For example, if you are using Email Magic Links, the response will look something like this:{
"member_device": {
"visitor_id": "visitor-....",
"visitor_id_details": {
"is_new": true,
"first_seen_at": "2025-01-02-....",
"last_seen_at": null
},
"ip_address": "1.2.3.4",
"ip_address_details": {
"is_new": false,
"first_seen_at": "2024-12-02-....",
"last_seen_at": "2025-01-02-...."
},
"ip_geo_city": "San Francisco",
"ip_geo_country": "US",
"ip_geo_country_details": {
"is_new": false,
"first_seen_at": "2024-11-02-....",
"last_seen_at": "2025-01-02-...."
},
"ip_geo_region": "California"
},
"member_session": {
"authentication_factors": [
{
"delivery_method": "email",
...
}
],
"custom_claims": {},
...
}
"member_id": "member-live-..",
...
},
Best practices for notifications
Once you’ve detected a login from a new device, you can notify them.
Here are a few things to keep in mind when sending new device notifications:
- “Not me” action
- Balancing signal and noise
- Latency considerations
”Not me” action
Your new device notification should include a “Not me” action to take if the login was not actually coming from the real user. When the user selects “Not me”, you can respond immediately to the suspicious login:
- Help them contact your support team with relevant information
- Automatically revoke all sessions associated with that user
- For password-based logins, you can reset the password
In the longer term, you can help improve their account security:
Balancing signal and noise
A new device is not necessarily an indicator of a bad actor attempting to log in. The three new device attributes will naturally change over time for real users:
- The
visitor_id may change due to users switching browsers or clearing their cache.
- IP addresses change naturally. Users may switch networks during normal usage, especially on mobile devices or when using VPNs. Even on the same network, Internet Service Providers (ISPs) may change the IP address of a client.
- The
ip_geo_country is based on IP address and may change more frequently in geographical areas where multiple countries are close to each other.
You can observe your own traffic to see which factors are most useful for your users, and tailor your notifications accordingly. For example, you may find that within your user base, IP addresses change often, so you can send a notification only if the visitor ID or country change as well. You can also contact Stytch support for help designing your notifications.
Latency considerations
If you are using the authenticate response in your backend integration, consider the latency impact.
For example, when a user logs in from a new device, you may want to send a notification via email. Sending an email can take multiple seconds, so it would be a poor experience if the user needed to wait for the email to be sent before they completed their login.
Instead of synchronously sending notifications in your application code, you can send notifications async or add them to a task queue, while immediately returning the logged-in session to the user.
What’s next?
Want to try Stytch Device Fingerprinting?
Find out why Stytch’s device intelligence is trusted by Calendly, Replit, and many more.